Home Solar Project - Round 2
About 6 months ago, I moved to a new house. The original solar project was never intended to be the end-all, be-all solution — we had already been planning on moving for a few years when it was installed. But I did want to get something going to gain hands-on experience and a feel for what my future needs would be.
And that future time has come.
My Goals
As I hopefully plan on eventually dying in this house, my goals are pretty simple.
Goals at a glance
- Off-grid capable — run the entire house, no compromise, ~85% of the year
- ~20 kW of solar (PV)
- Plenty of storage — enough to ride through the night in a fully-electric house
- Achievable ROI — pay for itself within the decade
- Keep it DIY — no contractor mark-up
I want to be nearly completely off-grid capable. That is — if I sever my connection to my local utility, I want to be able to run my ENTIRE HOUSE, with no compromise, completely off-grid, without relying on a backup generator, 85% of the time.
Why 85%?
100% reliance on solar is not feasible without a LOT of energy storage. Literally megawatt-hour scale storage.
During winter, it is not uncommon for everything to be completely covered in snow for extended periods of time.
In spring, it's not uncommon for us to receive a month of rain straight, with little sunny weather.
For those 15% of cases, a backup generator will fill the void.
Having seen the net-metering agreement from my new utility, there is no reason for me to go completely off-grid. But I do want to make sure my system has the capability for it.
I measured every watt flowing through my house since installing emoncms / solar-assistant a few years back. I know during July/August I could easily consume 120-160Kwh per day keeping the house cool during the hot months. So I'm going to need a healthy amount of solar panels — and quite a bit more energy storage.
One other important goal: I want an achievable ROI. This should pay itself off within the decade.
Collecting Hardware
With the goals set, the next step was gathering the gear. A good chunk of it is reused from the old install — the rest I picked up as deals came along.
Solar Panels
During this process, I did remove the full solar install from the old house. The vast majority of the hardware was retained and will be reused for this project.
I also managed to find a healthy quantity of used panels for around $40 a piece locally, in January. This will help my goal of hitting somewhere around 20kw of PV.
Between the 40 panels here, and the 5kw of panels from the old house — that should land me somewhere around my 20kw mark.
Inverter
The Solark 12k can only handle about 13kw of PV capacity:
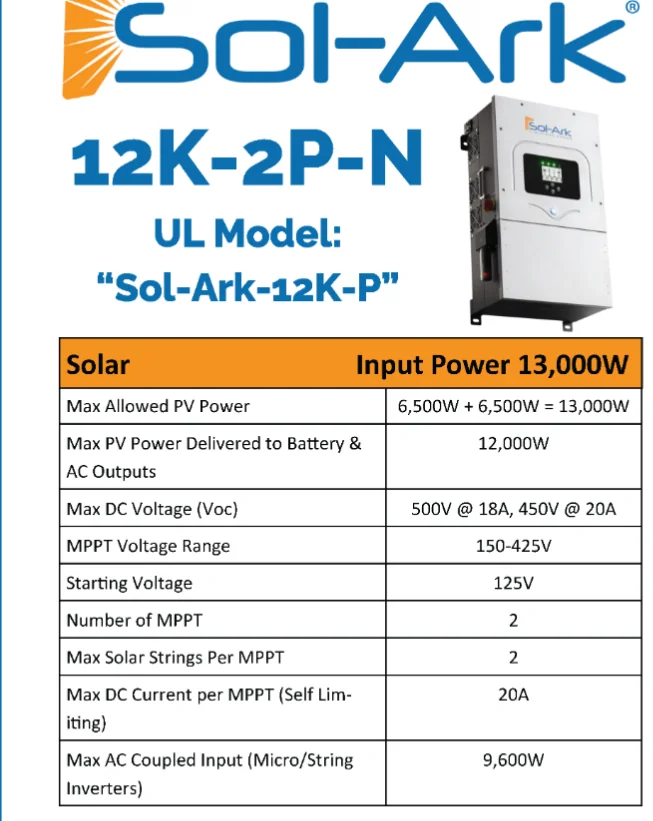
I decided it would not be suitable for this build, and instead reused it on another project.
After looking at MANY options — including the Solark 18k, Deye, SUNGOLDPOWER, EG4, and many more — I eventually decided to go with an EG4 FlexBoss21.
The key items I care about:
- 21Kw maximum usable PV capacity — i.e. how many solar panels can it take advantage of.
- 600V max DC PV input — the higher the allowed voltage, the fewer amps I need, and the smaller the wire gauge I can run, which will save a lot of $$$.
- 12kw / 50 Amp output on battery-alone — when the grid is down, and the sun is not shining, this is the amount of power it can output.
- 24kw peak output / 195A L.R.A. — this is important, as AC units usually have a large inrush current. See AC Soft Start post.
- Ideally I would like to retain full capabilities, even when off-grid. I was able to do it in the old house. I intend to do it better here.
If I do run into capacity issues with this unit, it supports parallel operations — I can mount a 2nd unit and essentially double the input and output capacity. But I don't think this will be needed here.
Battery
From the old setup, I retained the 20kwh of EG4-LL and EG4-LLv2 server-rack batteries.
However, I knew from experience this was NOT enough capacity — especially since my new house is 100% electric for everything: water, heating, all of it.
20kwh was enough to run the old house through the night. Barely.
After looking at many options, having heard pretty good feedback regarding YIXIANG, I picked up a 32kwh battery pack. (I also used one of these for the other project and did not experience any issues.)
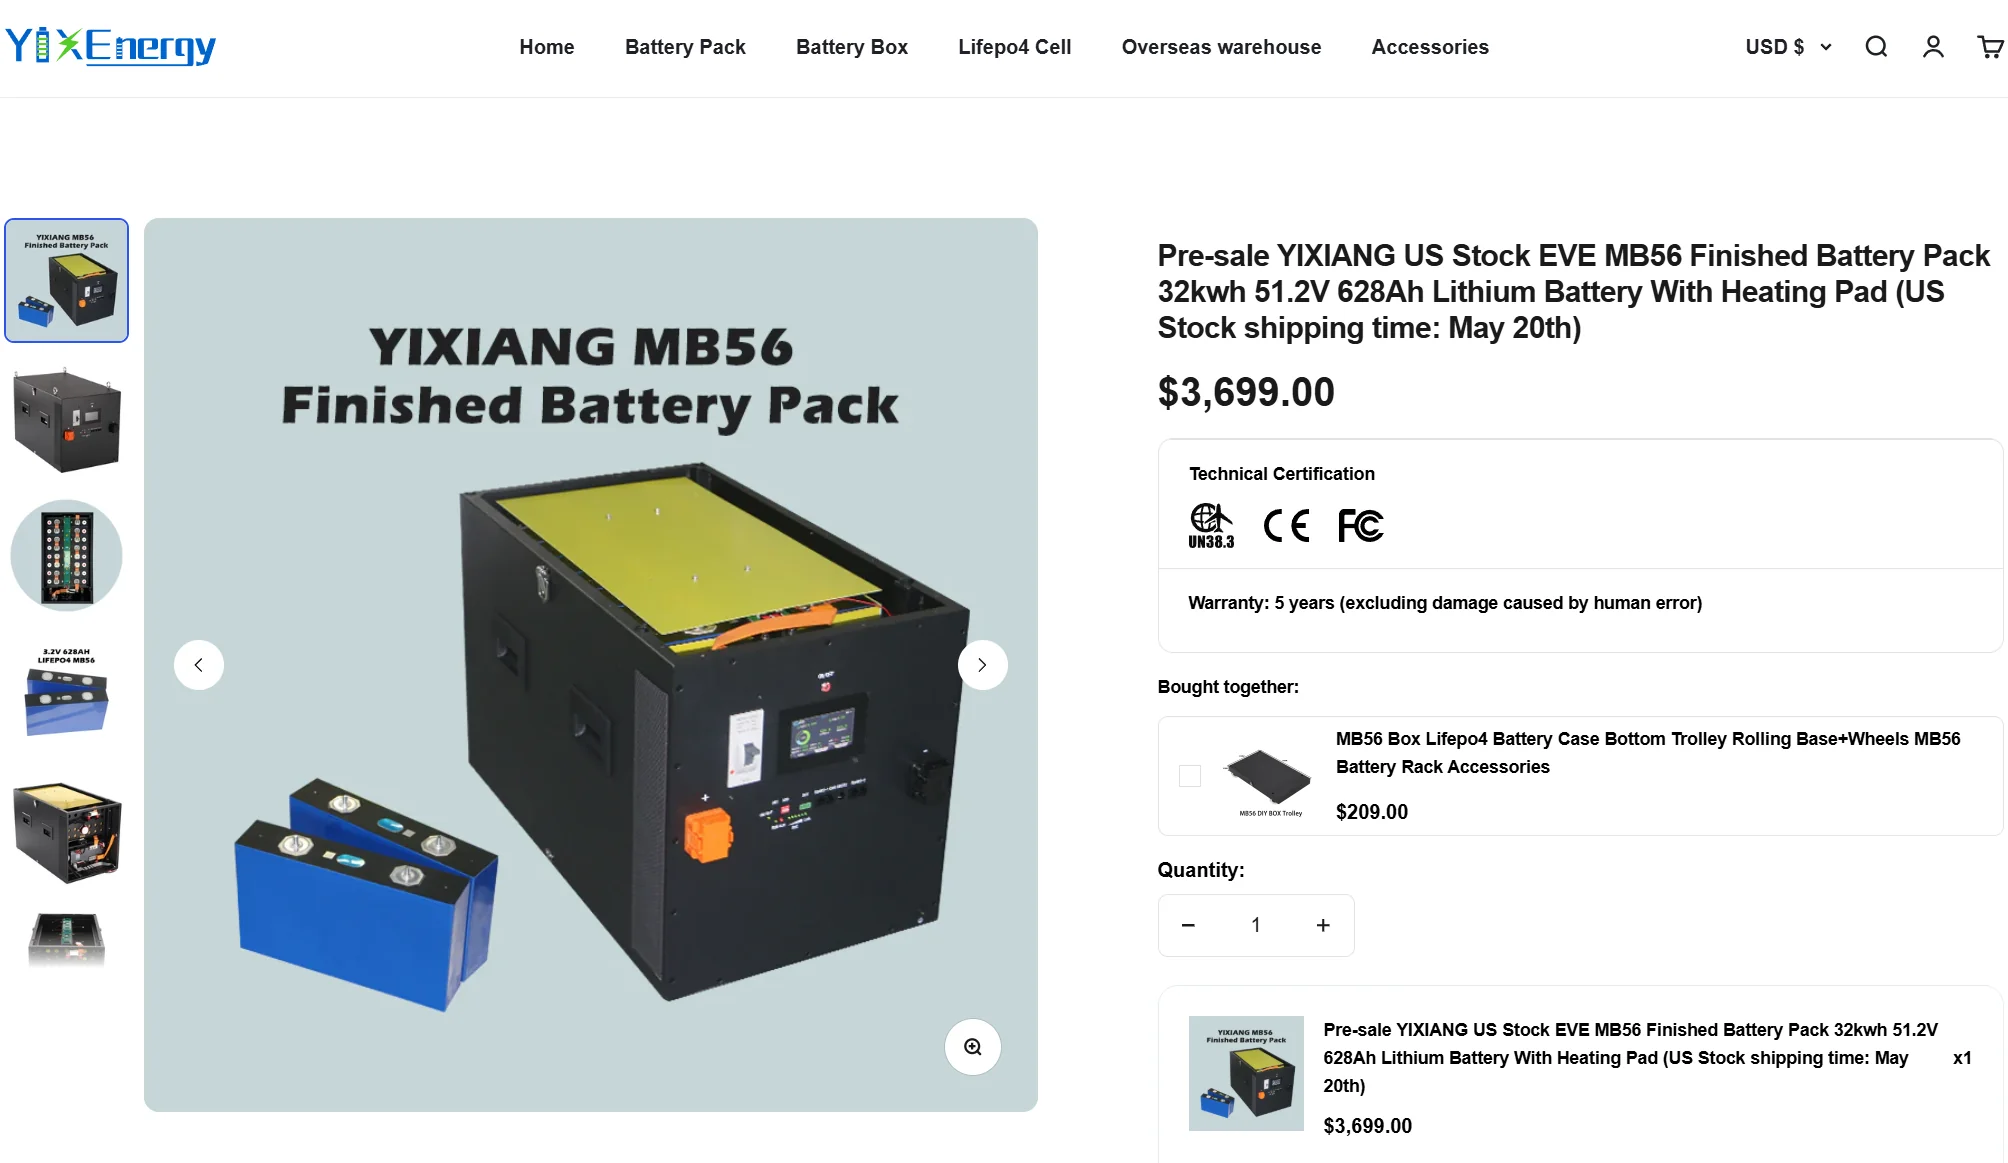
At nearly half the cost of many of the other options, this is nice. Adding the two remaining slots of my existing battery rack would net 10kwh of storage for around $2,400 — this is 32kwh of storage for $3,600.
Overall, this will give me around 54Kwh of capacity, which should be plenty for now.
Warning
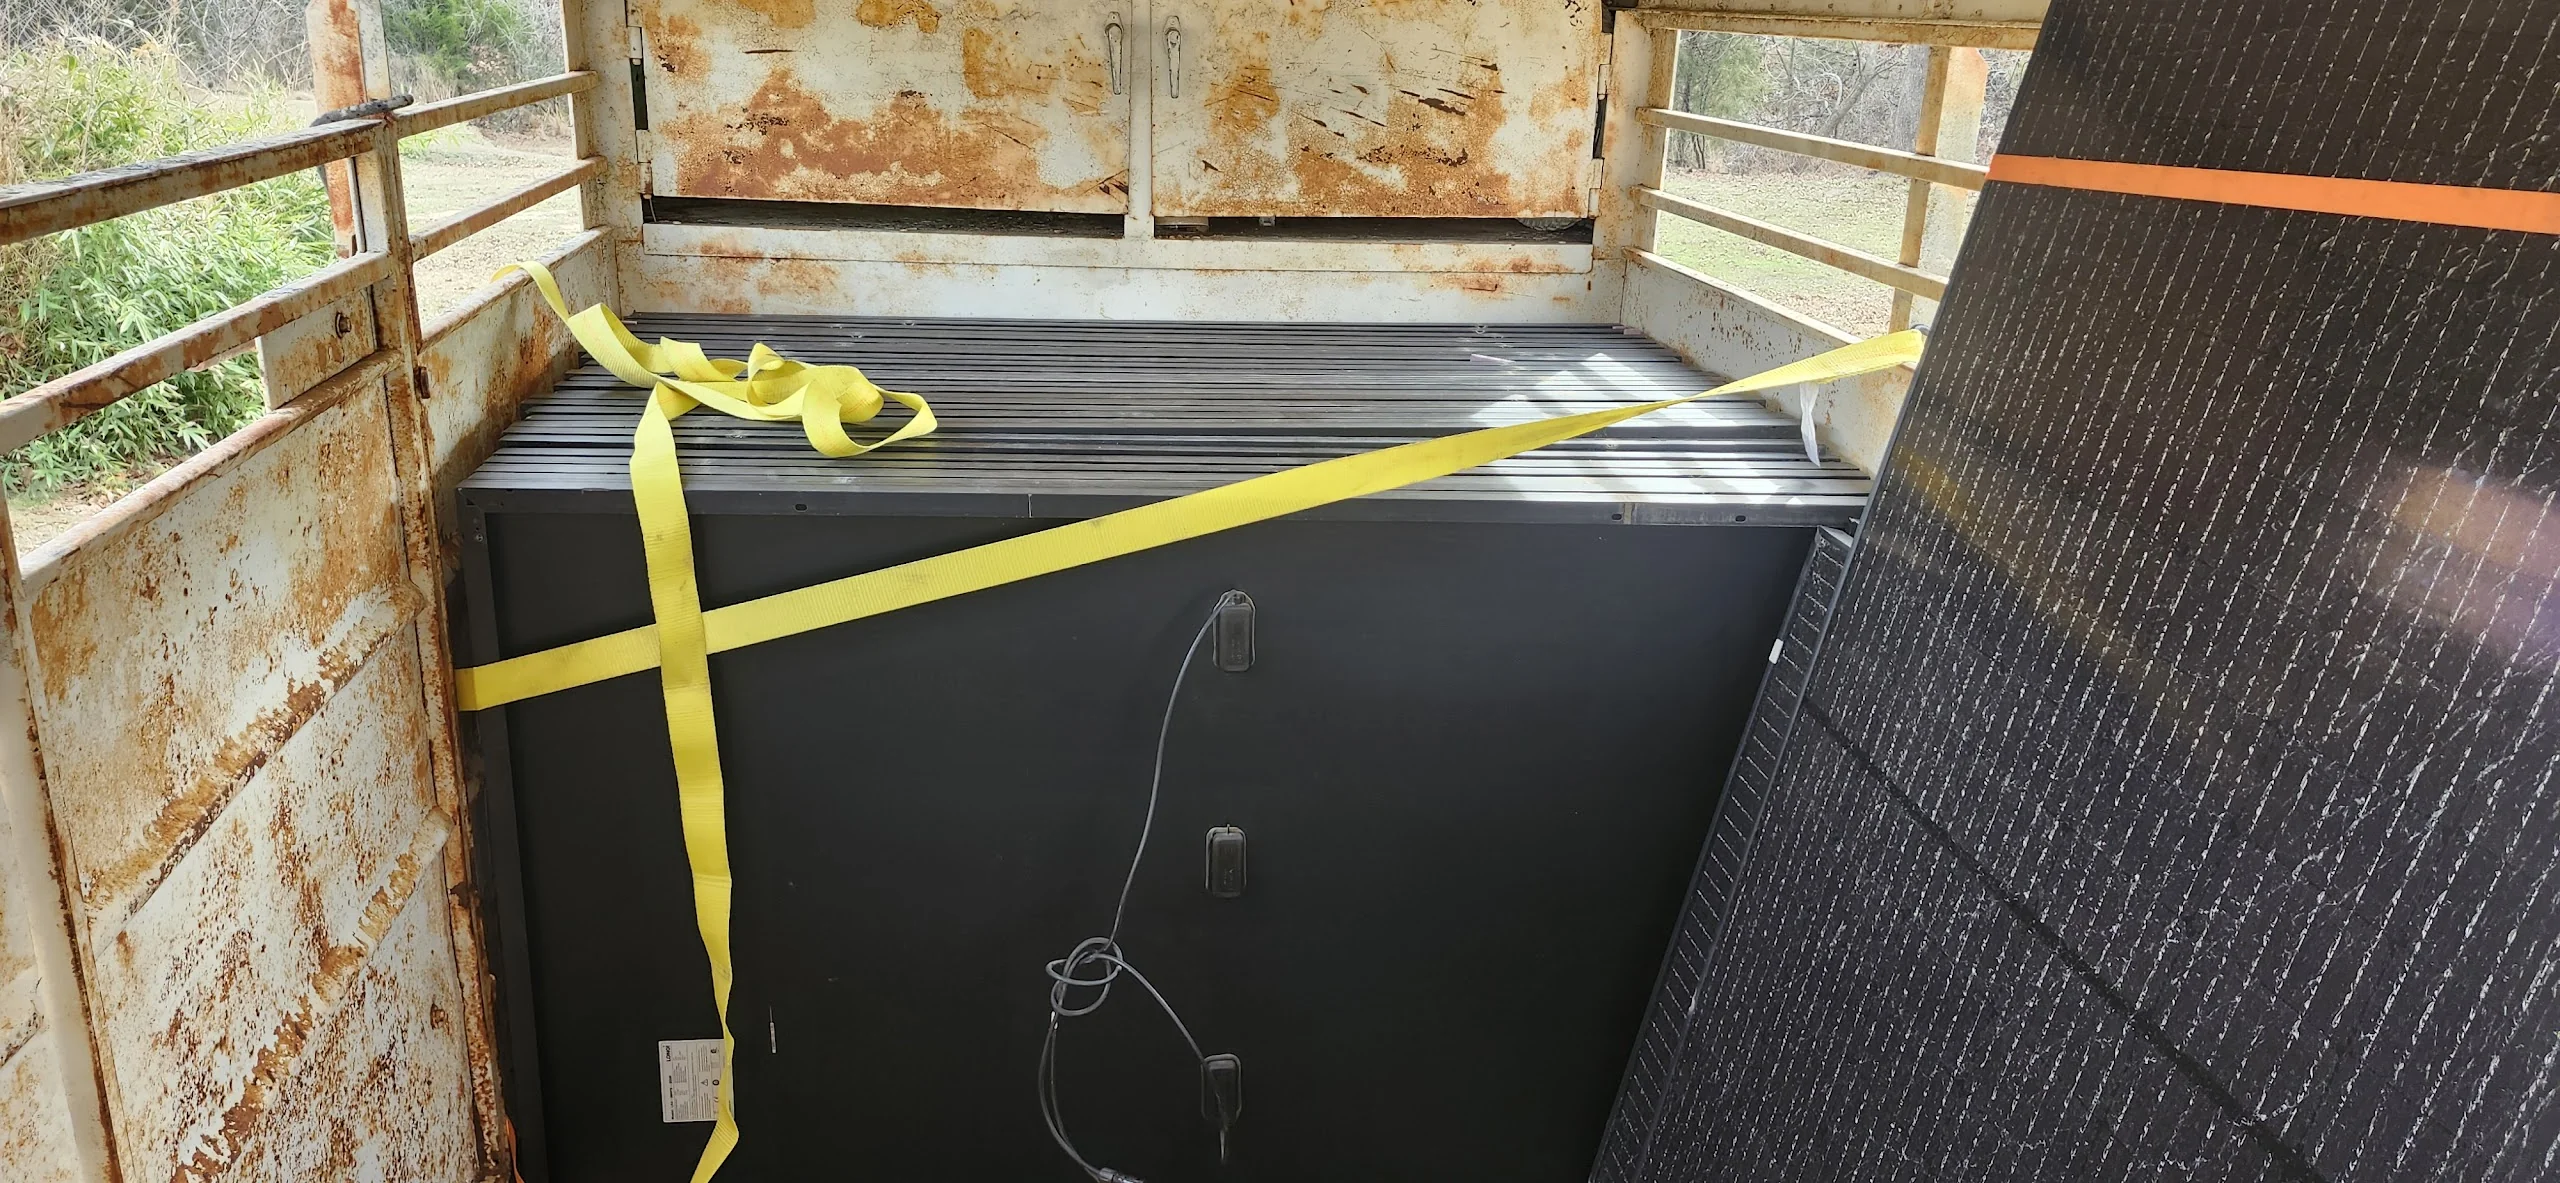
Do watch out — these batteries are HEAVY.
The shipping weight was 624lbs. It took an engine hoist to move this battery around.
Planning
With the hardware in hand, the rest comes down to two questions: how it all connects, and where it physically lives.
Wiring Diagram
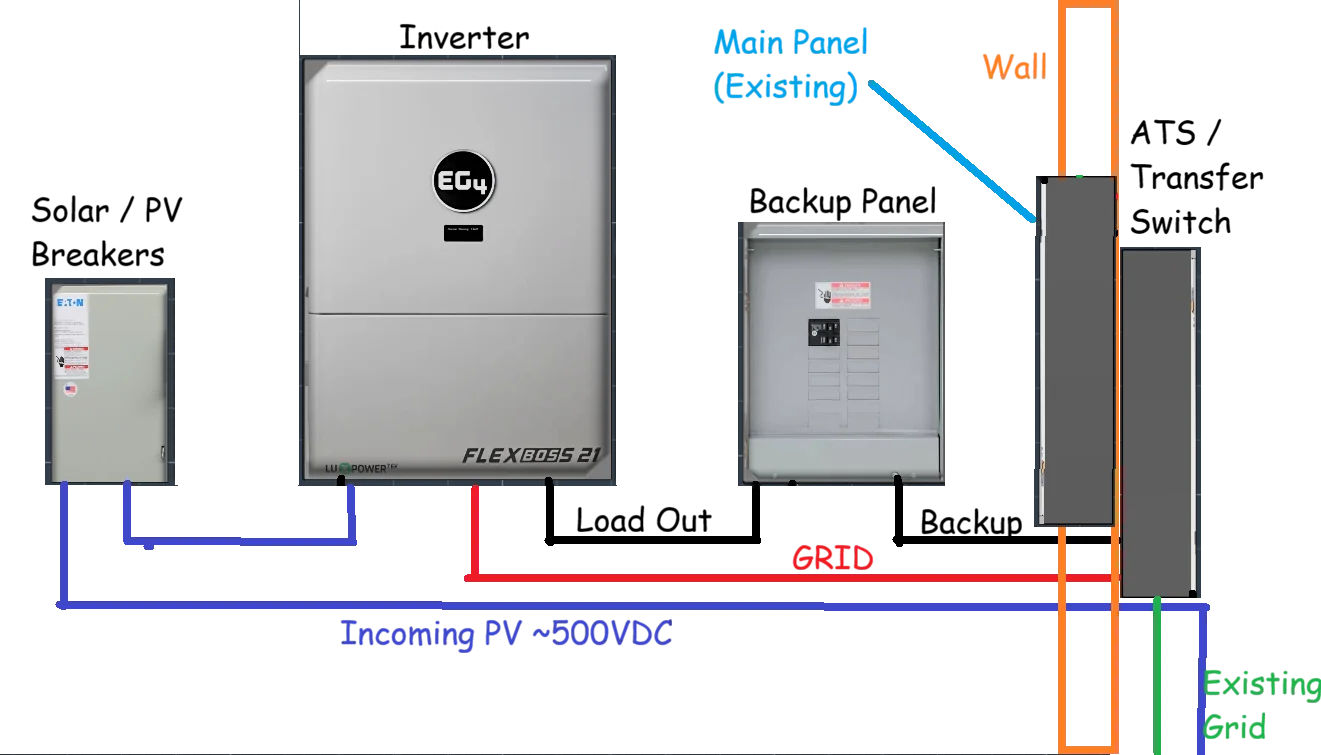
Here is one of my current revisions of the wiring plan:
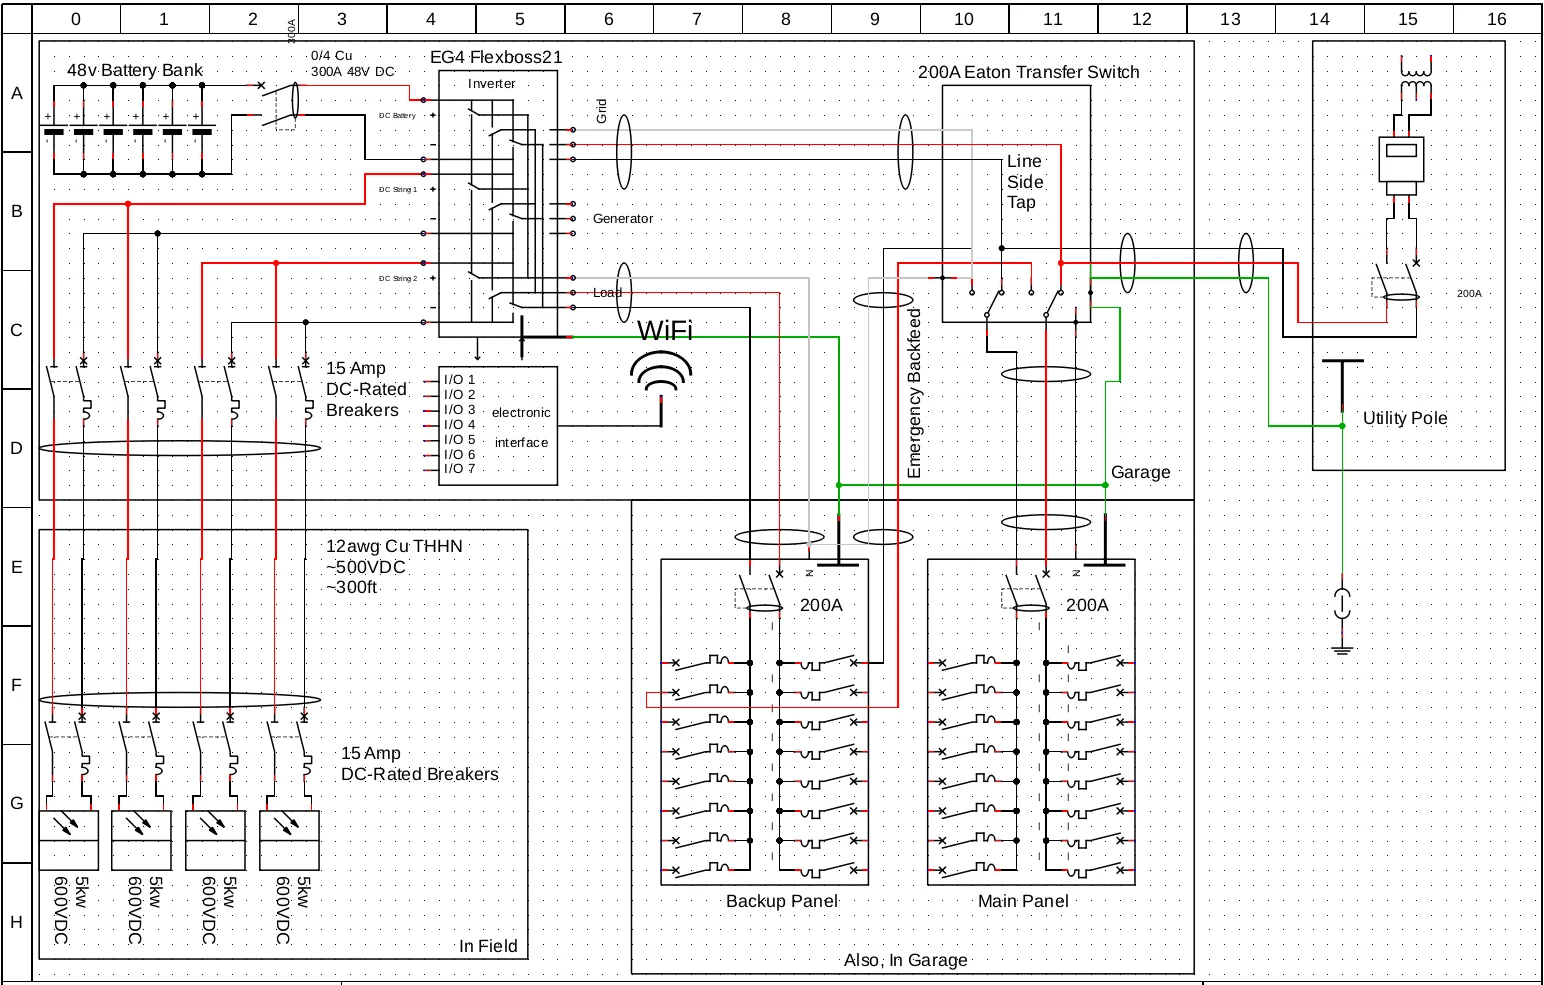
While still early, I believe it encompasses the main components I am looking for. Initially I used the GridBoss in the diagram, which does simplify quite a few elements. However, I don't want to pay $2,000 for another transfer switch at this time, since I already have the 200 amp Eaton ATS.
Panel Placement & Wire Run
About the only big challenge of this project is where the panels are. My current property has about 5 acres of land, and I am wanting to place the panels on my back field, which is about 300 feet from my house.

Thankfully, since I can run high voltage DC from the panels back to the inverter, I can use 12 AWG copper. I will be running four parallel runs:
Verifying with a voltage drop calculator:
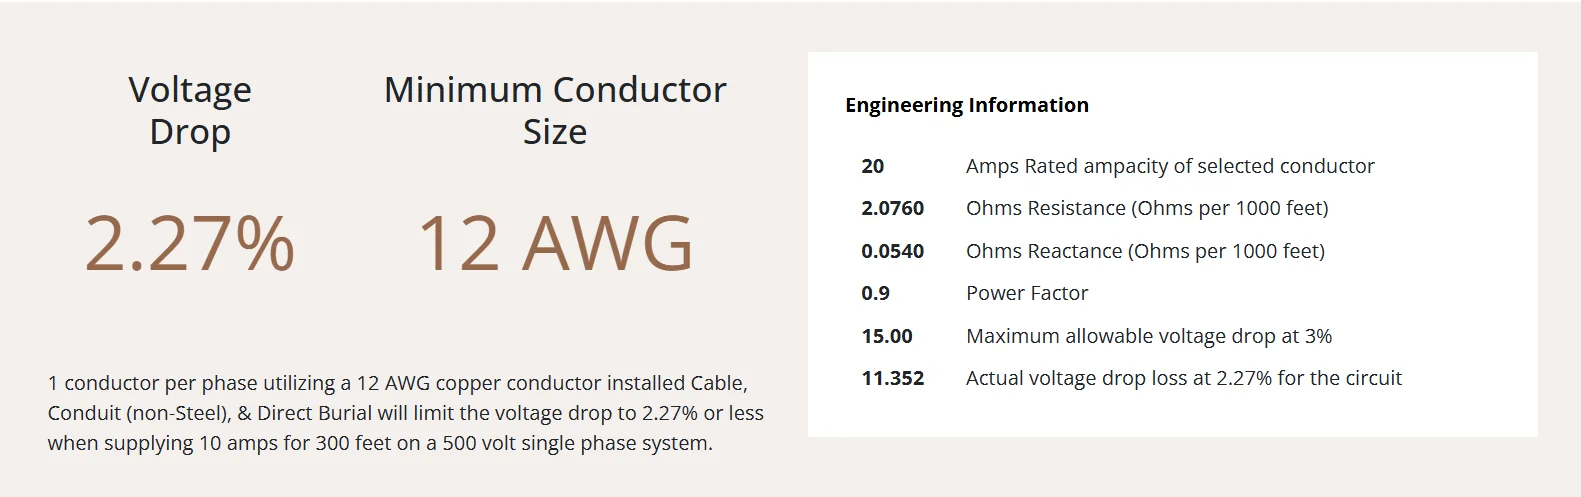
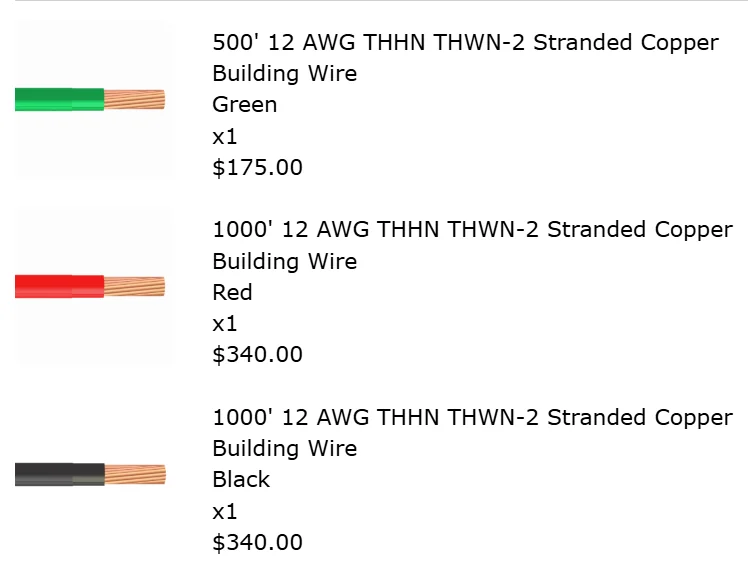
With that confirmed, I picked up 2,500 feet of 12AWG THWN-2 from nassaunationalcable.com.
Warning
THWN is important! THHN is only rated for indoor use! Make sure it's dual-rated for THWN!!
I settled on using 1" conduit, and verified this was within allowed conduit-fill specifications:
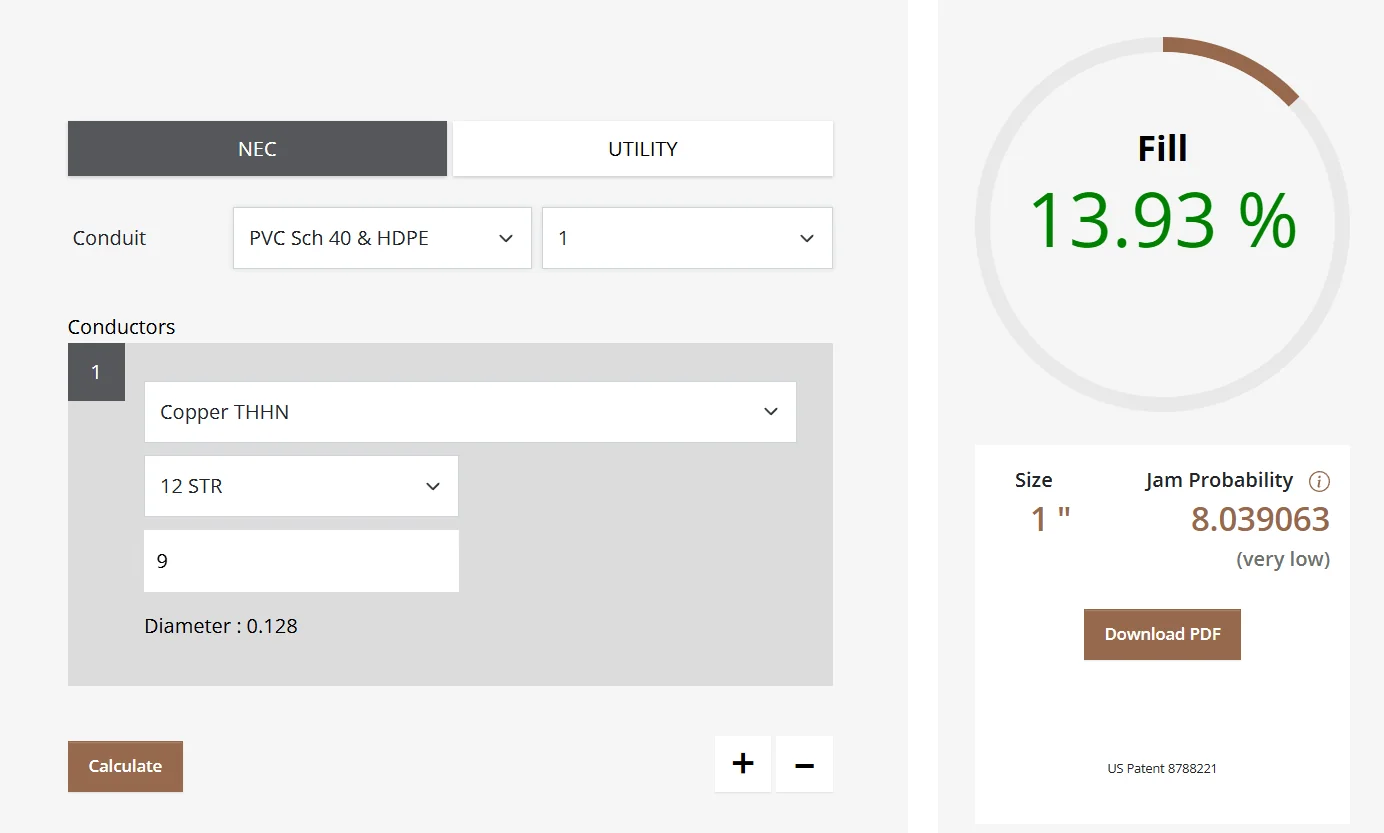
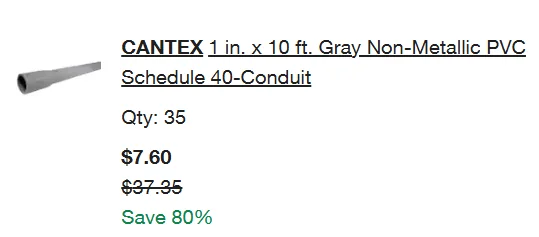
Picked up the conduit from Home Depot.
ATS Placement & Garage Layout
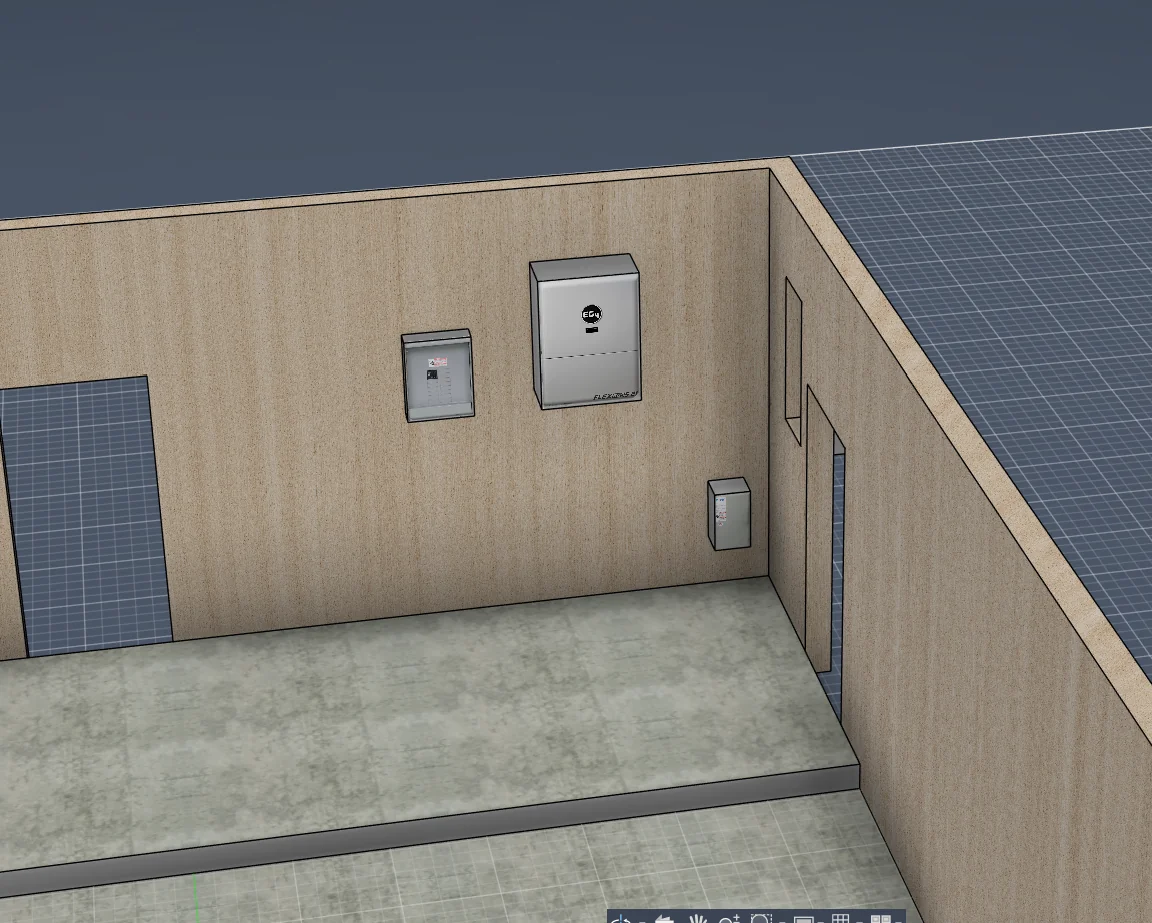
The next question was where everything physically goes. I played around with a few ideas using Autodesk Fusion:
I eventually settled on placing the ATS on the exterior of the house. This has two advantages:
- The existing BIG power cable can be pulled out of the existing panel and run straight into the ATS, saving a bit of cable.
- The existing conduit to the panel can be run directly into the rear of the ATS, avoiding the need to drill another hole.
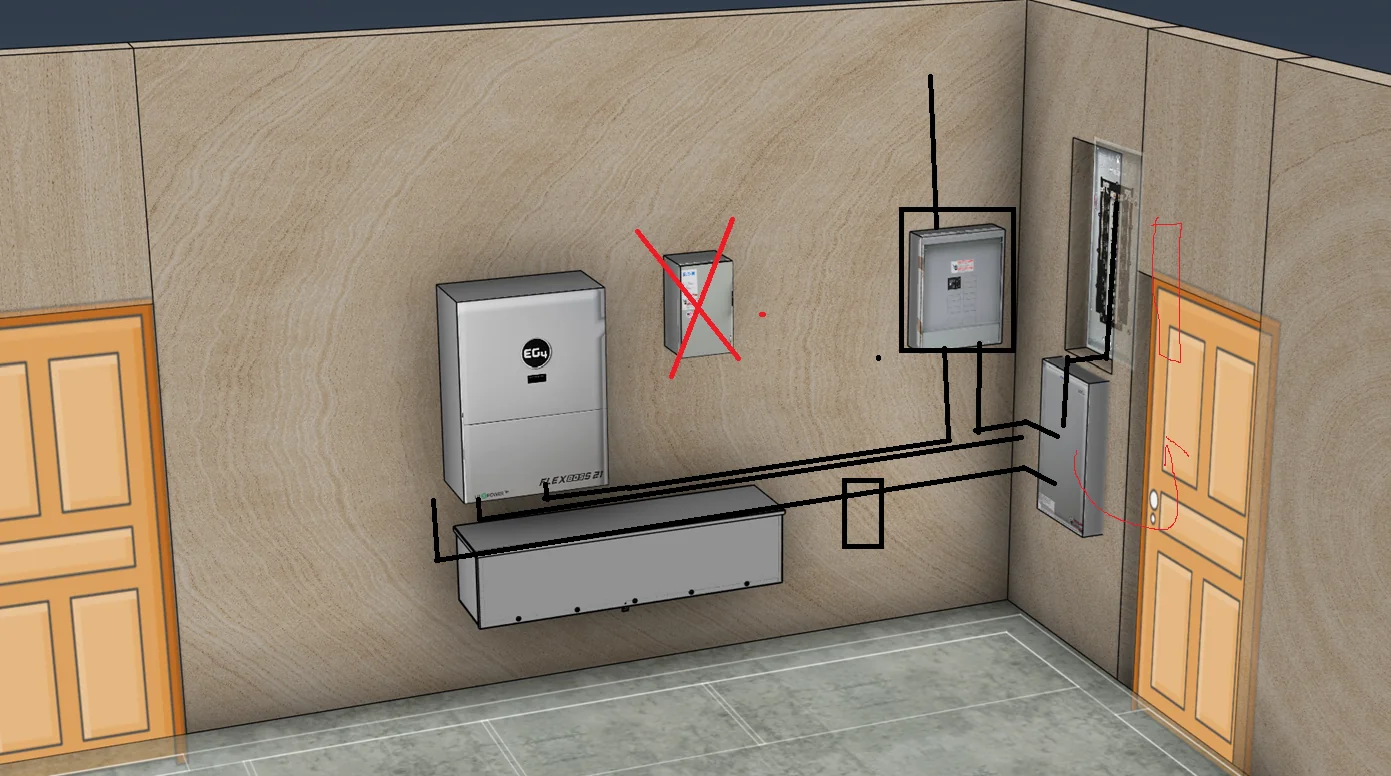
This layout also let me start rough-planning the conduit runs. After messing around in MS Paint for a bit, I landed on a suitable design:
Budget & ROI
As one of my goals was to have an achievable ROI, keeping the budget as low as possible is the plan.
I am making the assumption I will have an average $300 electrical bill for the next 10 years. Part of this assumption is rising energy costs, AI datacenters, blah blah blah.
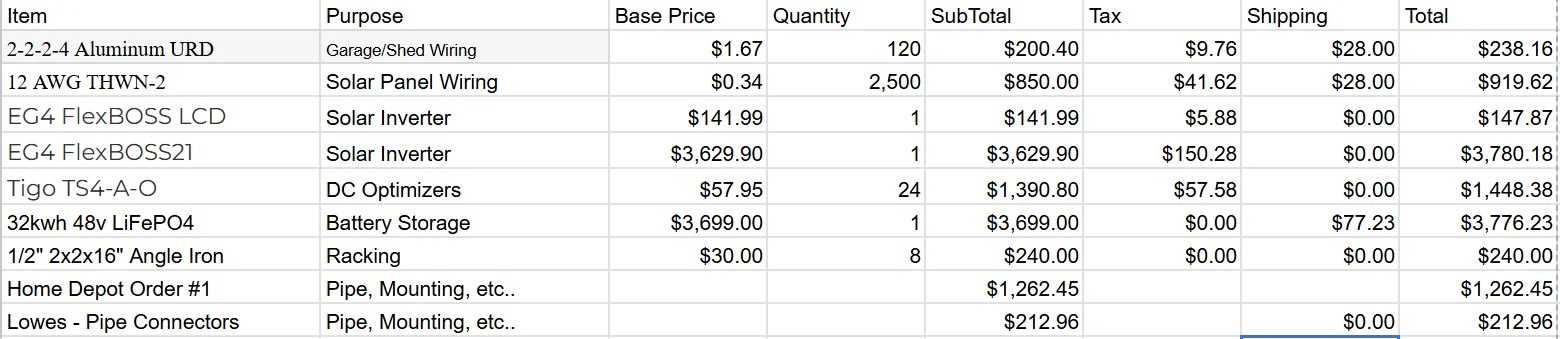
As of this point in time, I have the majority of everything purchased, and I am at $12,025. I estimate this project should come in under $15,000.
Doing the math:
// Expected average bill
BILL = 300
// Total cost
Tc = 15000

RoiMonths = Tc / BILL   // 50
RoiYears  = RoiMonths / 12   // 4.1
Based on that information, that is an outstanding prospect for ROI. But there are a few reasons this number is very low:
- Solar panels from the old house were paid off with the sale of the old house, and are not an expense.
- The used panels I paid $1,800 for are not accounted for here.
- I am NOT using a contractor or solar installer — no 300% mark-up. I am doing this myself. I will draft the technical drawings myself, and I will present them for approval to the utility myself.