How to start your A/C compressor off-grid.
Starting your A/C compressor generates a massive inrush current. Many inverters will have issues getting the motor spinning.
In the case of my 3.5 Ton unit, the L.R.A. (Locked rotor amps) is 112.0 amps @ 220v (24,640 watts). This is far more current then my inverter can provide. This is the amount of amperage which it can potentially take to start the compressor motor.
This post, describes how to install a soft start, which will allow your compressor to easily start off-grid using your solar array with inverter and batteries, or via a smaller generator.
Introduction
The day my system was fully installed, one of the tests I performed, was attempting to start the A/C compressor off-grid.
Well, when I tested this, there were a lot of horrible noises, dimming lights, and beeping noises. It wasn't a very successful test.
There is in fact a pretty simple way to resolve this: With the use of a soft-starter
For this test, I went with the EasyStart 368-X72-Blue by Micro-Air, rated for a 4 – 6 ton compressor.
Why you might want to do this:
IF, you intend on running your A/C compressor either via generator power, or via off-grid solar, there is a good chance your inverter or generator will have issues starting it, without dimming lights.
If you have a permanently installed 30kwh Generator, you likely don't need to worry about this.
But, if your generator is rated for under 12,000 watts, this will likely help you.
As well, if you are planning on running a large A/C compressor, off-grid on solar alone- this will help you. Without it- my unit wouldn't successfully start without having energy from the grid.
Lastly, these units will improve the efficiency and lengthen the life of your compressor's motor by reducing the inrush current when starting the motor.
Parts / Tools Needed.
Soft start
Micro-Air ASY-368-X72-BLUE (Max 6-ton, 220v), Manufacturer Link
MicroAir ASY-368-X48 (2 - 3.5 ton, 220v)
This is the unit I went with. I ordered through the exact same link, as it had next-day delivery. If you order through the manufacturer, you may save 20$, however, you don't get next day shipping!
For RVs and other 110v applications, see the EasyStart 364-X20-IP or the 364-X36-Blue
Info
To note- the properly sized unit for my compressor motor is the ASY-368-X48.
However, since I plan on installing a larger compressor in the future, I went with the ASY-368-X72-BLUE which is oversized for my unit.
Micro-air does offer a model selector to identify a unit properly sized for your compressor HERE. As well, they may offer better pricing than Amazon.
Tools Needed
- Not required, but a cordless drill helps a lot. If you don't have one
- I would recommend the Milwaukee M18 Fuel Drill, if you want a high-quality drill. Seriously, this thing is great.
- Most HVAC units use 1/4" screws. If you don't have a set of hex nut drivers, they come in handy.
- Milwaukee Magnetic Nut Driver Set.
- Cheap/Generic Set is also an option.
- A normal socket, or 1/4" screwdriver will work too.
- You will likely want a ratcheting crimper. This will allow you to make proper, secure crimps.
- Klein 3005CR Wire Crimping Tool This is the high quality option.
- There are cheaper versions available, however, based on my research, you will only save 10 bucks.
- You may need a pair of wire cutters.
- Klein D248-8 Pliers This is the high quality option that will last you forever.
- Cheap Pliers These work too. All depends on what kinda tools you want to buy.
- Spade connectors. In my case, 12AWG was the proper size. You may need 10, 12, or 14AWG depending on your installation.
- 12-10 AWG Spade Connectors
- Note- Make sure to get connectors rated for up to 600 volts.
- Wire Nuts. I needed a single, 12AWG wire-nut. I picked it up from my local hardware store for 10 cents.
- Wire Nuts if you prefer Amazon.
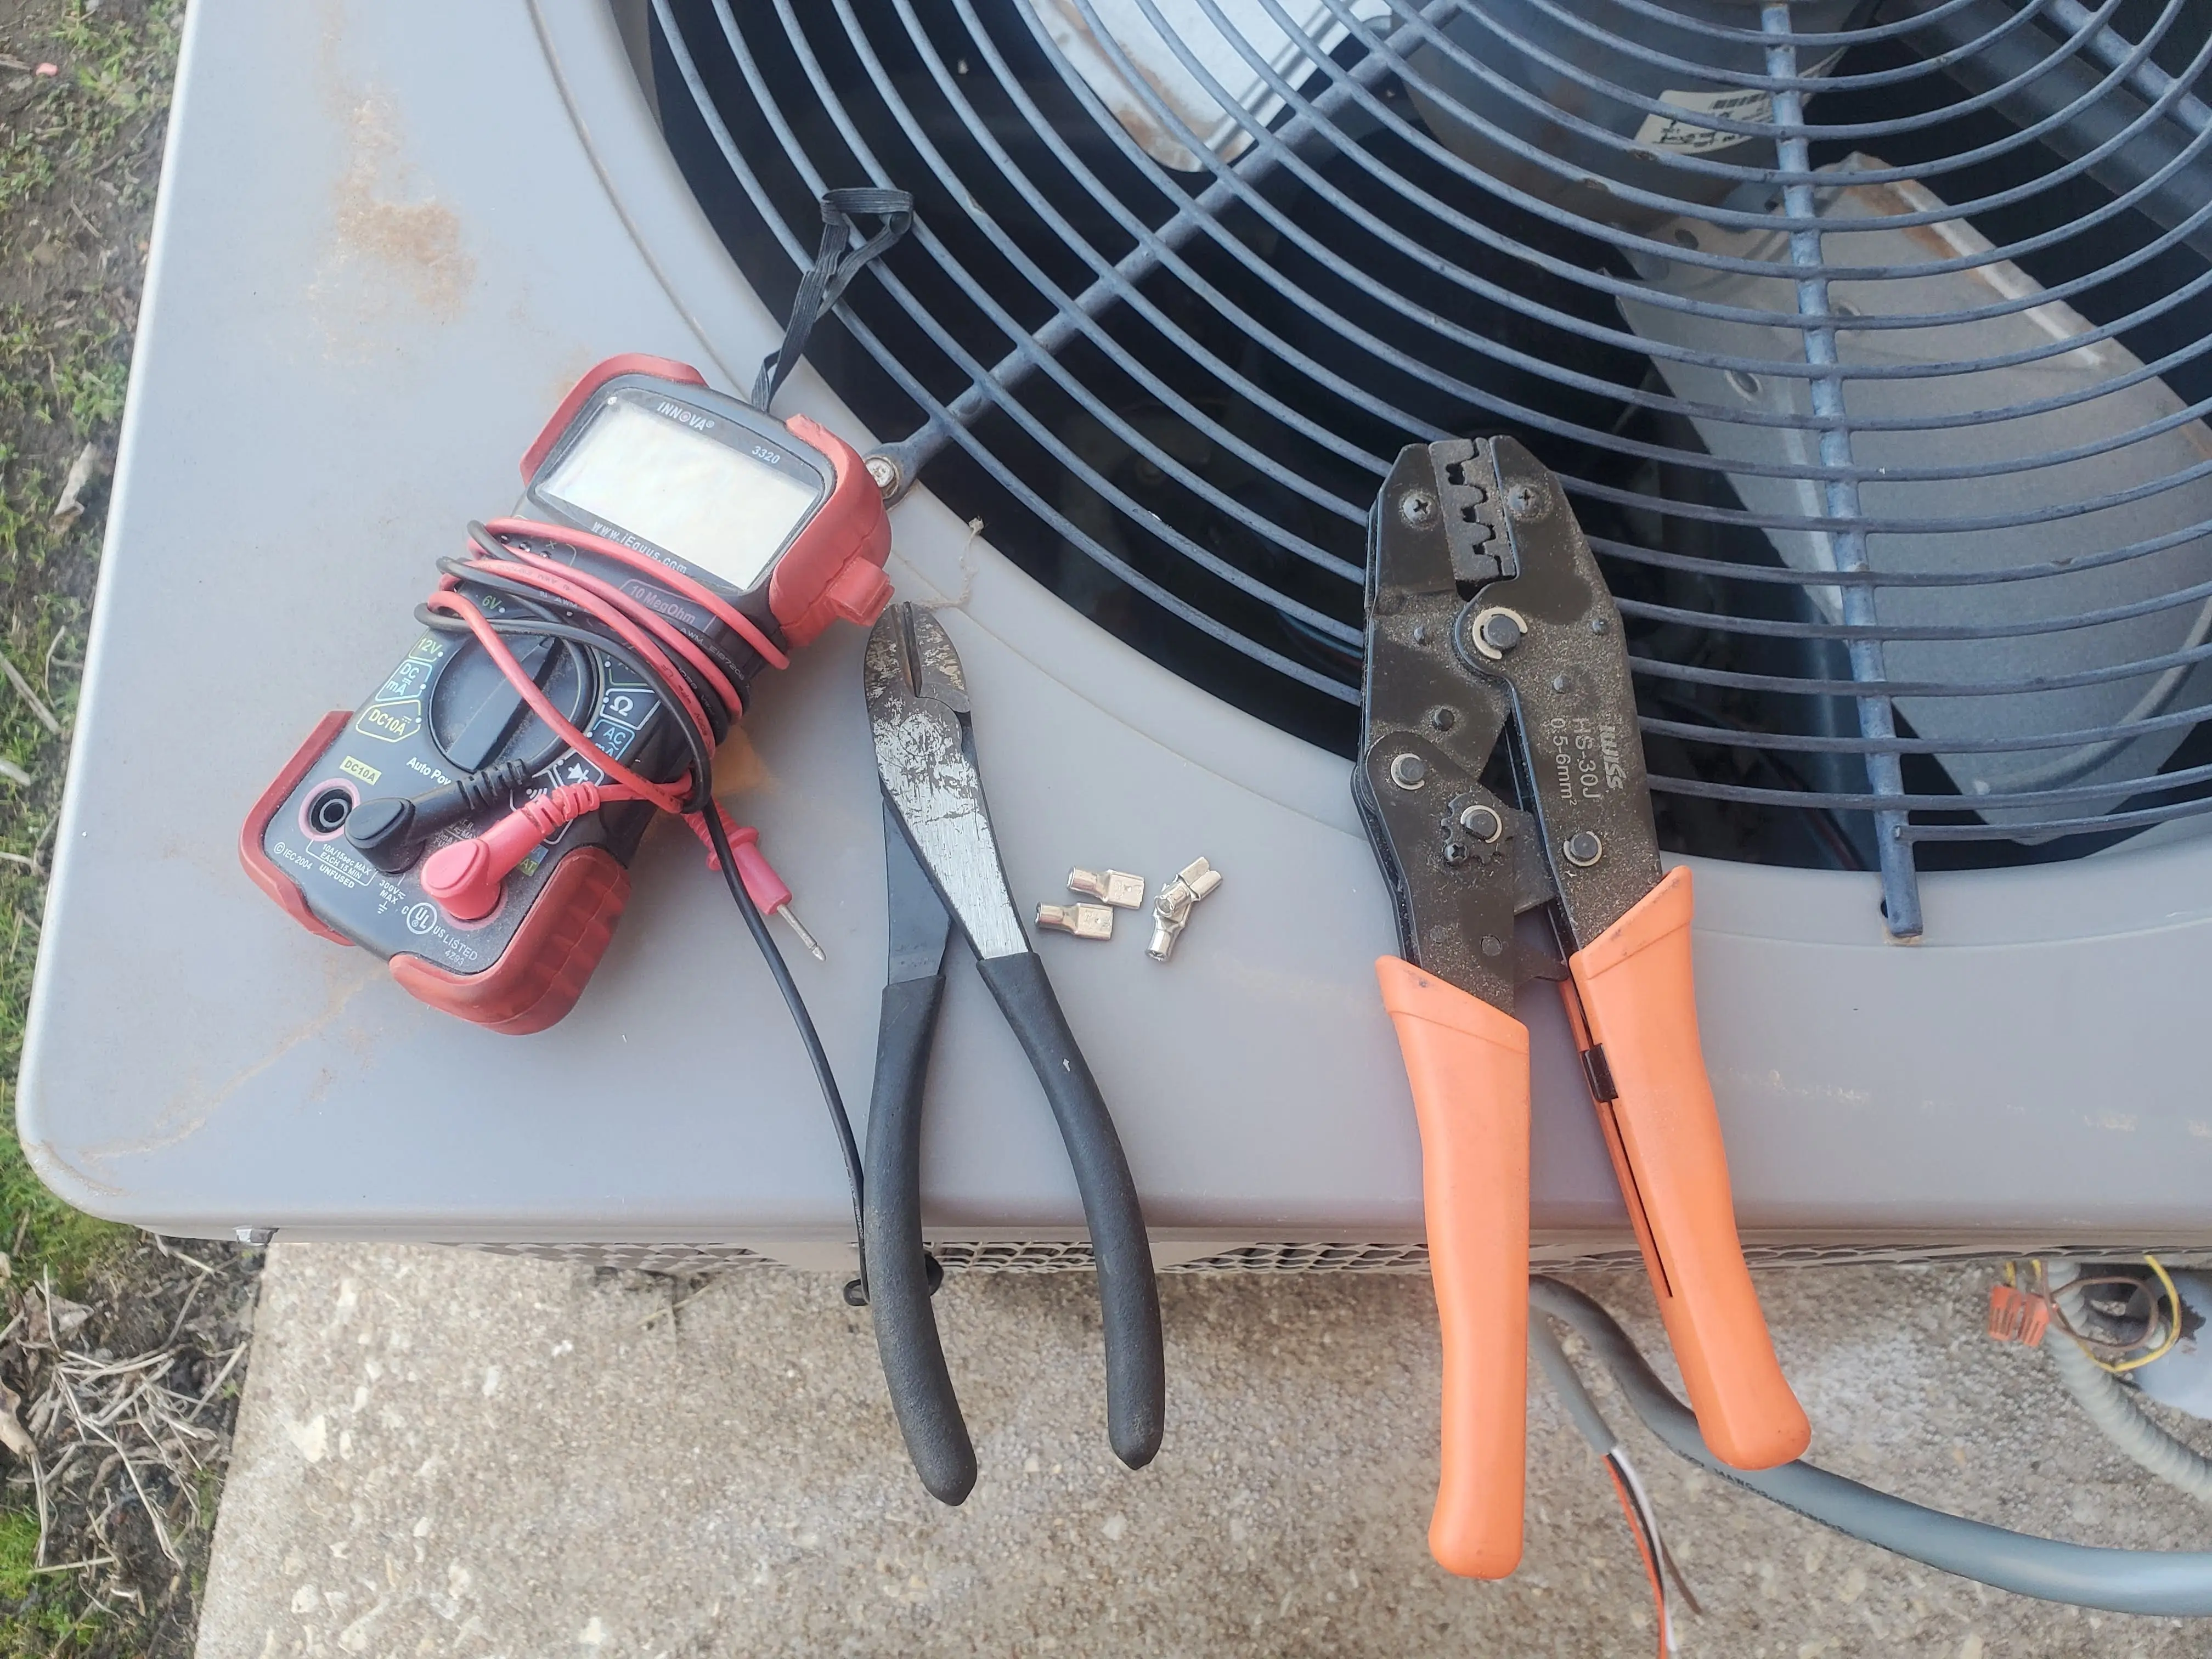
At a minimum, you will need wire cutters, a crimping tool, and a multi-meter.
Hardware to mount easy-start unit.
To mount my unit, I visited my local hardware store and picked up some 1/4" nuts, bolts, washers, and lock washers. If you take this option, make sure you also have a suitable drill bit. Overall, it costed around $1.50 to buy the hardware I needed.
You can also use 1/4" stainless self-tapping screws
A Center punch comes in handy for marking your holes and getting the hole started. I have had this exact one since 2018, and it still works well.
Getting Started
Danger
The electrical wiring inside of your A/C unit can kill you. Even when the power is disconnected, there can be residual energy stored in its start capacitor. This can kill you.
If you are not qualified to work on electrical circuits, you should call a licensed electrician, or HVAC specialist to perform the installation for you.
I am not responsible for injury, death, or loss of property which may occur. This unit works well for me, however, your results may vary.
Step 1. Disconnect Power
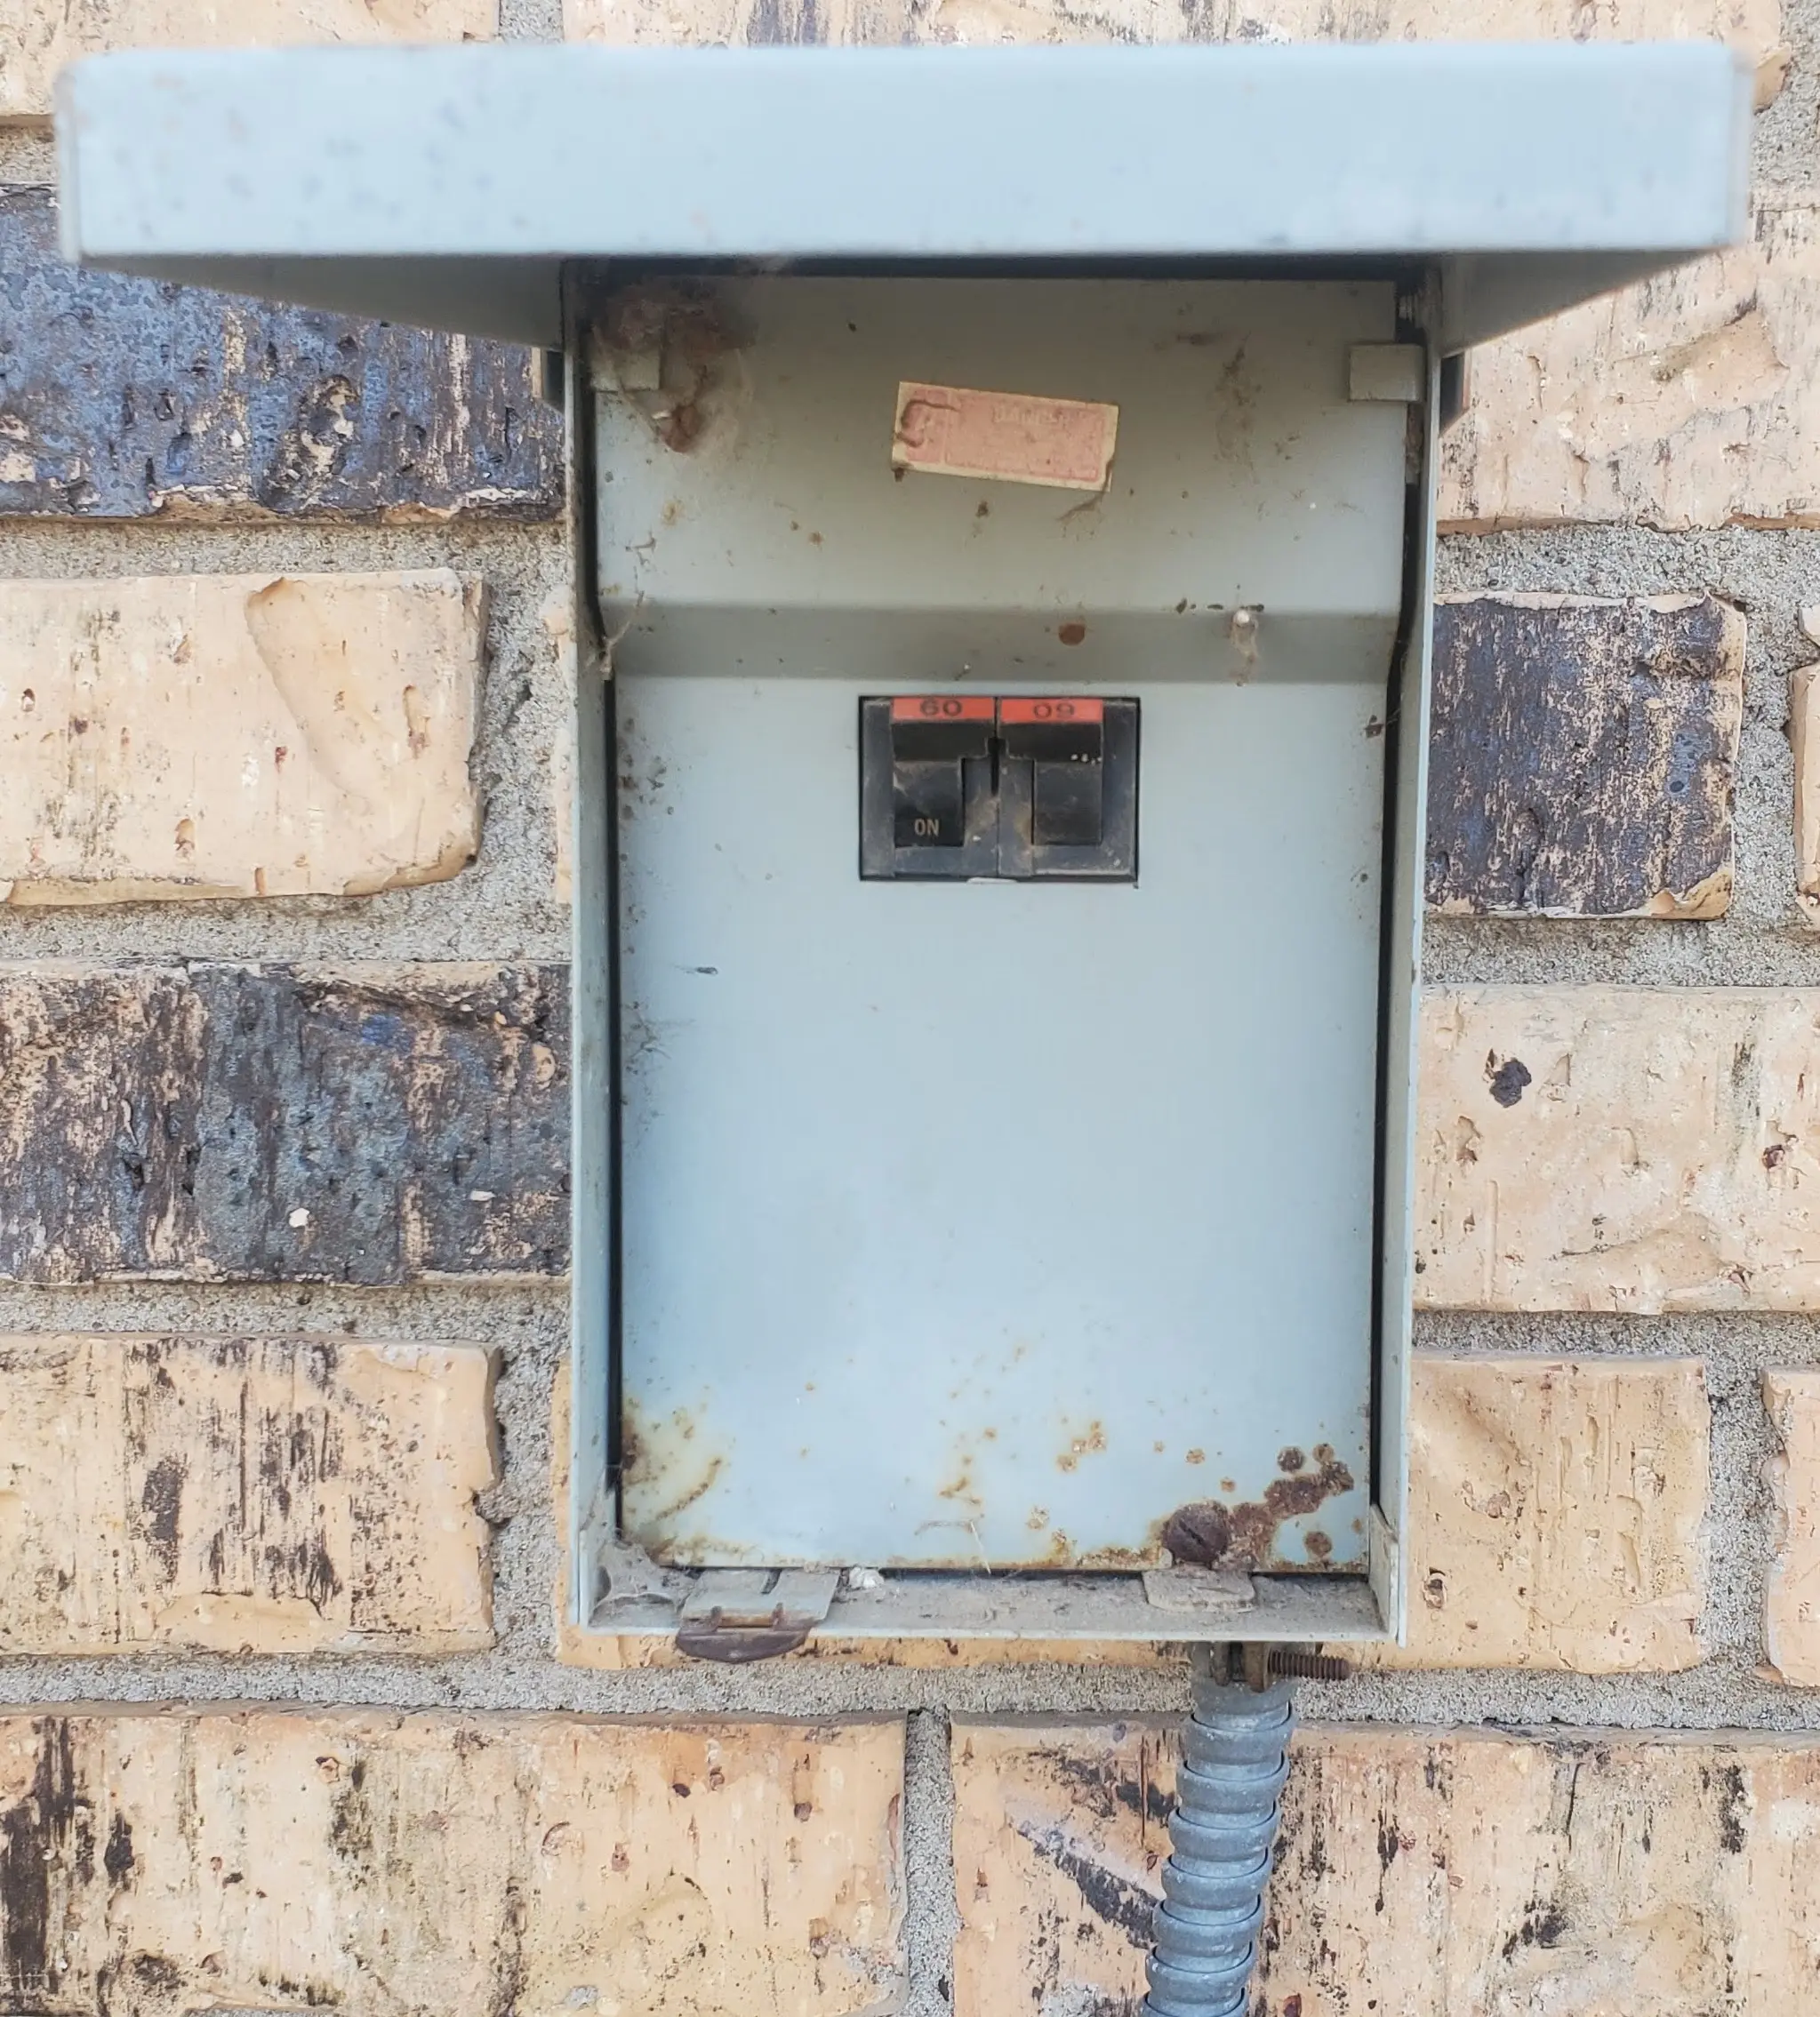
Near most A/C units, there will be a box, containing either a disconnect blade, or a breaker. Remove the disconnect / shut the breaker off.
In the example of mine, you would want to flip the breaker downwards, so that it displays "Off"
Step 2. Remove "Access" panel / Identify suitable mounting location.
Look for where the power cables come into the A/C unit. You should see a corner/side panel which can be easily removed with a few screws. Remove it.
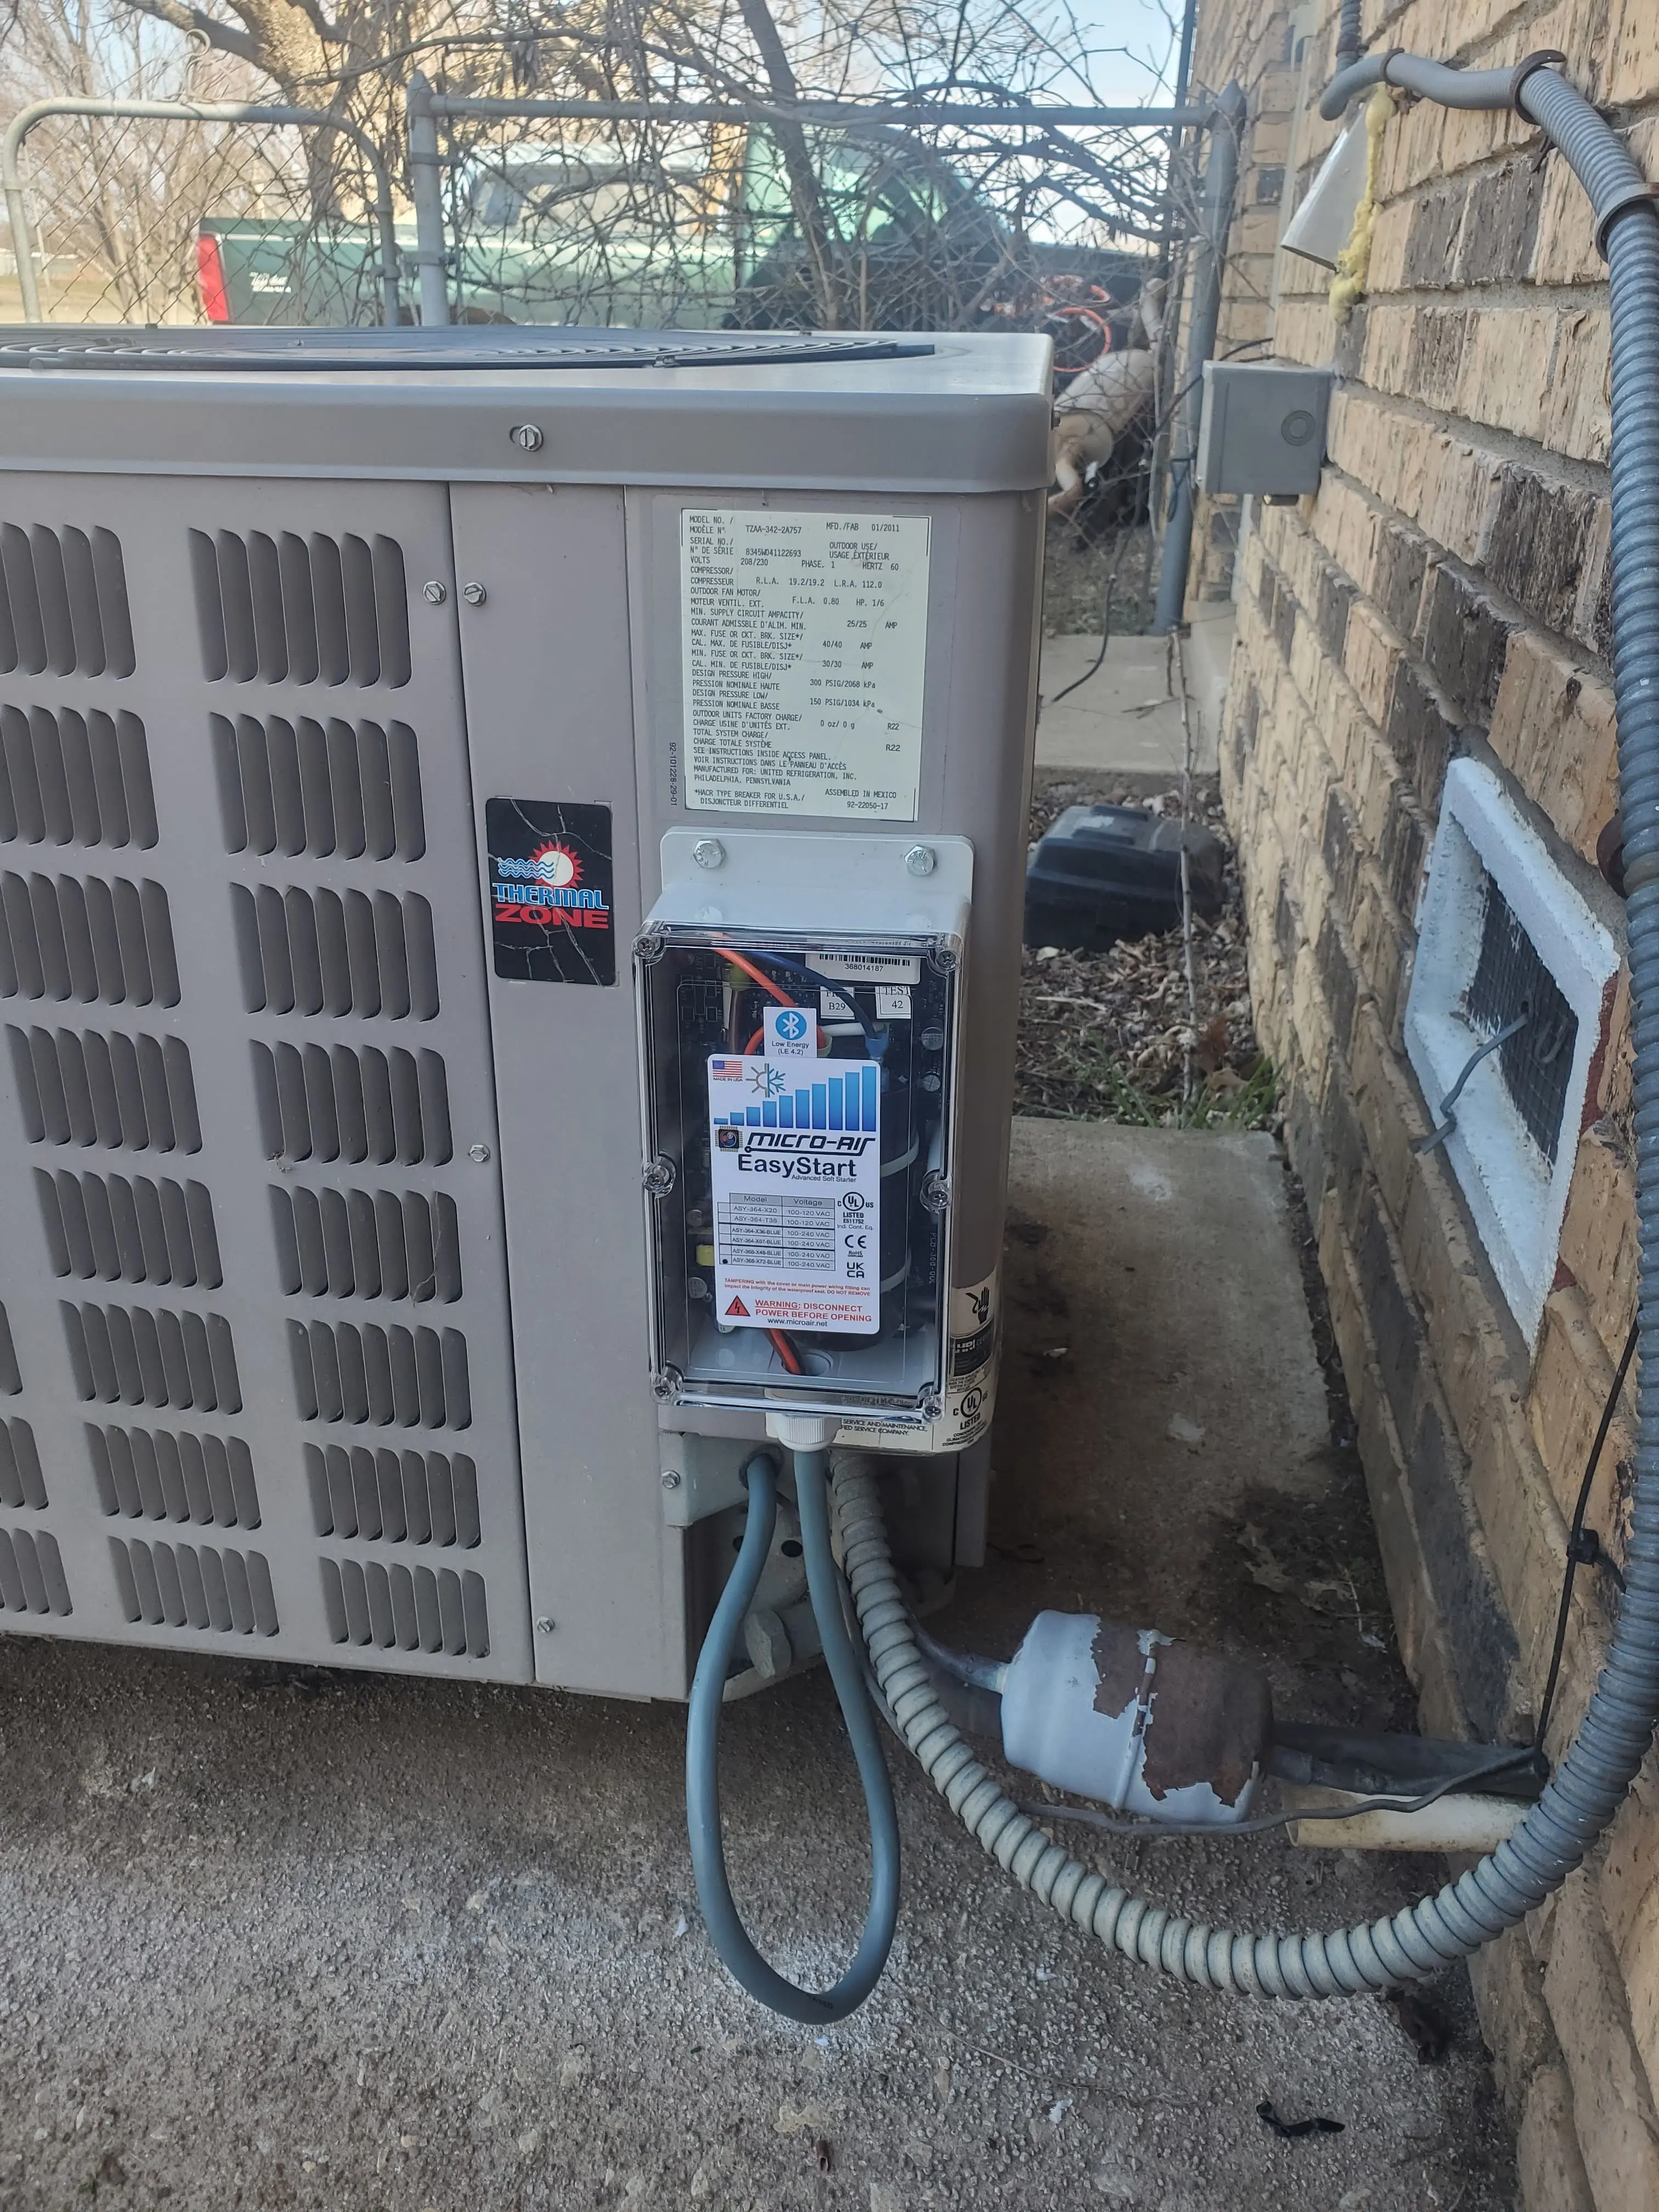
Next up, you will need to identify a suitable location to mount the soft start unit.
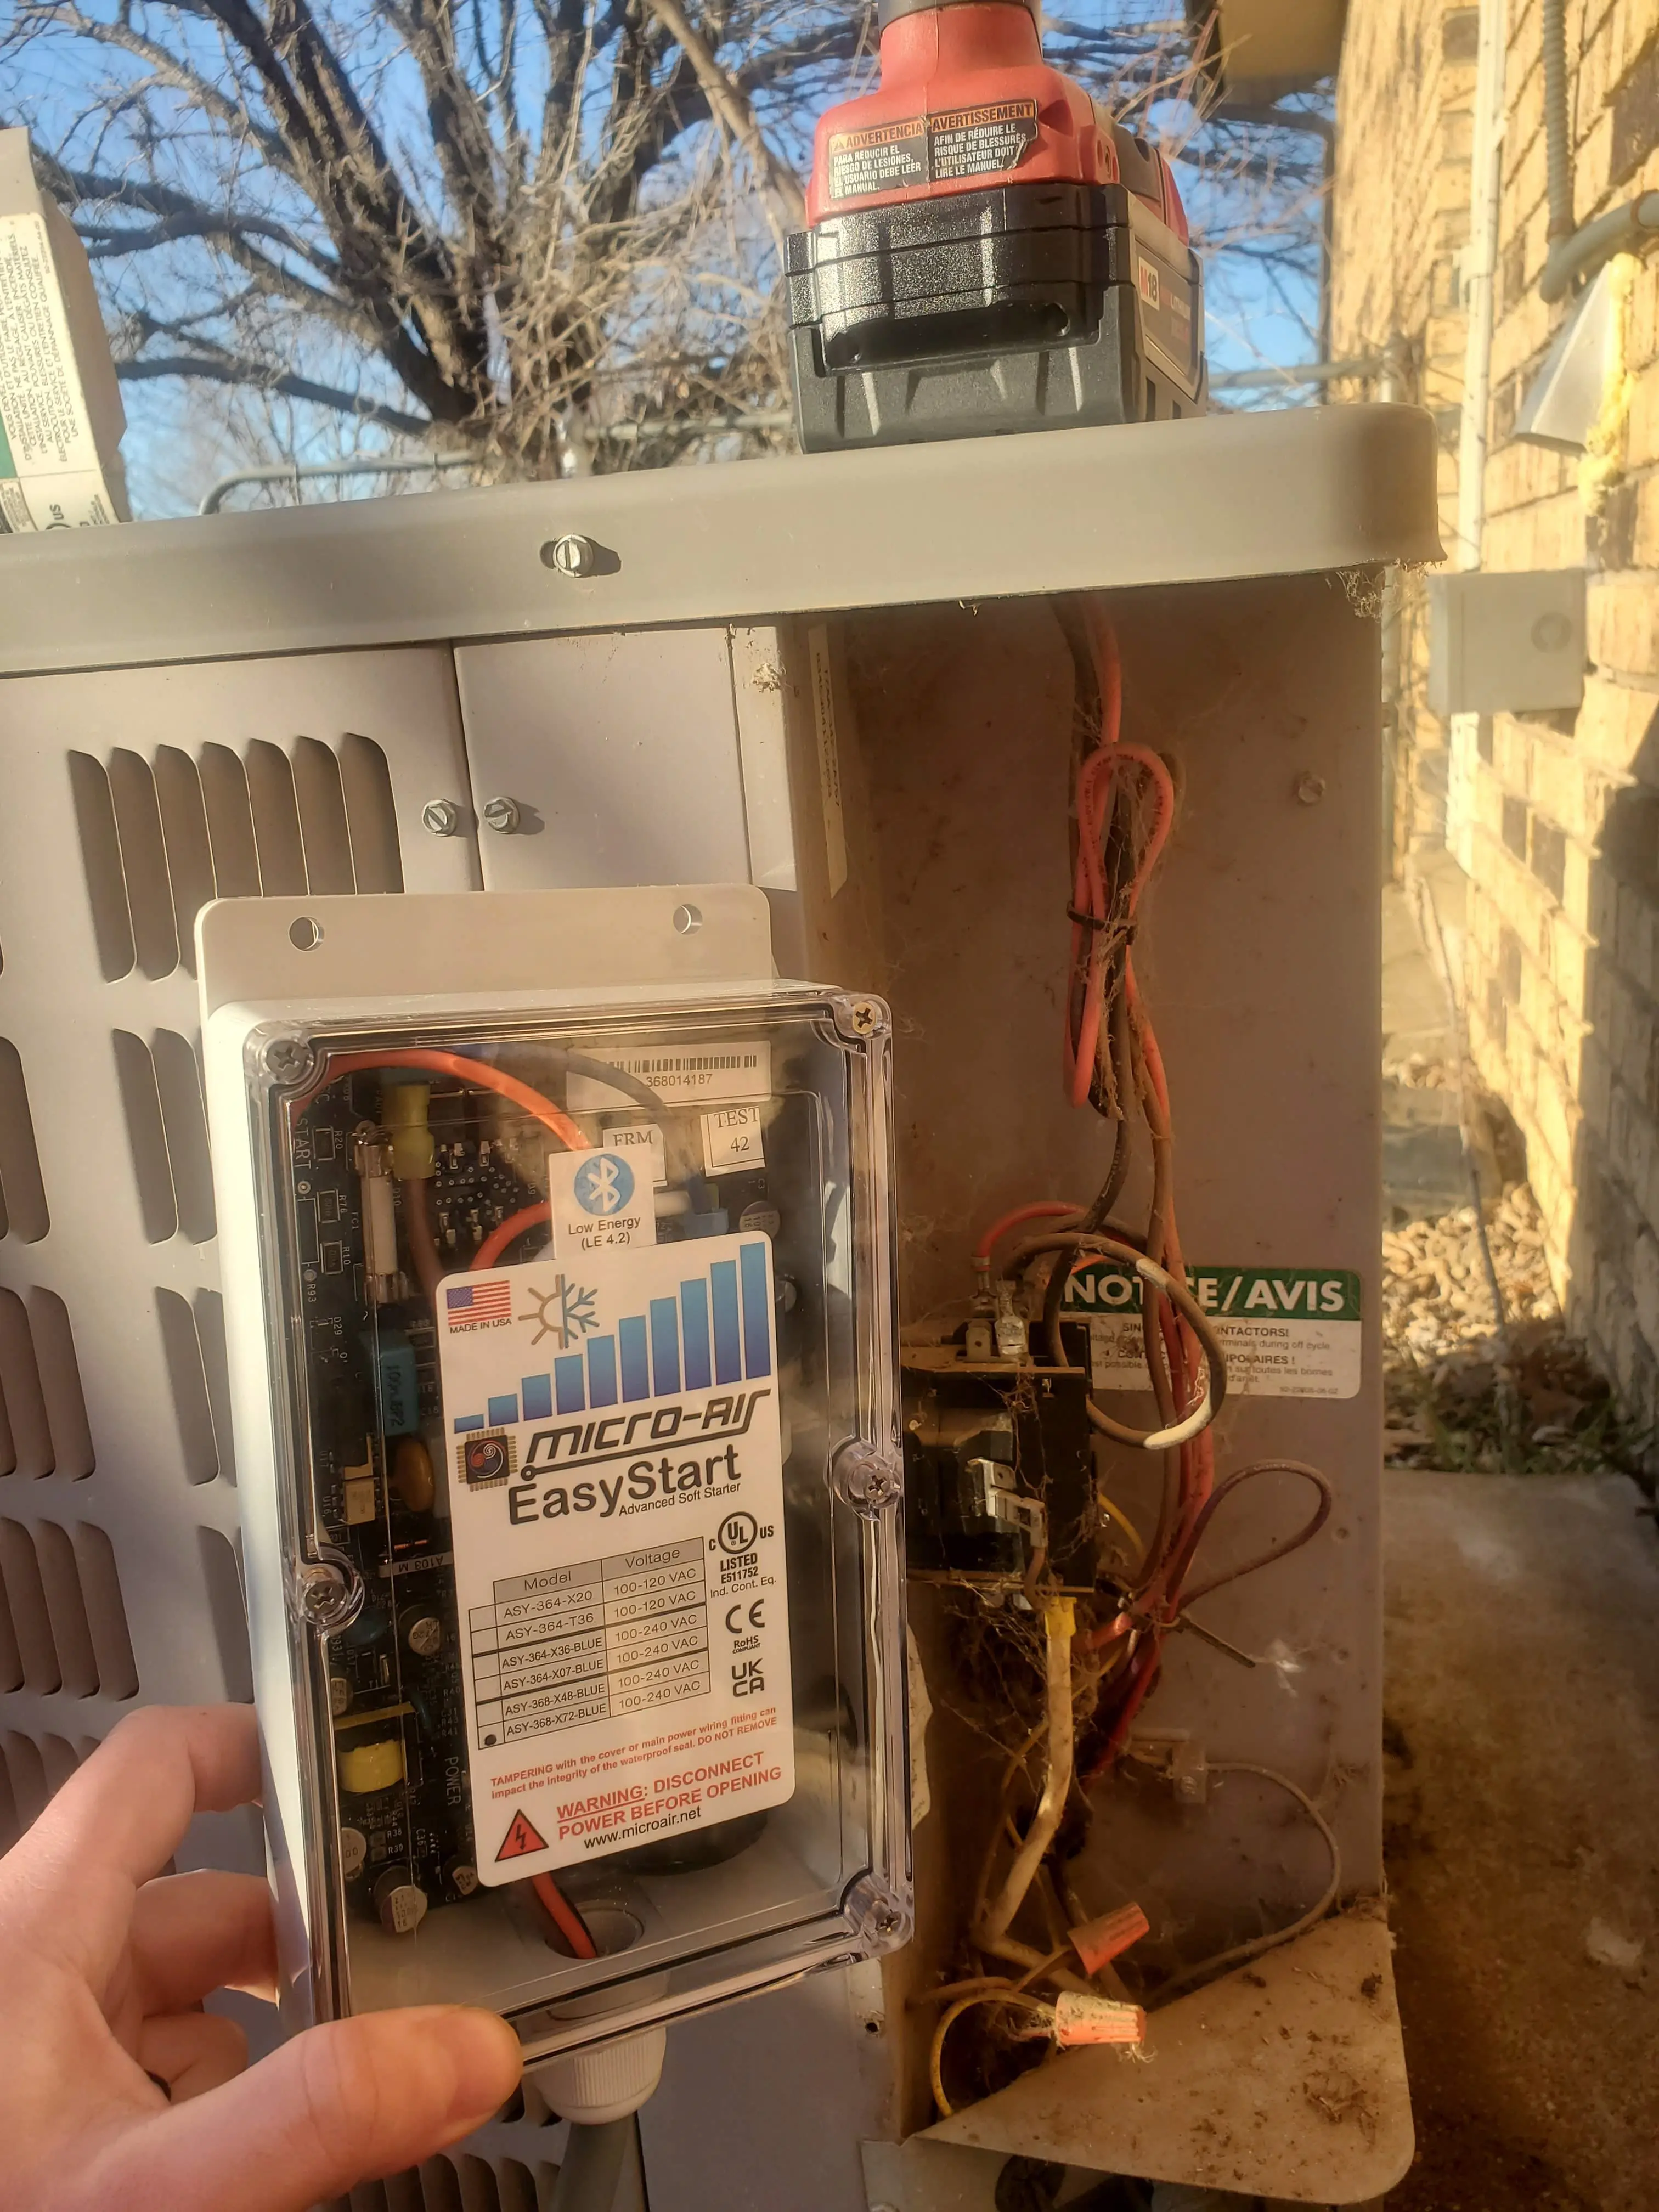
In my case, the box is larger then the available area on the inside of the access panel. Since the unit is water proof, and is rated for outdoor mounting/use, I decided to mount it directly to the access panel.
After ensuring the hardware wouldn't come into contact with any of the electronics on the other side of the panel, I used my center-punch to mark where the holes should be. Then, I drilled holes, and mounted the unit with 1/4" hardware.
Do note, I did use lock washers here. Since the A/C unit vibrates a lot, I felt these would help keep the unit secure.
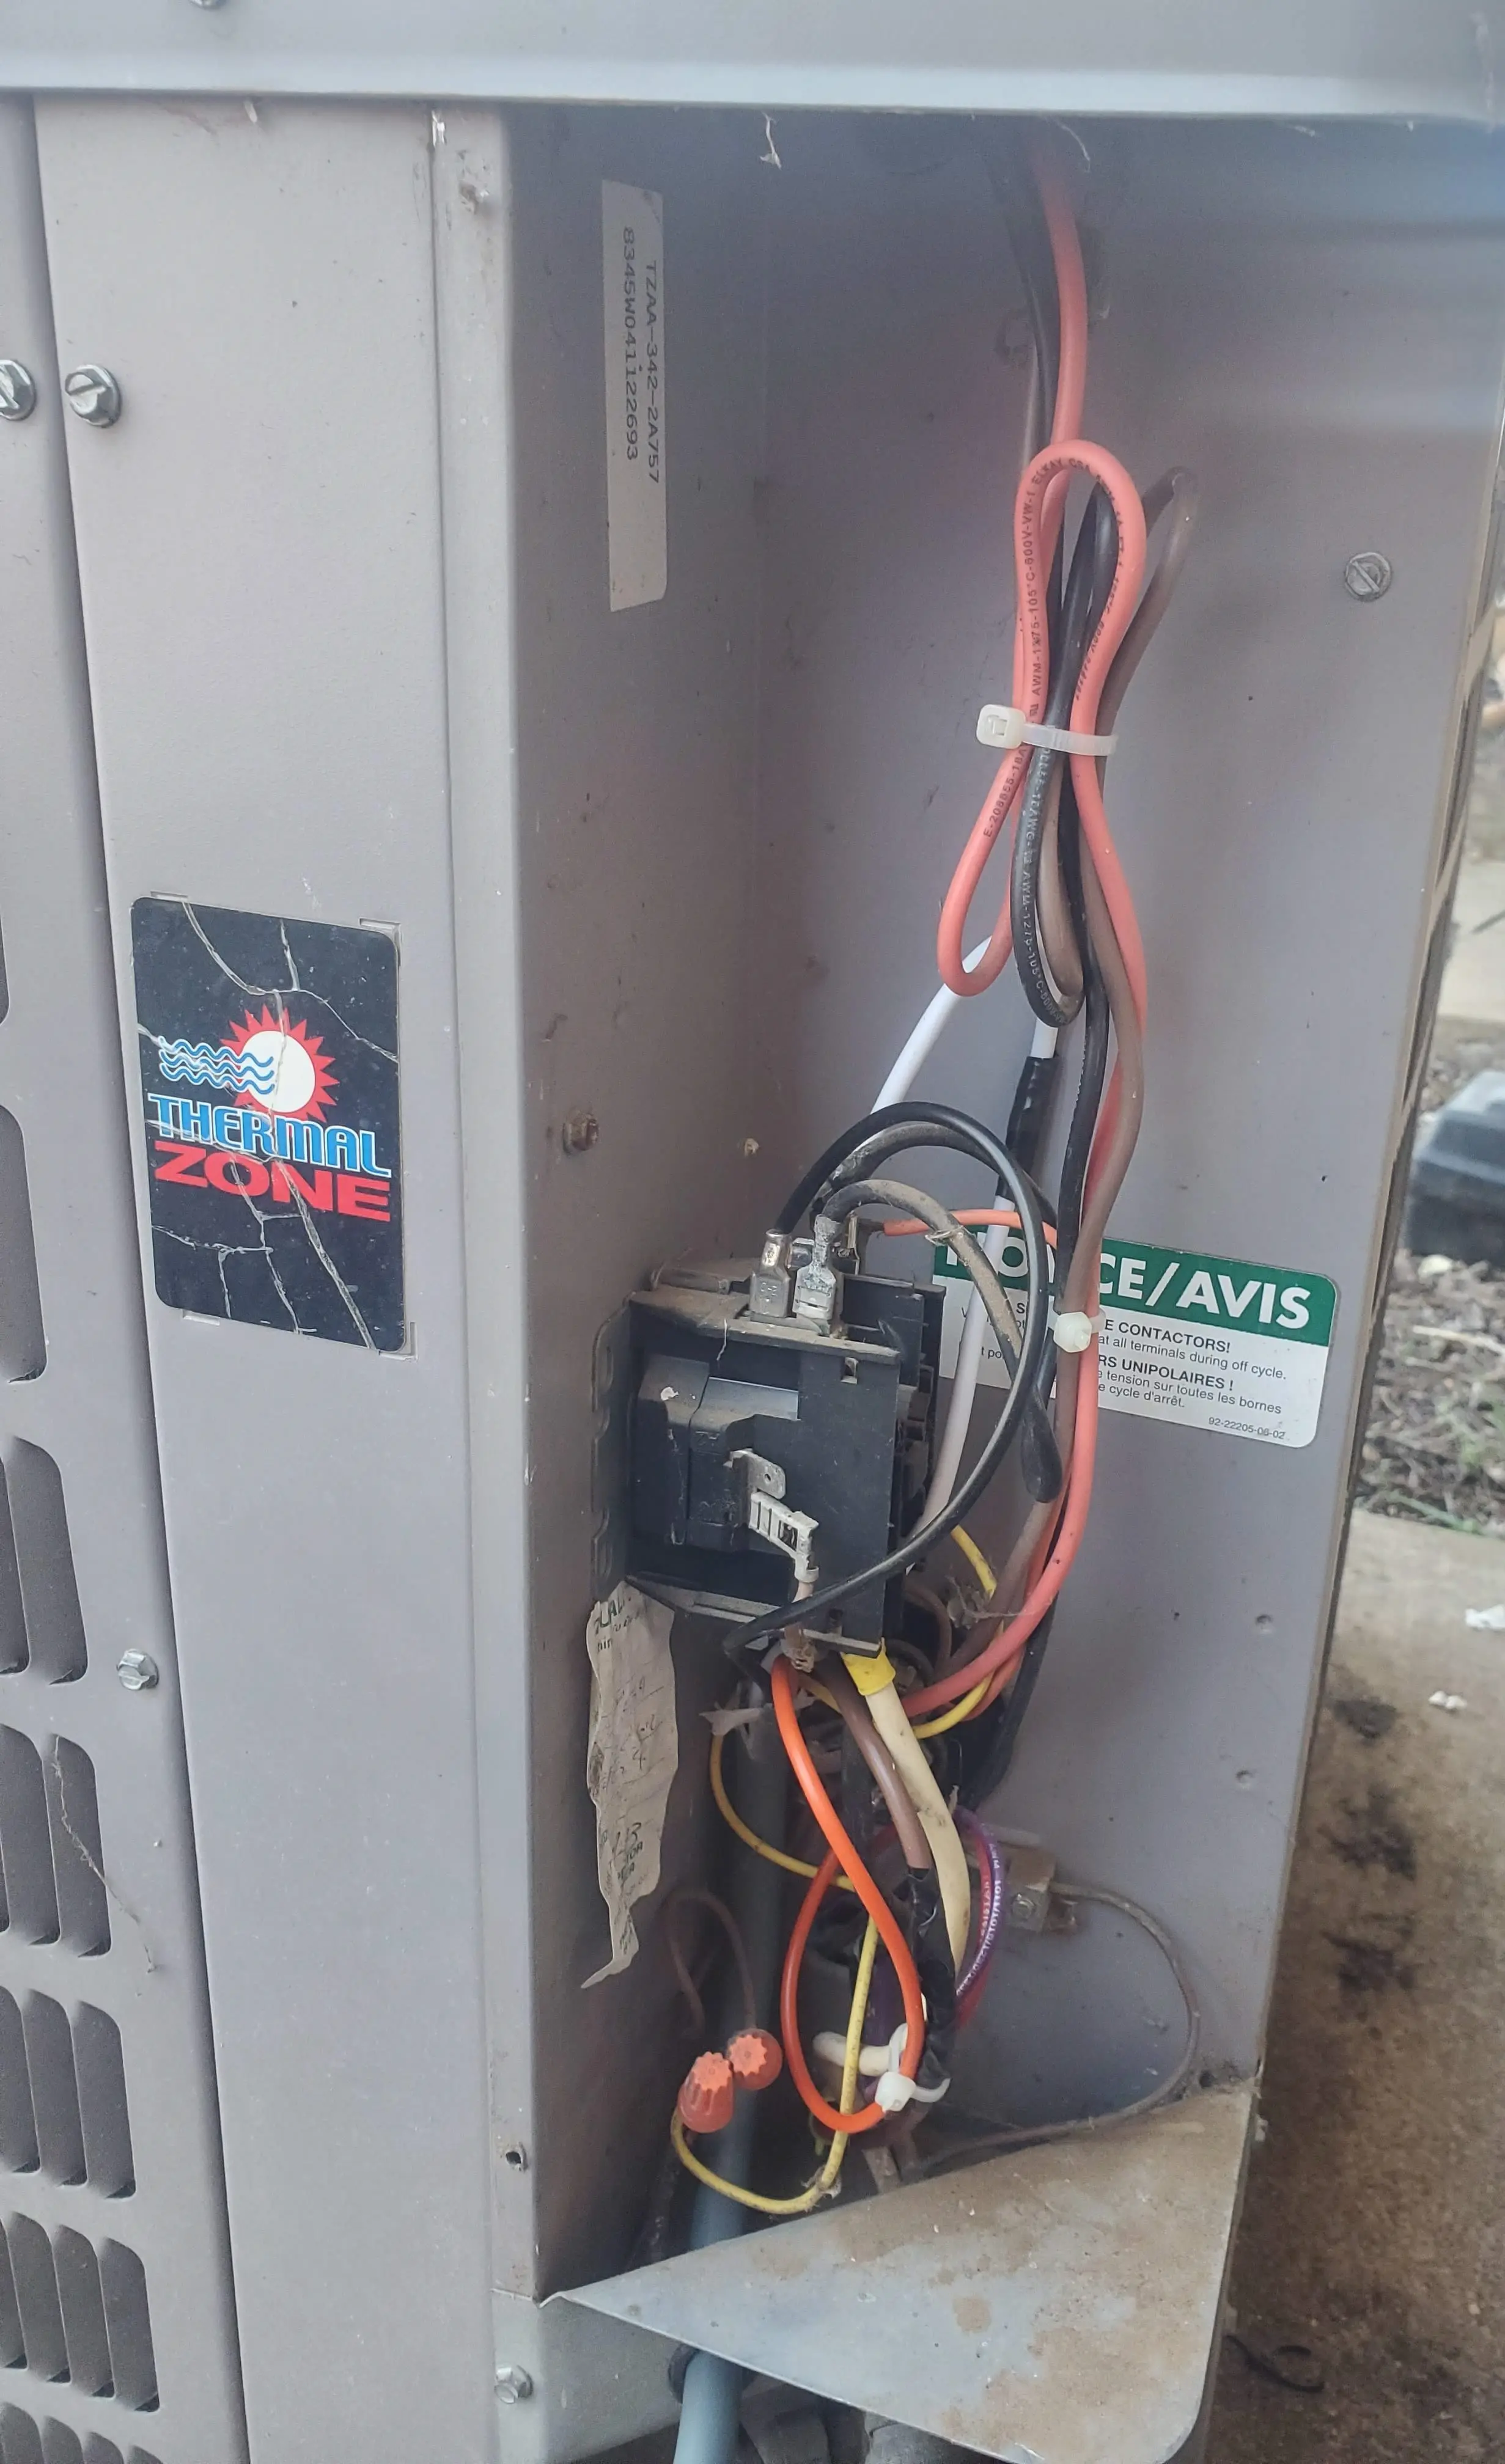
Step 3. Clean the unit
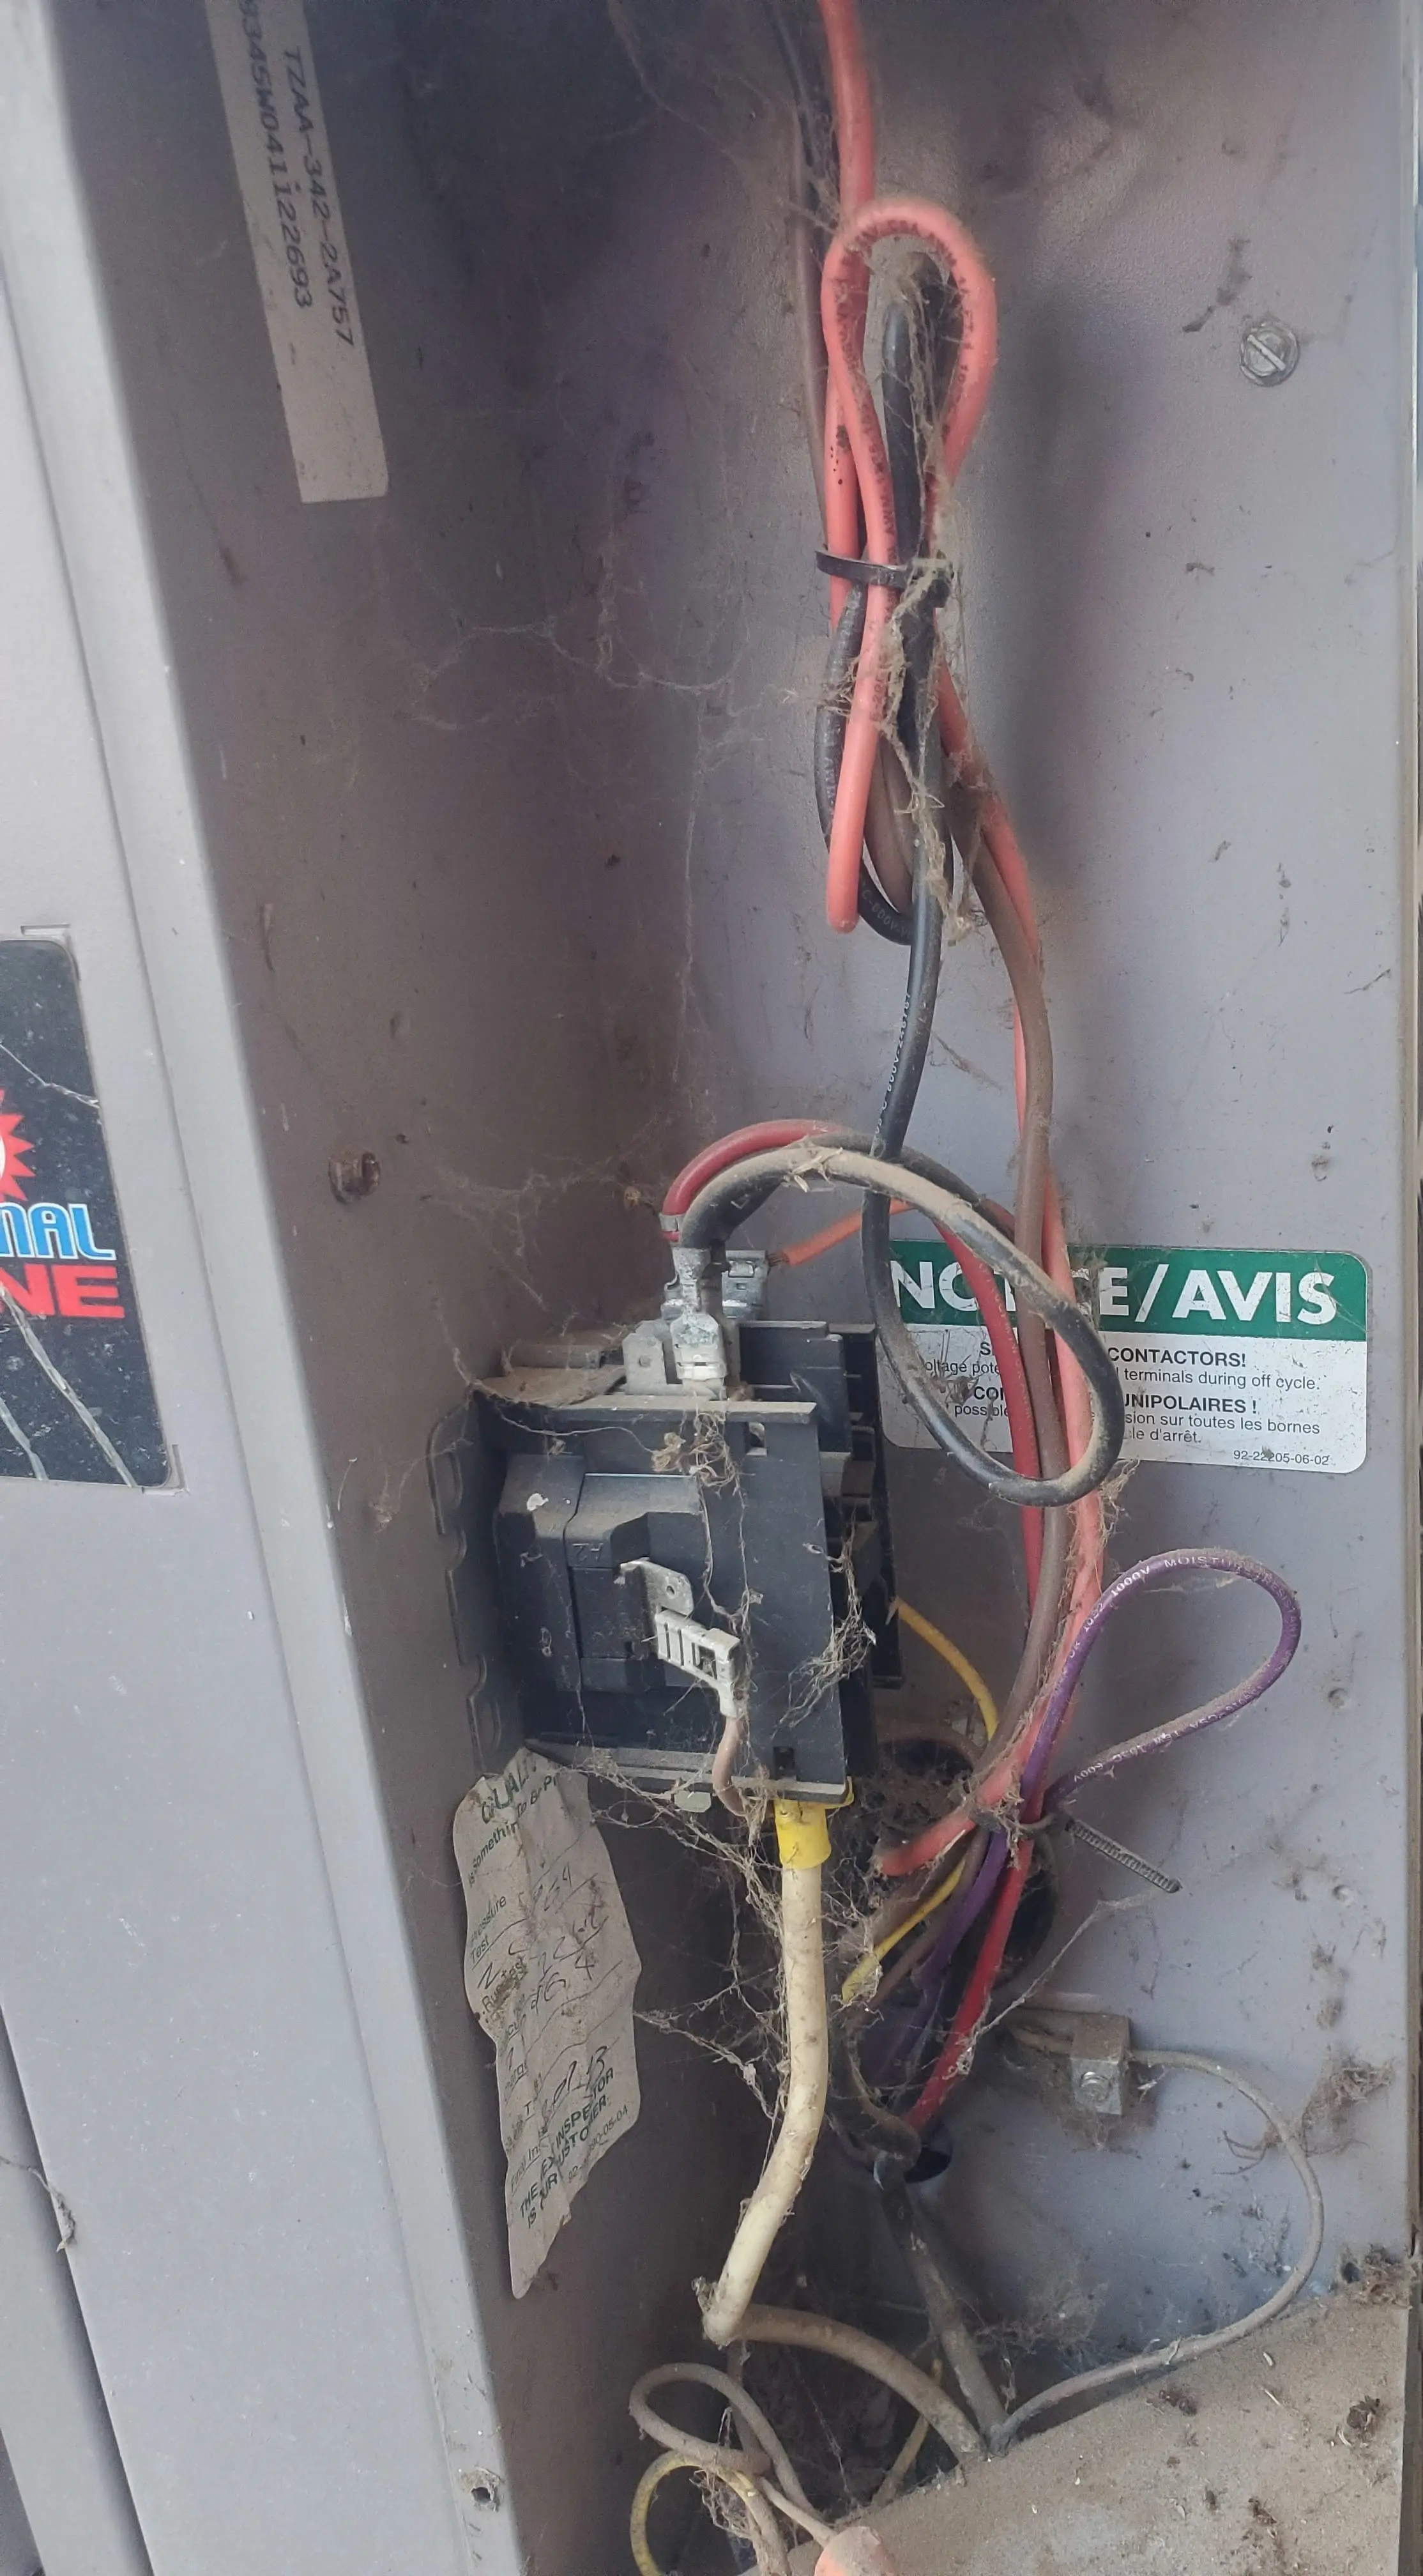
After removing the access panel cover, My unit was a mess covered with spiders, spider webs, dust, etc.
I personally used my leaf blower to clean up everything a bit. I'd recommend instead, using a brush and/or vacuum... as a leaf blower can potentially blow dirt and other debris into your components.
Before cleaning-
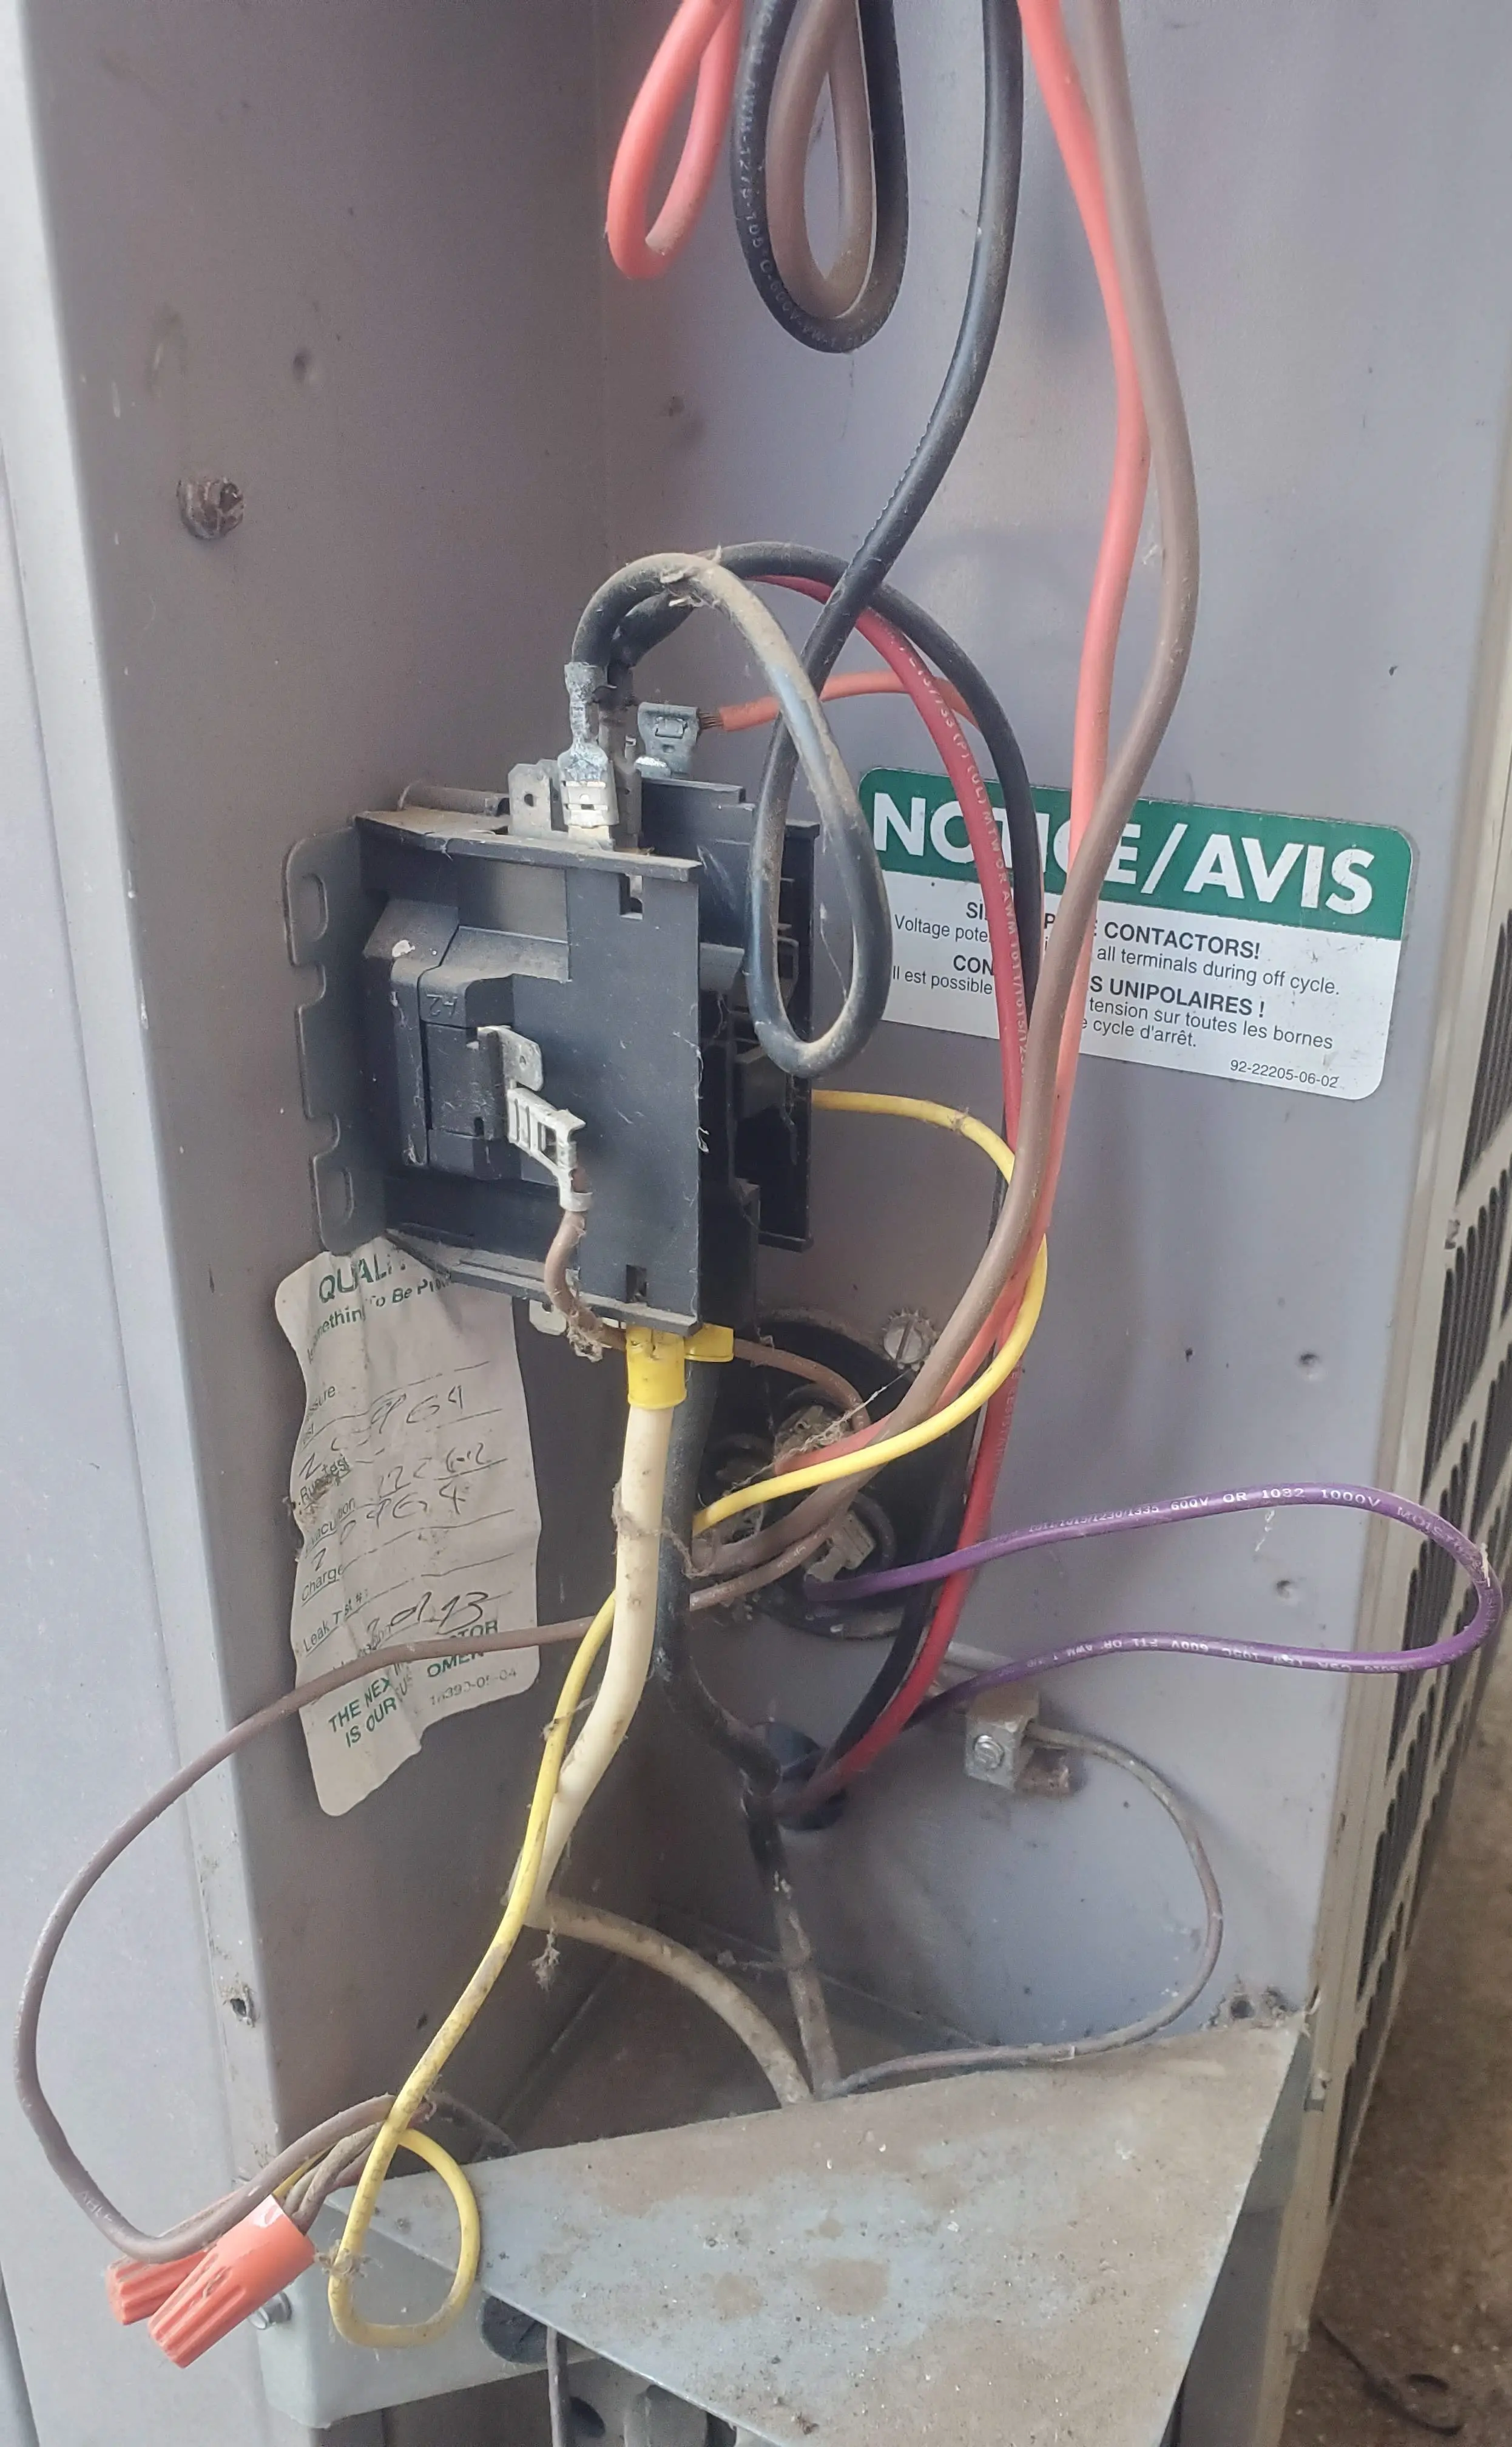
After cleaning and removing some of the wire ties.
Step 4. Wiring
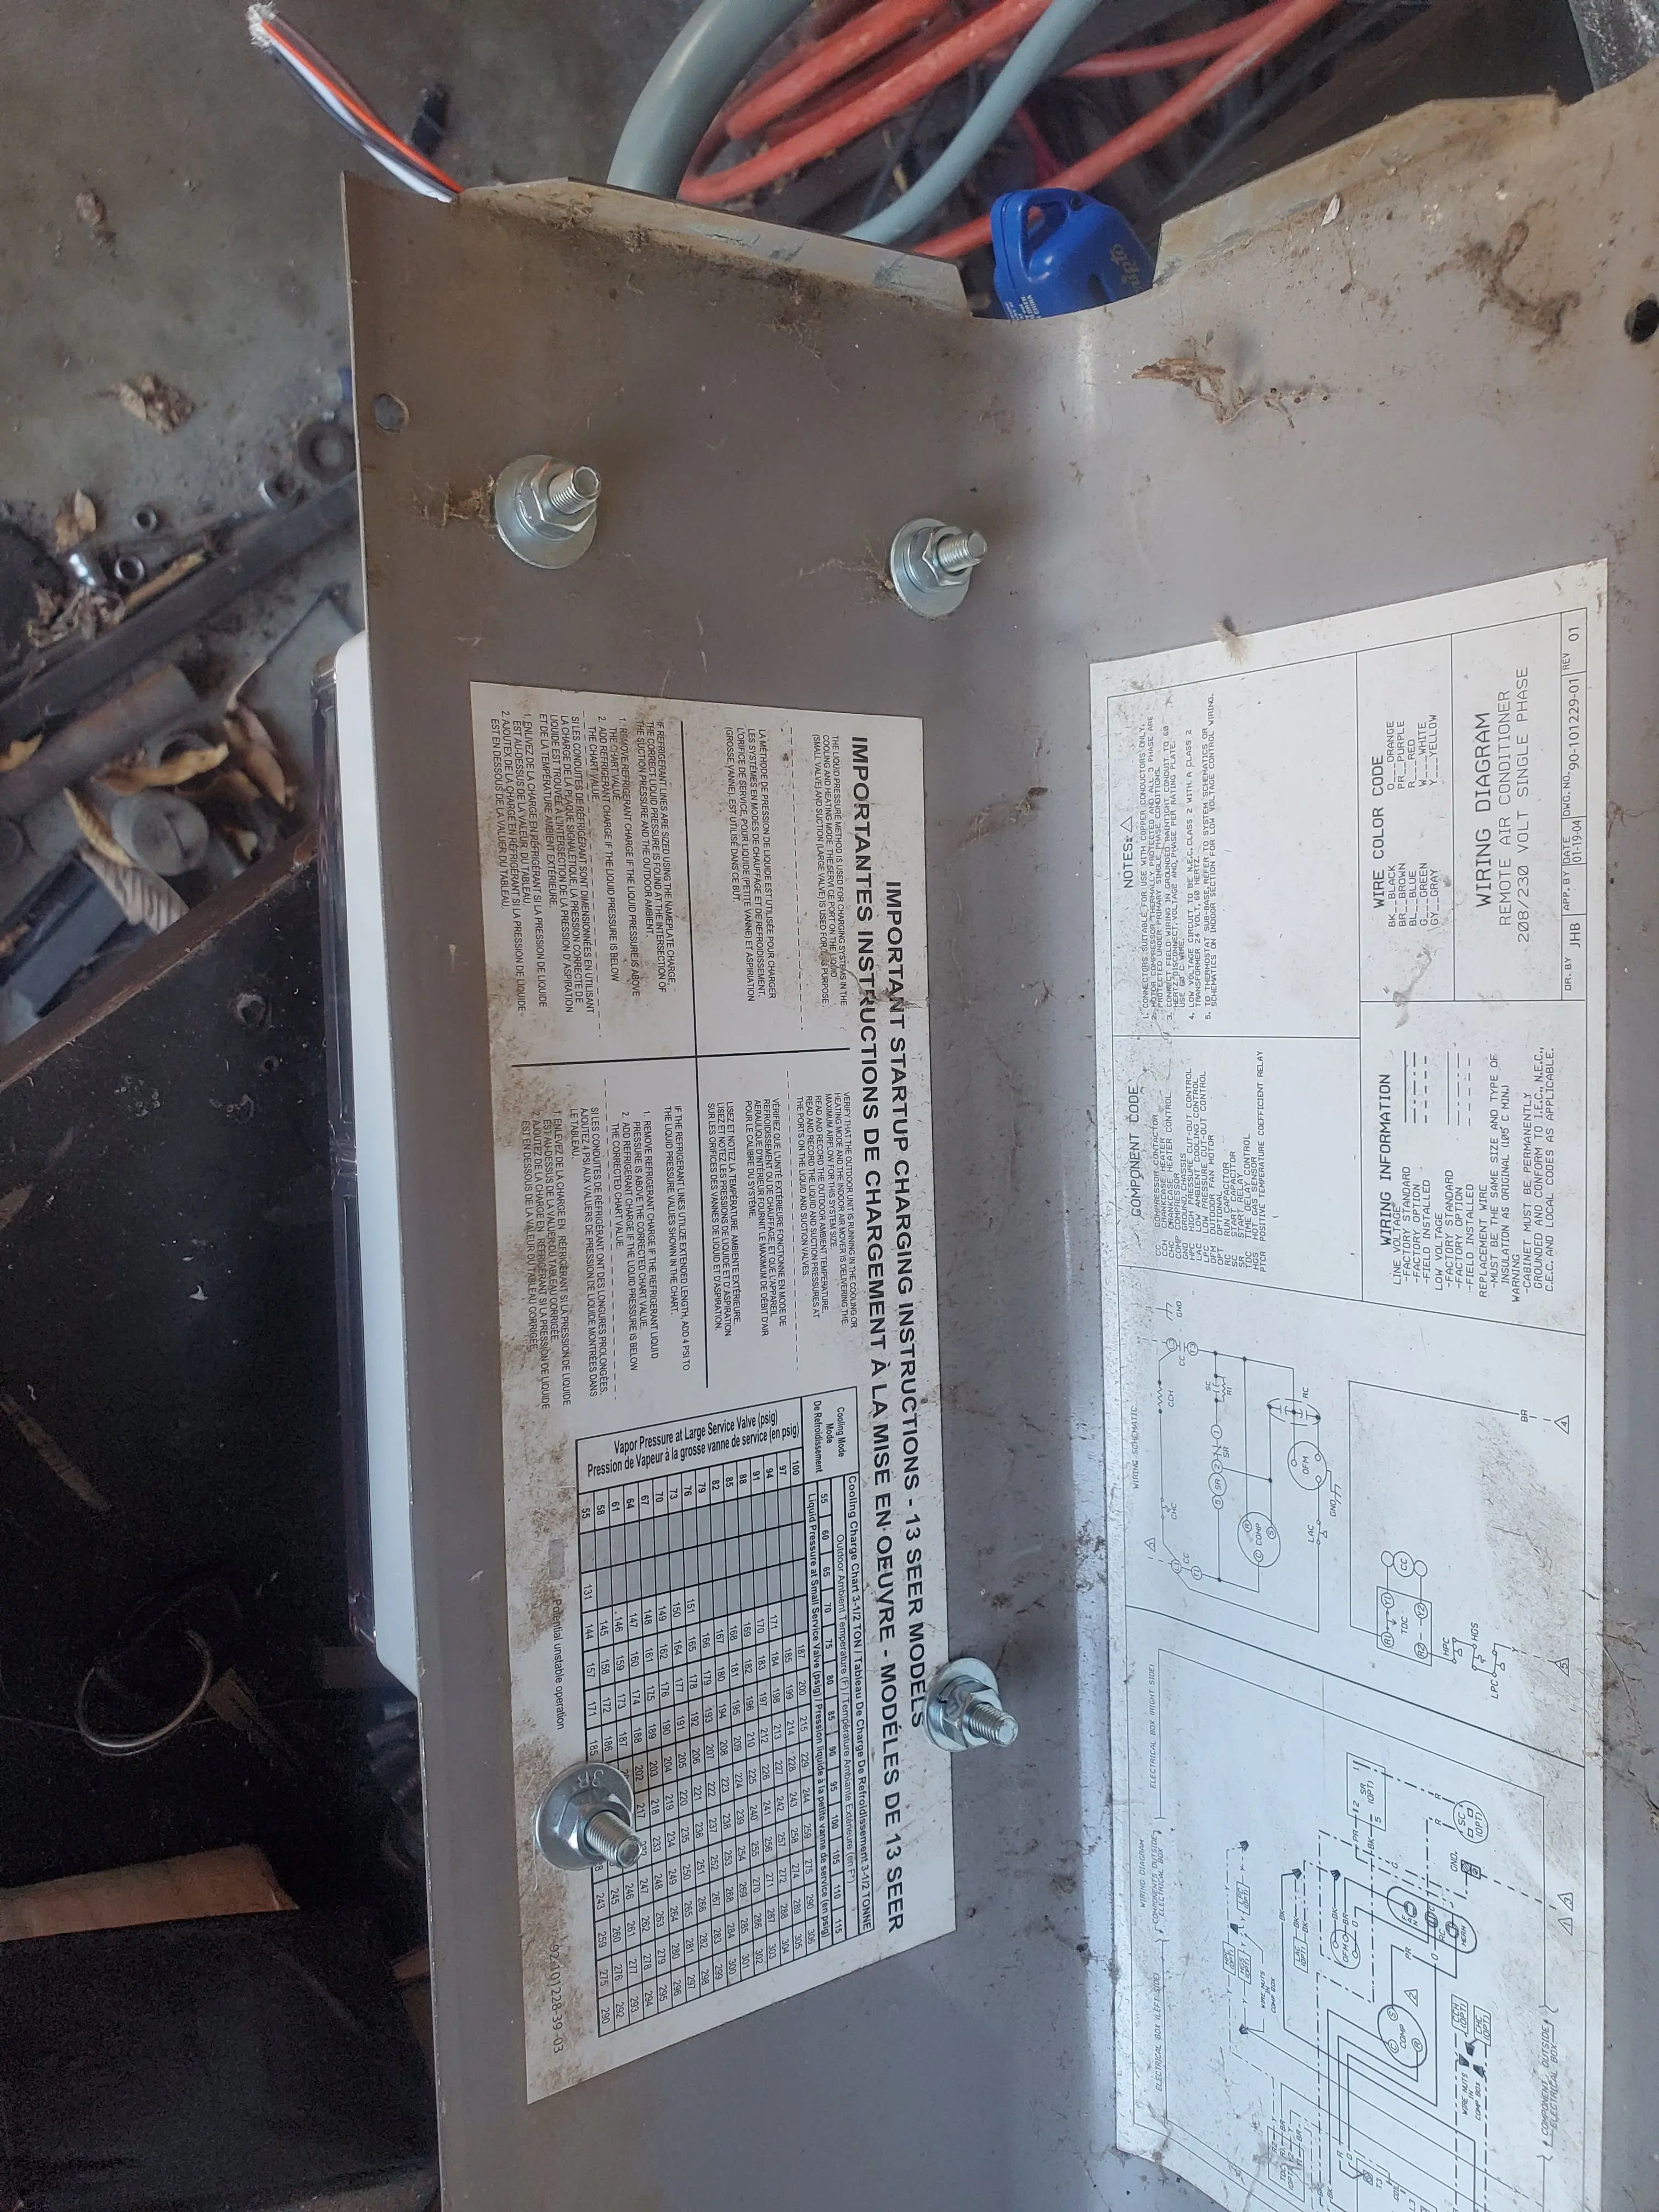
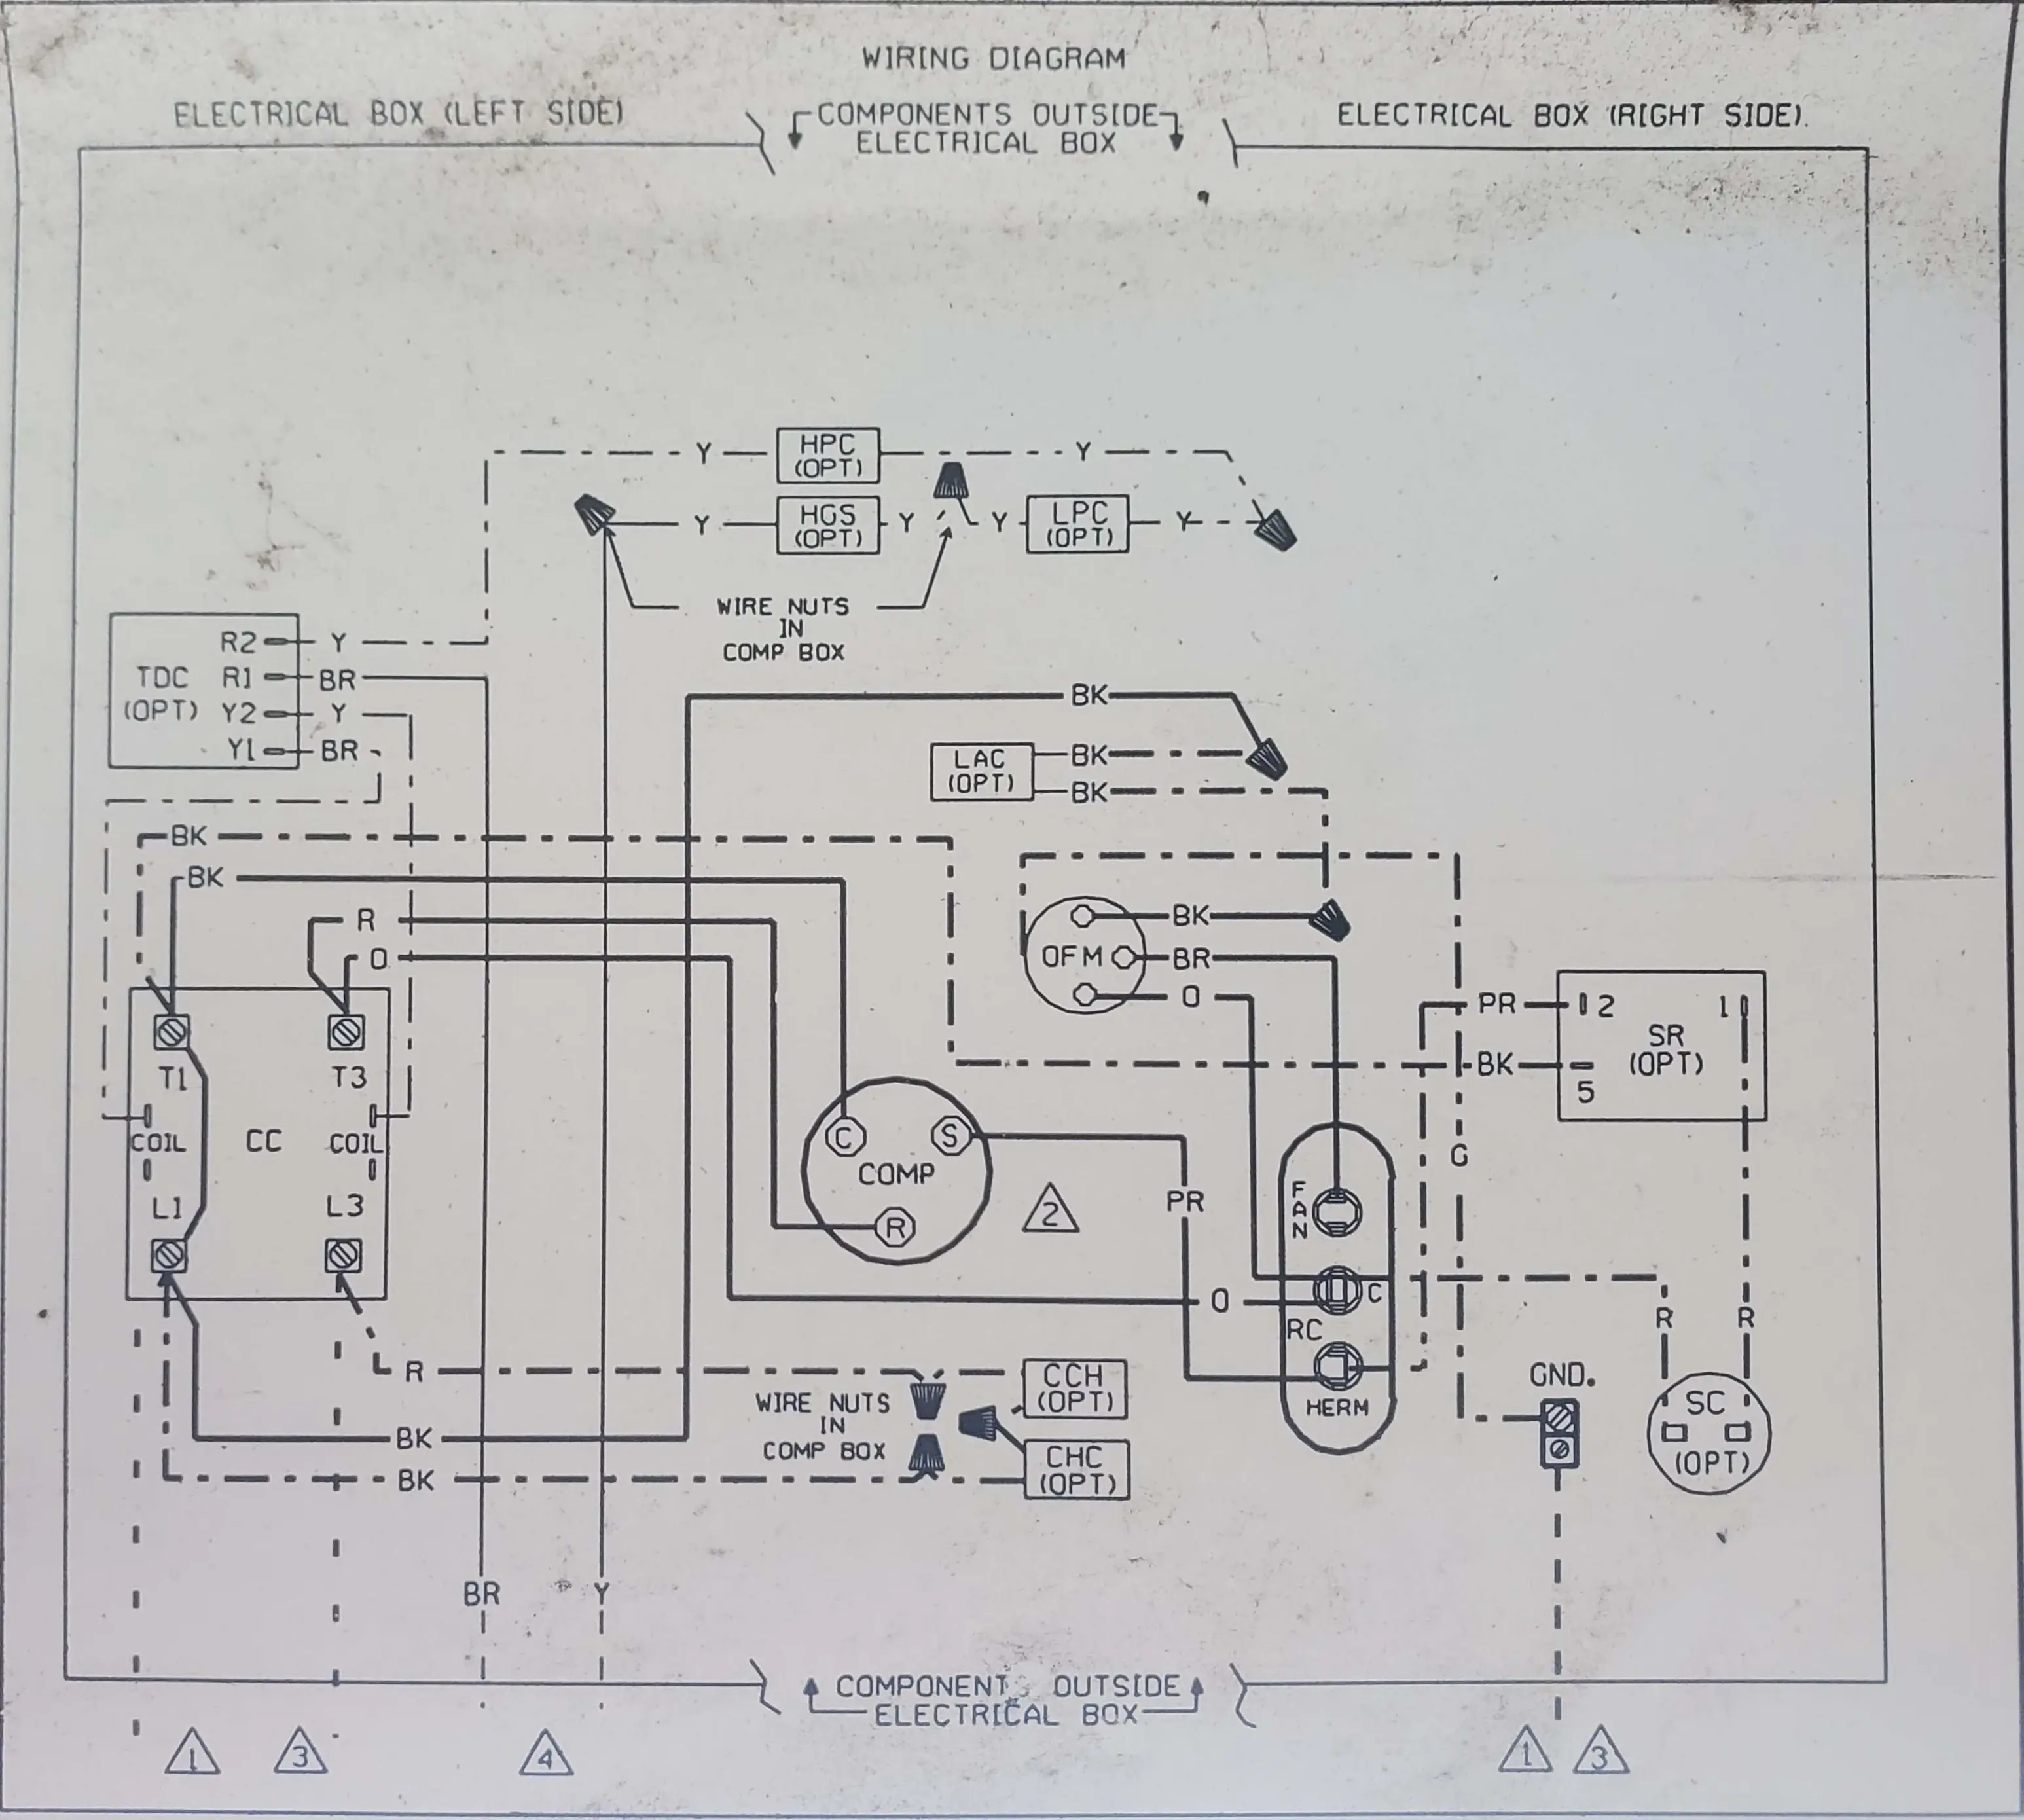
The next step took the longest. You will need to double-check the wiring diagram of your unit (usually written on the cover).
So, for my unit, here is the wiring diagram:
Hopefully somebody appreciates the perspective transform done here in Gimp! I am not the best photographer..
Next, we will need the easy-air's instructions.
Also, you might check if they have a brand-specific installation manual for your unit
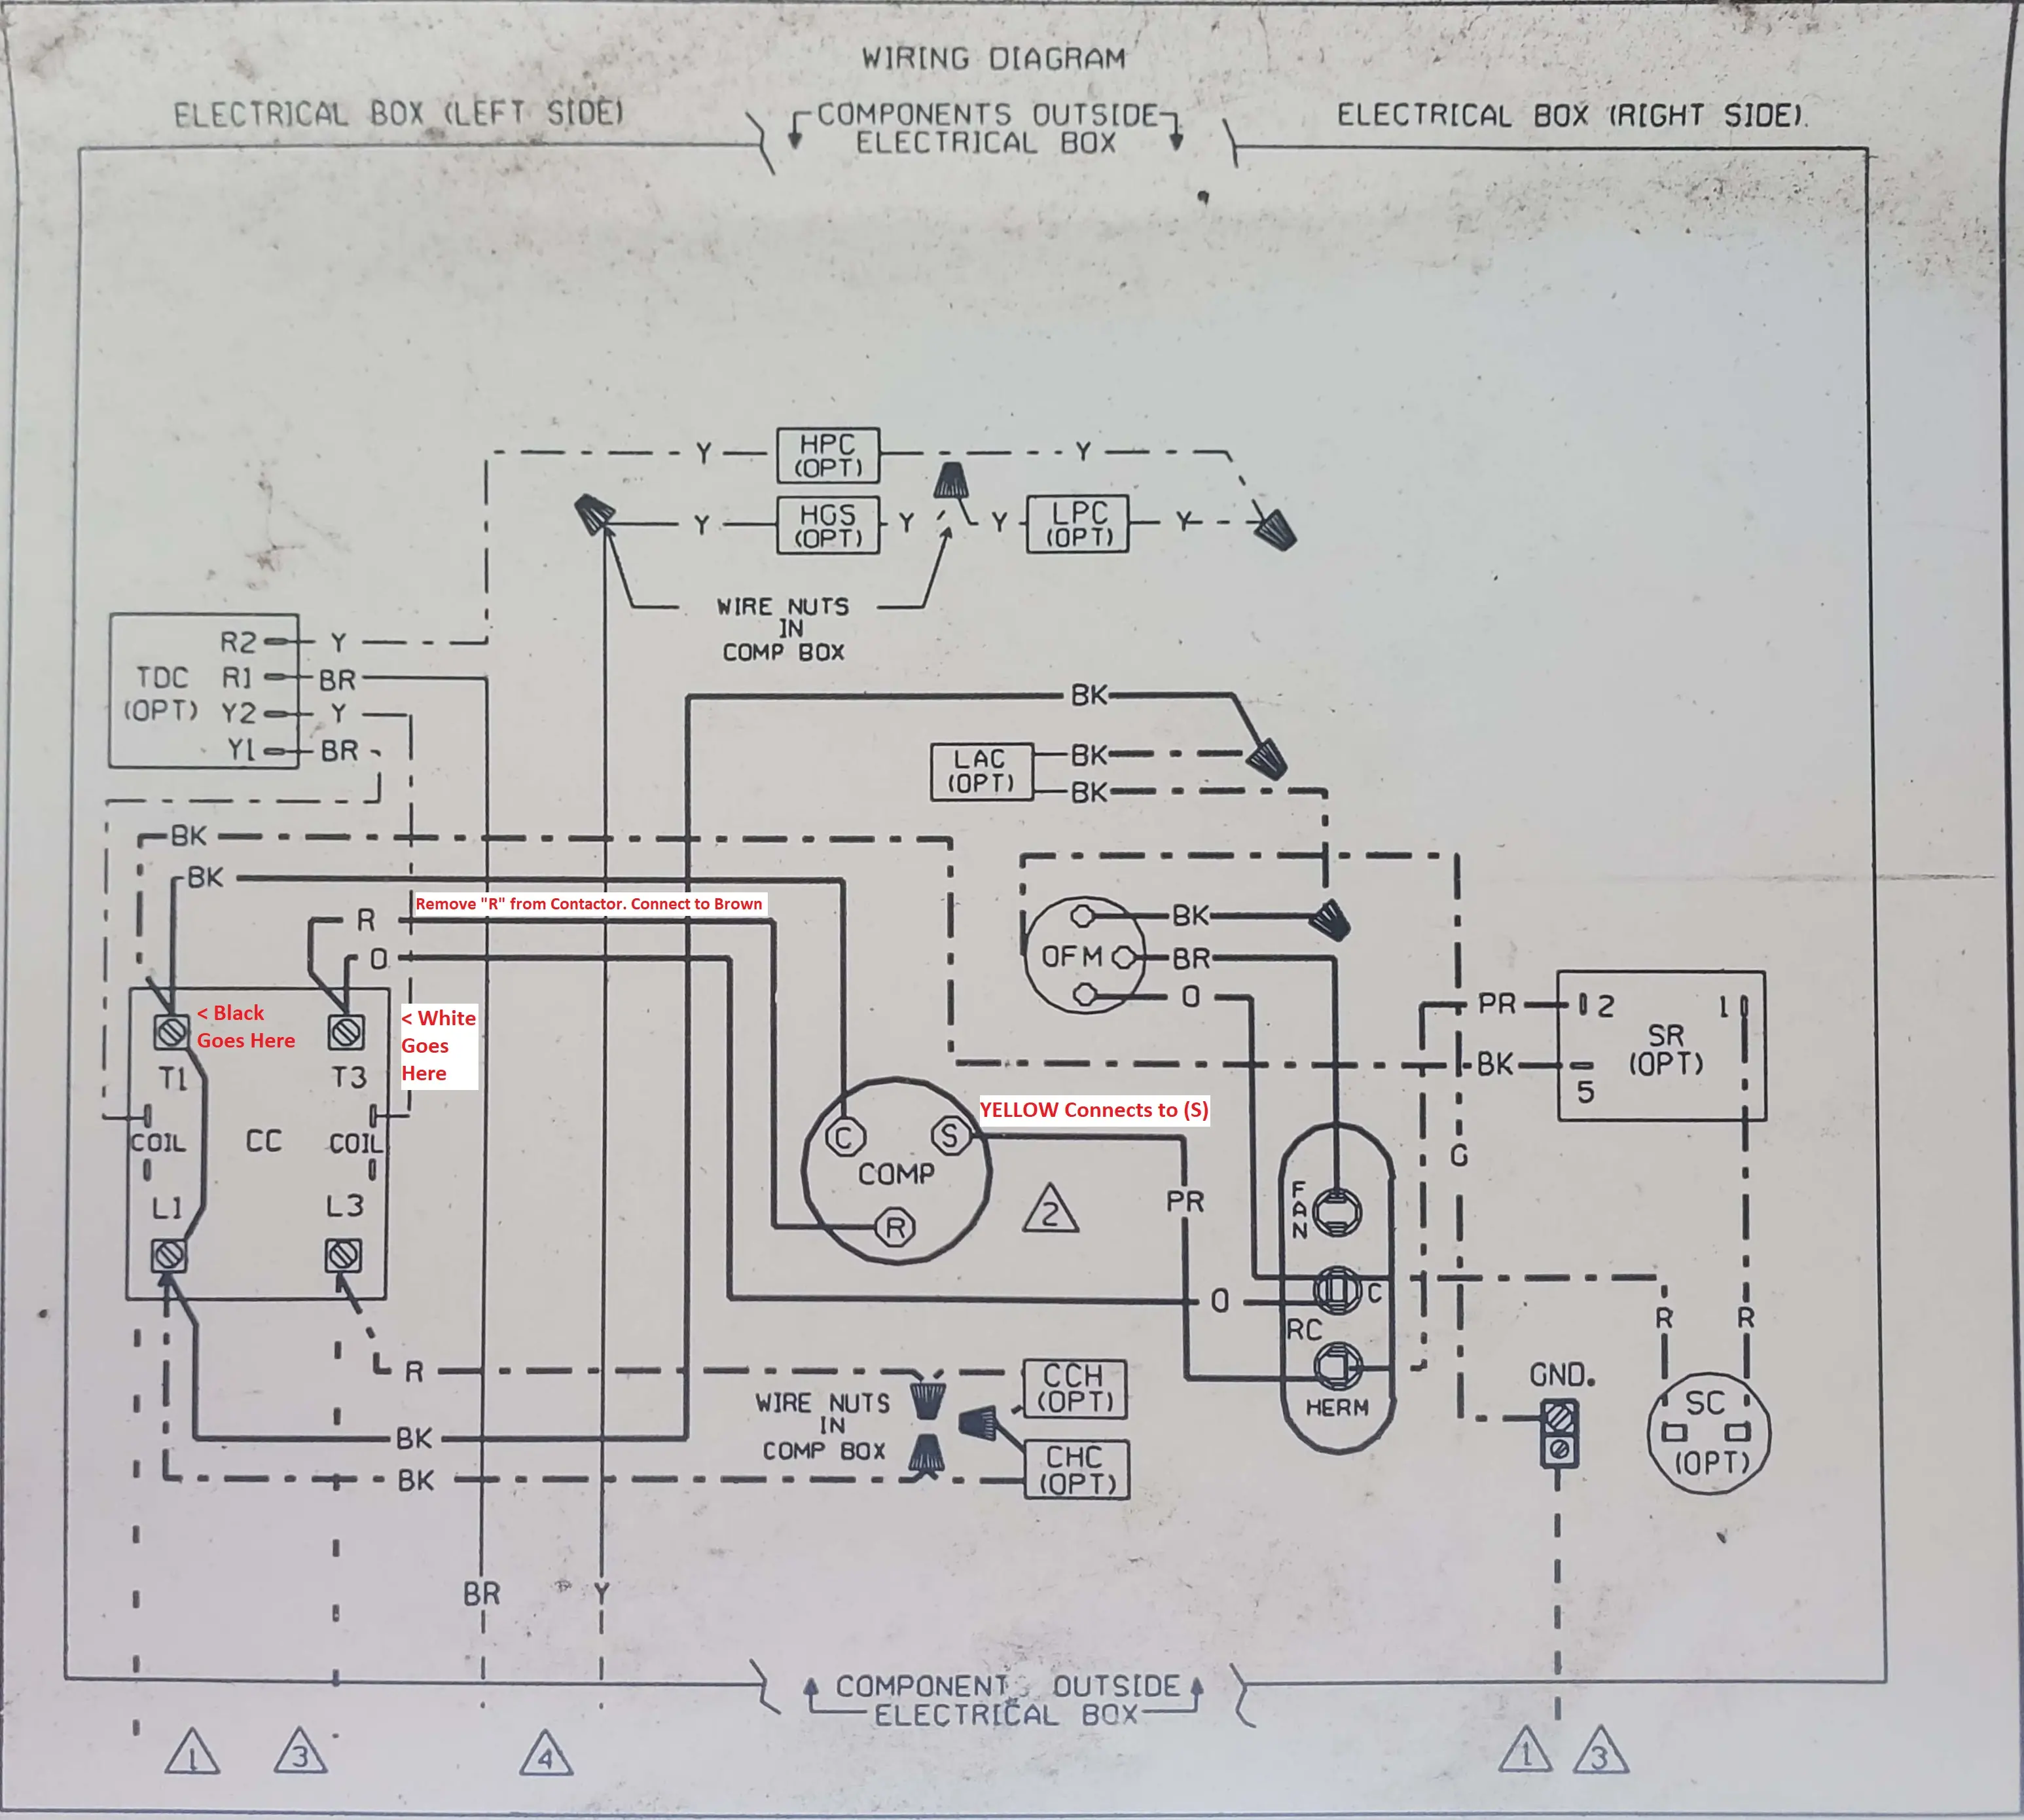
After reading over the installation manual, here is my annotated wiring diagram.
Here is a slide from one of Micro-Air's installation manuals showing the same steps:
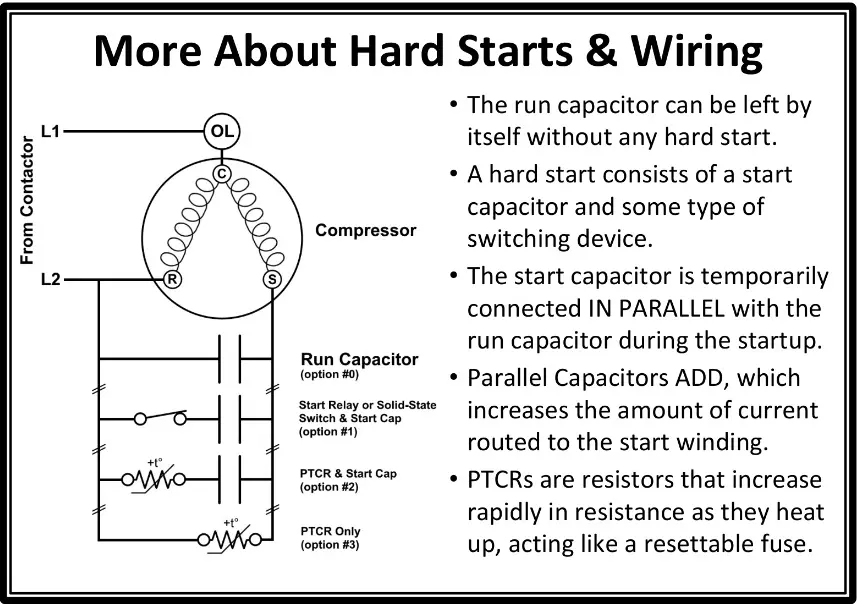
The red Xs on the right are noting to remove any existing start capacitor and relay as those will not work with this unit.
If any of the start components are found- all connections and wires to them must be removed! Otherwise, this unit will not function correctly and you could potentially cause damage.
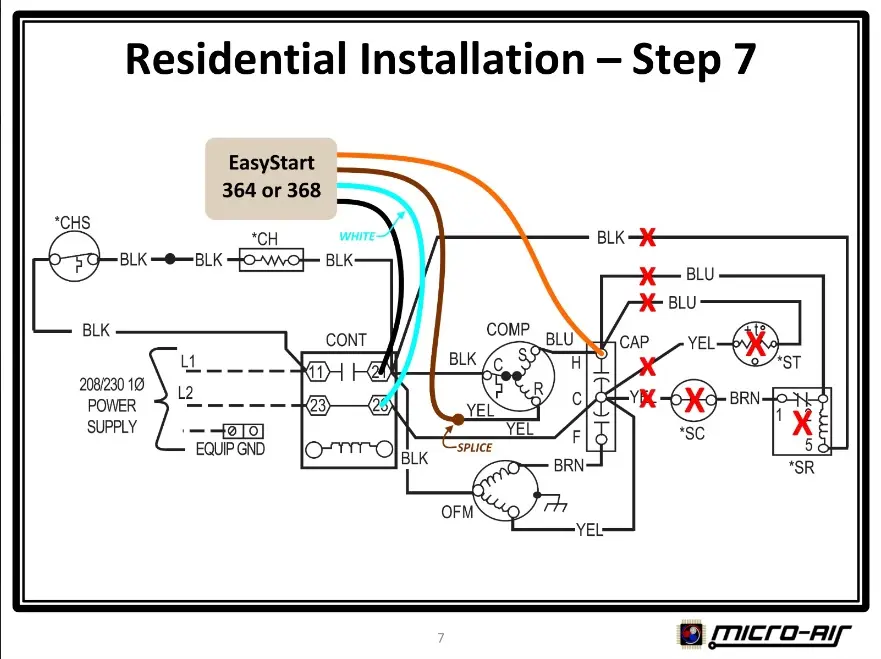
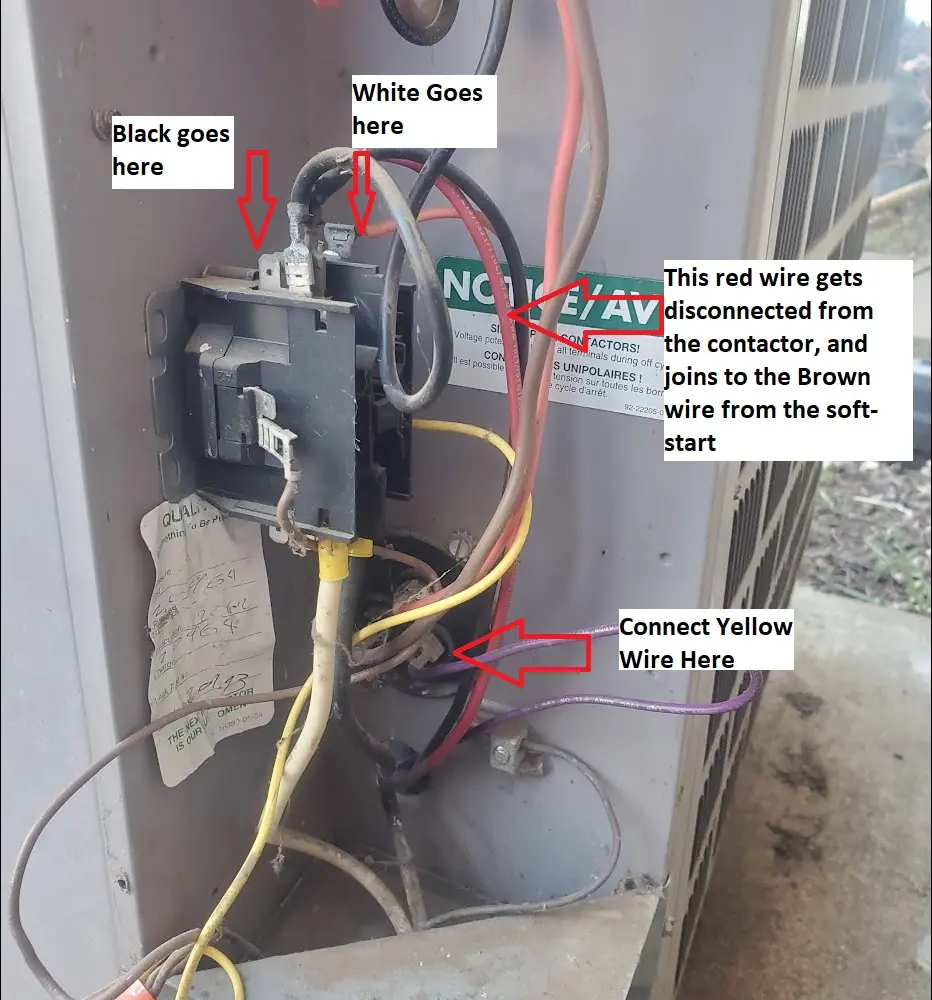
To summarize the connections-
- Black wire connects to a spare location on the left side of the contactor.
- Remove the "Red" wire from the right side of the contactor, going to the compressor. Then, wire nut it together with the "Brown" wire from the soft start. Note, Your compressor wire may not be red.
- Connect the "White" wire from the soft start, to the right side of the contactor.
- The "Yellow" wire from the soft start, will need to connect to the "HERM" terminal of your capacitor. For my unit, there was a purple wire connected to one of the spots on this terminal.
- IF, you have an existing start capacitor and start relay, it must be removed.
For, anyone confused as to what is what- here is a slightly annotated diagram.
Warning
If any of these steps are confusing or you are not 100% absolutely sure on what to do, you should stop what you are doing and call a licensed electrician or HVAC professional.
Again, all of these wires can carry enough energy to kill you. If you incorrectly wire this, it can cause a fire which can damage your property.
As well, incorrectly wiring anything can result in a 8,000$ repair bill for your now broken A/C compressor.
Danger
Before touching ANYTHING, Make SURE the power is turned off to this unit.
I used a multimeter to probe all of the terminals for residual current. The capacitor can carry current even when this unit is not powered.
IT CAN KILL YOU!!!!!
Here is my install after performing the required connections
After crimping the proper spade connectors on, making the connections and ensuring everything was securely fastened, I added new zip-ties to keep all of the wires from moving around.
The last piece here, is to reinstall the cover.
Don't forget to admire Project Racecar in the background! Its ugly, but, its the heart that counts!!
Note, I left the cable long by design. This allows the cover to still be removed, and placed on the ground.
If, this long cable bothers you, you are free to cut your cable to a shorter length.
Testing
Letting the unit "Learn"
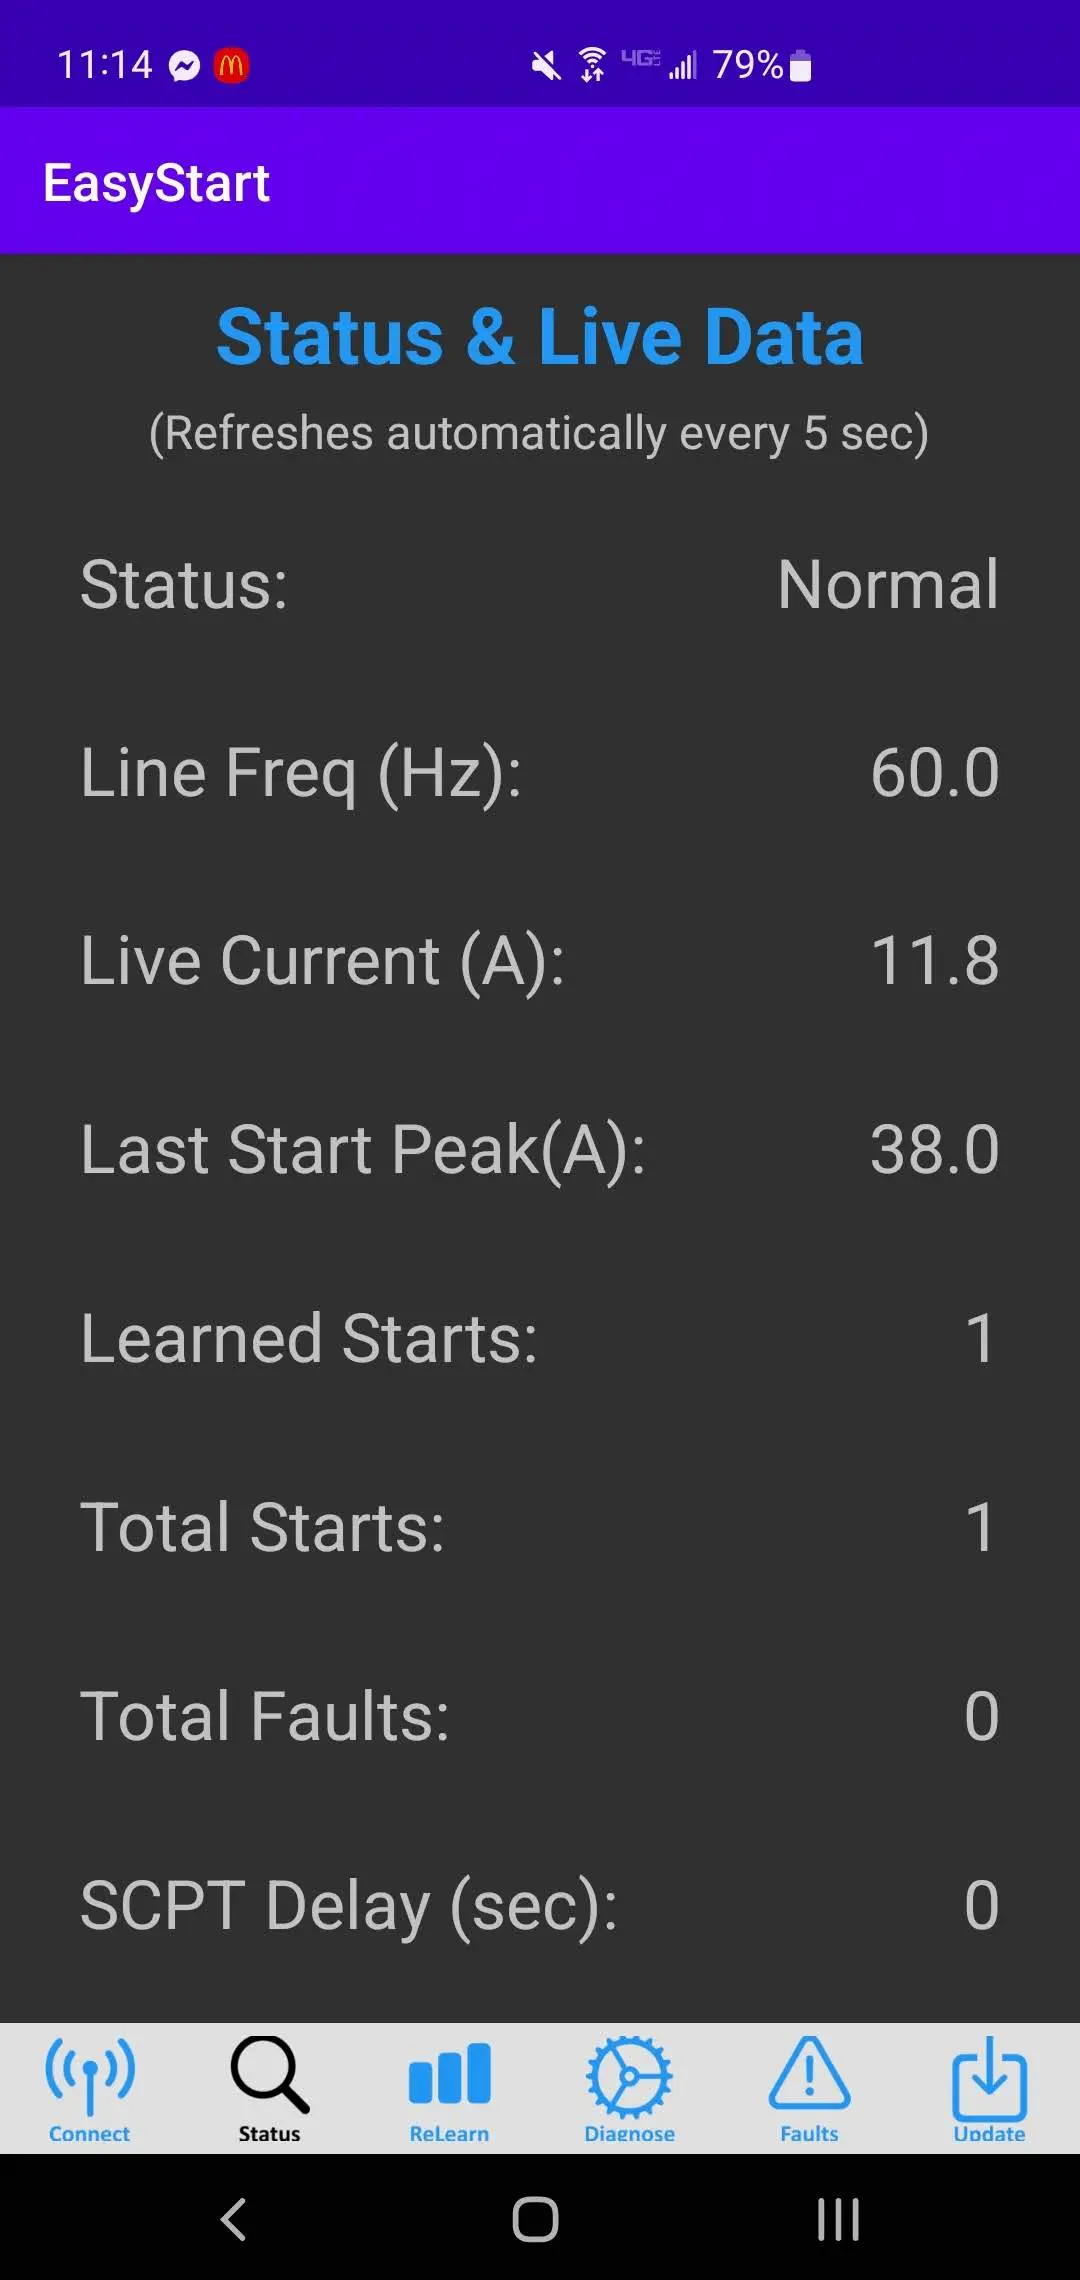
My unit recommends at least 5 starts while connected to the grid for the unit to "learn".
So, over the course of a few hours, I let the unit run normally while it collected data.
Start 1:
And- after letting the unit work normally for a while-
Start 7:
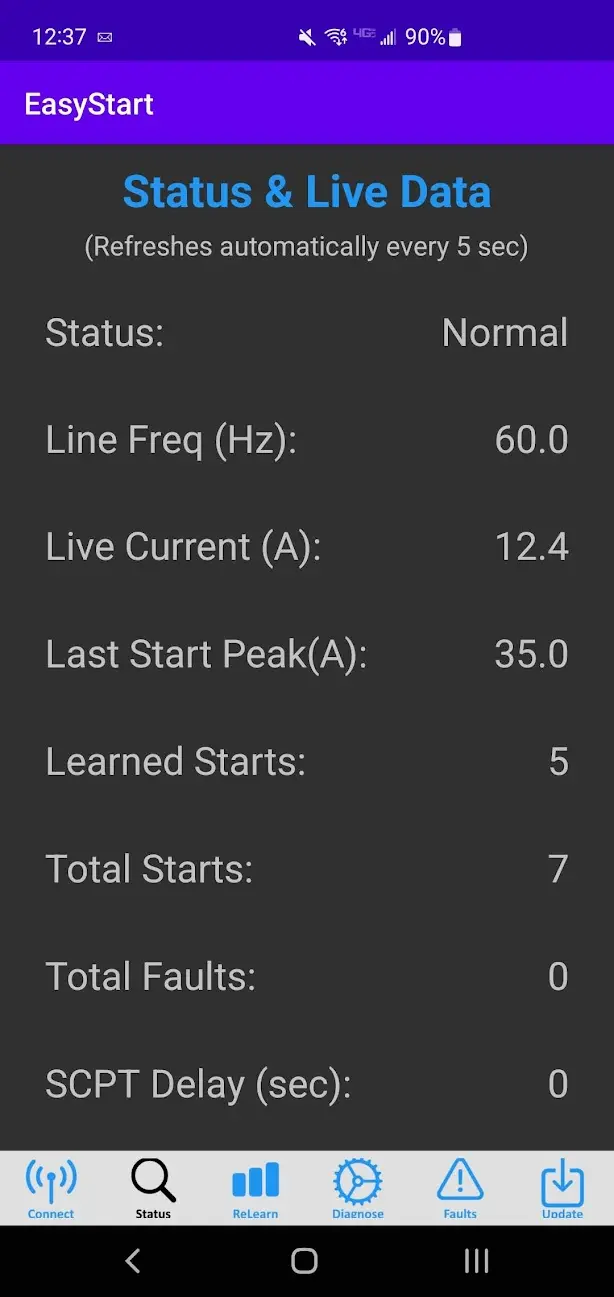
Compared to the nearly 80 amp start surge this unit was drawing before installing this unit, 35 amps is a massive improvement.
Since- the unit has now completed its recommended learning period, lets see if it works on solar!
Testing Off-Grid
The testing plan was pretty simple.
I flipped the grid disconnect breaker off. After doing this, my automatic transfer switch will shift all of the loads in my house to run on the inverter using a combination of battery power and solar energy.
Afterwards, I just needed to turn the A/C compressor on.
And- as you can see in my poorly edited video, it works!
Conclusion?
Overall, it took me around 45 minutes to install this unit. I took my time, and triple-checked all of the connections.
The installation process was easy, and the unit worked as expected with nothing else needed.
After letting the unit "learn" 5 starts, it had no issues at all starting up the compressor off-grid.
In addition to now being able to run my A/C compressor off-grid, this unit should also extend the lifetime of my compressor's motor due to a reduction in the startup surge.
How does this unit work?
After validating this unit did work as expected, and allowed me to run my A/C compressor on inverter alone- I was curious to know the specifics of how this unit worked.
So, I gave Micro-air a call and they were able to send over some documentation to help me answer a few questions.
How does this unit compare to installing a start-capacitor?
A start-capacitor will actually INCREASE the amperage during compressor startup, but, will reduce the amount of time it takes to start.
Terminology:
- Normal Start - This is referred to as an A/C compressor starting without the assistance of either a starting capacitor, or soft start module.
- Hard Start - This is when you are using a starting capacitor with your compressor motor.
- Soft Start - This refers to the Easystart soft start unit referenced in this article.
For the longer answer, here are a few relevant slides I obtained from Micro-air.
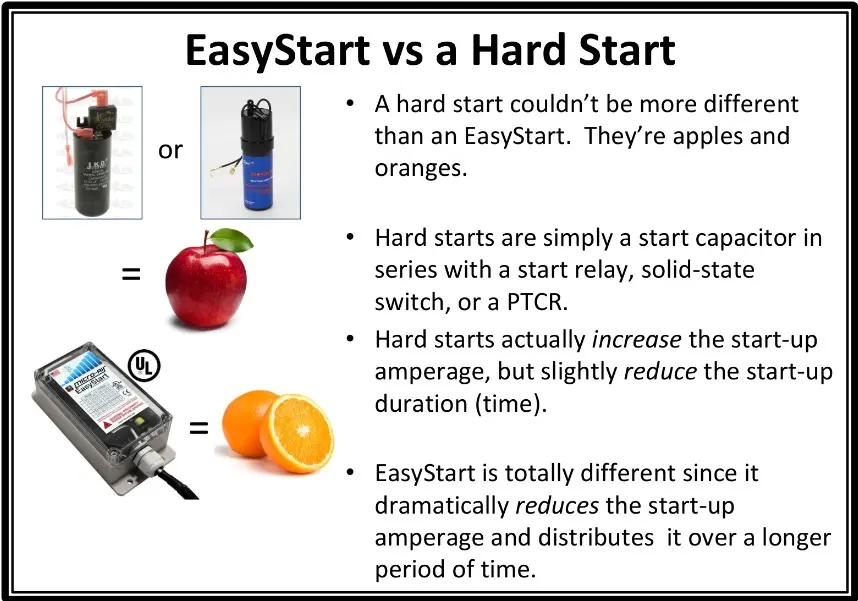
Here is a graphical representation of the various methods to start an A/C compressor.
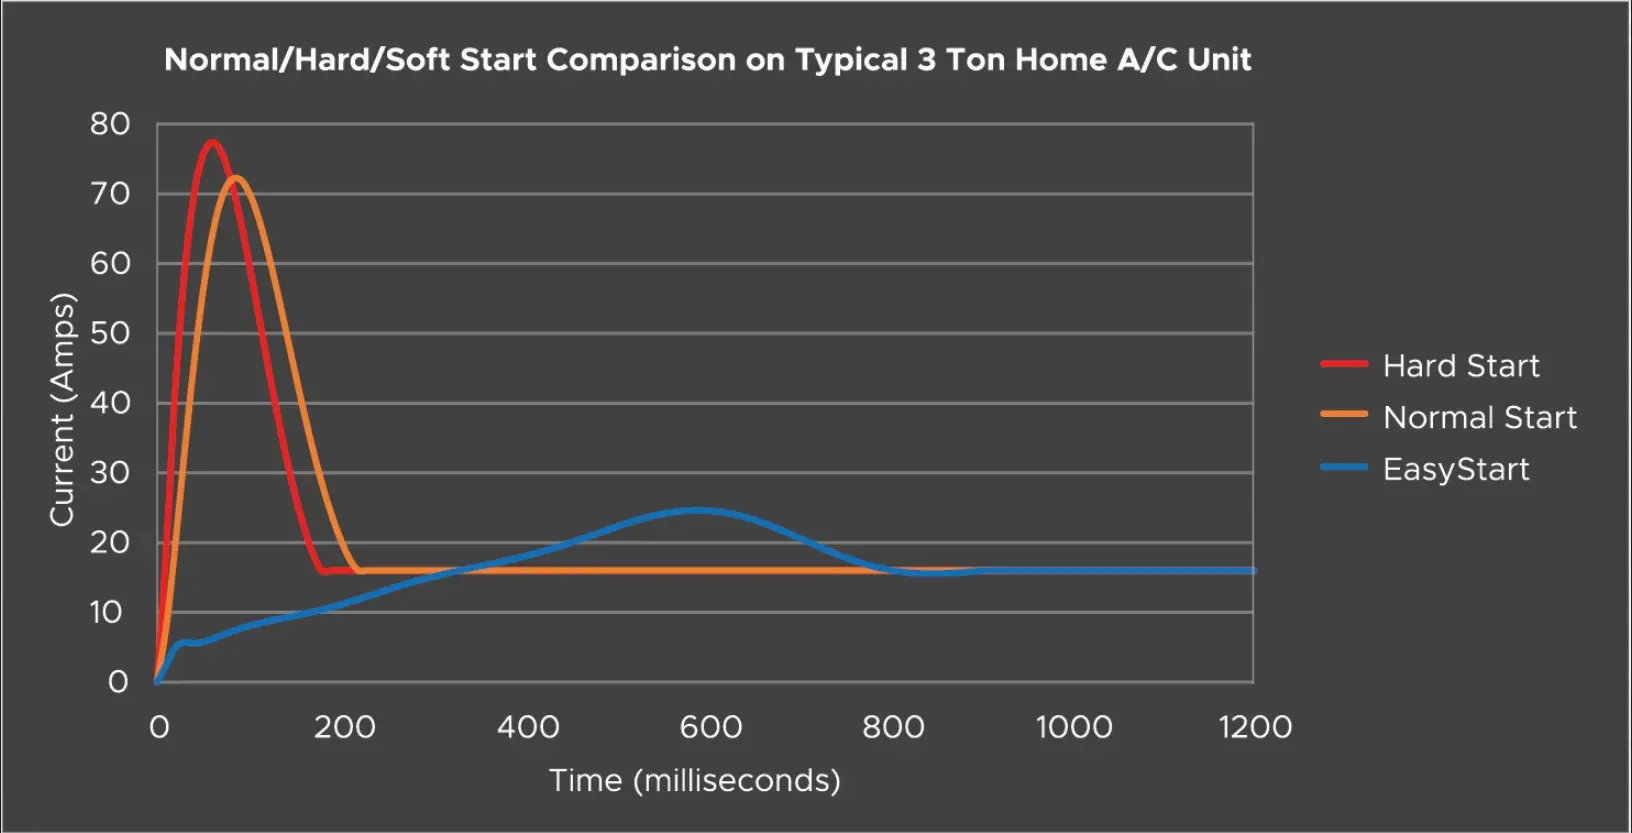
The gist of the above comparison- A start capacitor gives a bigger "kick" when starting the motor, to get it running faster. The easy-start unit causes the unit to start more slowly, with greatly reduced amperage.
What are some other benefits this unit can provide?
Using a few of the provided slides-
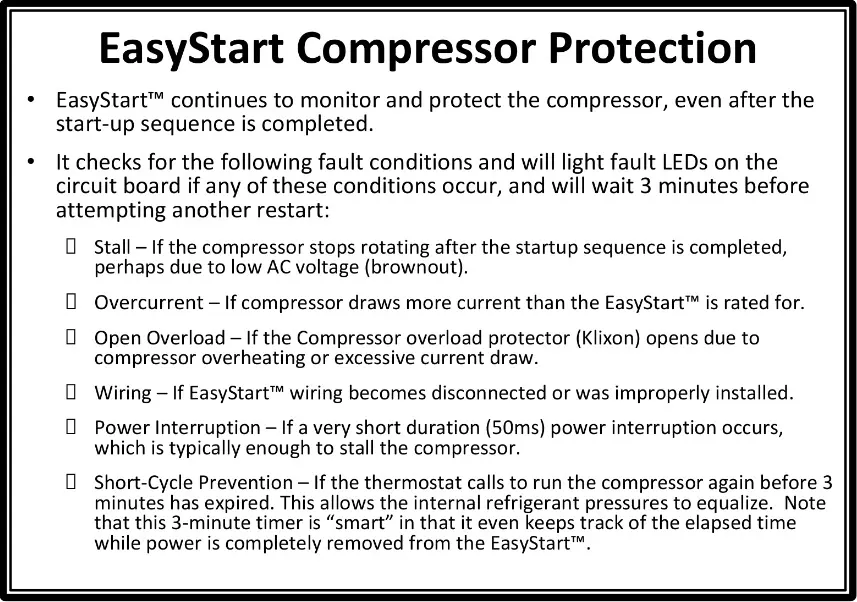
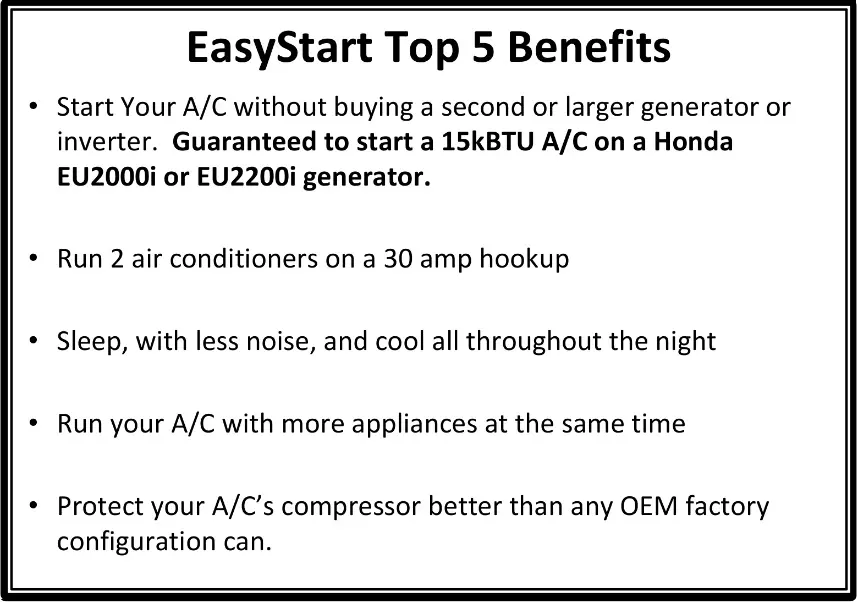
To summarize-
- Checks for many potential fault conditions, and offers protections for your A/C compressor.
- Built-in short-cycle protection. This will prevent your A/C compressor from being cycled too quickly. This can be handy if your thermostat / HVAC control board does not have short-cycle protection built-in. Short cycling your compressor can damage it.
- You will need a smaller generator/inverter to properly start your A/C compressor.
- This unit also provides bluetooth diagnostics. If you run into any issues, you can upload the diagnostics to Micro-air, and they will be happy to assist you with identifying and resolving the issue.
- No more dimming lights when your A/C kicks on.
Disclaimers
Not Sponsored
This post is not sponsored or affiliated by Micro-air, and I received no compensation for publishing this.
All hardware, time, and tools was provided and paid for out of my pocket.
Amazon Affiliate Links Used
This post DOES include Amazon affiliate links. If you found this content useful, please consider buying the products displayed using the provided links.
You will pay the same amount as normal, however, it does provide a small benefit to me. This benefit is usually used to purchase other products and hardware for which I can review / blog about.
I do not display advertisements on this site. As such, the only compensation from this service, comes from affiliate links. I do not ask for, or even accept donations.