433 Mhz Temp / Humidity Sensors
How to get started with 433mhz based automation and sensors.
This article, will provide the basic steps, for integrating 433mhz based sensors, using docker containers, and an RTL-SDR
Why I recommend 433mhz automation?
What are the benefits?
- Battery life is measured in years.
- Range is exceptionally well, and not strongly affected by interior walls.
- Update frequency is generally every 15-30 seconds.
- The sensors are cheap, and easy to get on-boarded.
- This solution is extremely reliable.
Lastly- it makes it very easy to create a dashboard showing the temp and humidity for every room inside your house.
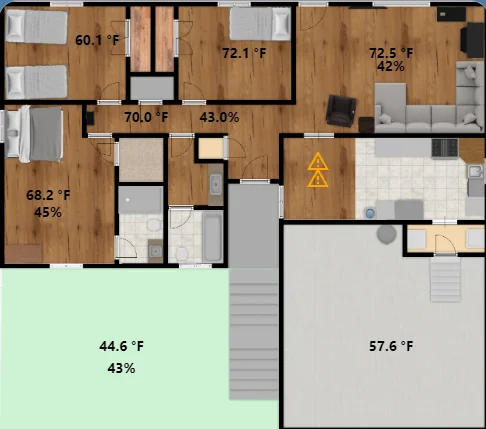
Note- all three of the above bedrooms, the livingroom, and outdoor sensors are 433mhz. The other various sensors are different technologies.
What are the downsides?
- You will need a dedicated RTL-SDR stick, and antenna (rabbit-ears are fine.).
- 433mhz has no security. Anybody in range, with the proper equipement can see the measurements.
- This- generally isn't a huge issue- as I don't too much care if others can see the various temp/humidity measurements from my property.
- The data has no personally identifable information. It looks like this:
{"time":"2022-11-19 16:49:55","model":"Acurite-Tower","id":14824,"channel":"C","battery_ok":1,"temperature_C":20.1,"humidity":45,"mic":"CHECKSUM"}
Required Hardware
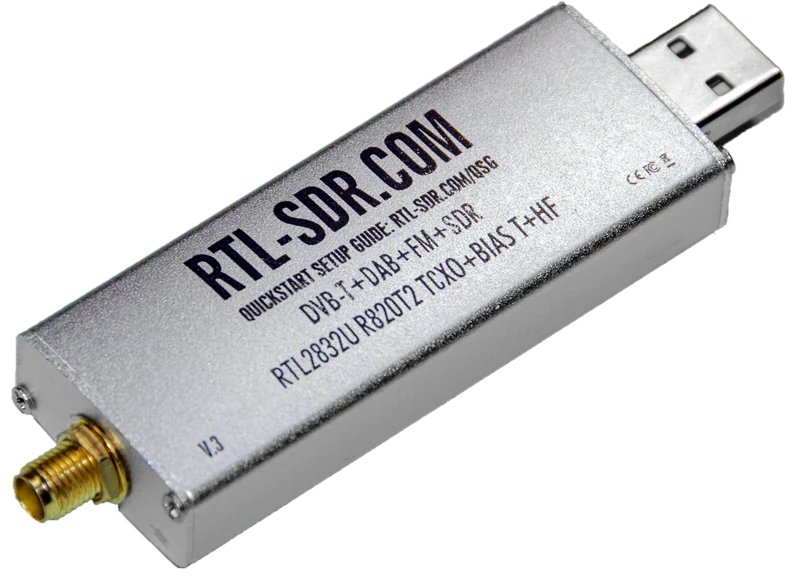
- RTL_SDR Radio – Around 20-40$
- I personally used the RTL-SDR v3 however, they do not appear to be for sale anymore.
- The NooElec NESDR Mini 2 appears to be pretty popular now, with an extremely reasonable price.
- 433mhz Sensors
- AcuRite 06002M Indoor / Outdoor Temp/Humidity Sensor
- These are my top pick
- AcuRite 606TX Indoor/Outdoor Temp Only
- Cheaper than the 06002M, however, only transmits temp. No humidity.
- AcuRite 00986M Fridge/Freezer Temp Only
- I use these to monitor my fridge/freeze temps.
- Includes a magnetic display you can put on your fridge.
- Only recommended for fridge/freezer monitoring. Does not work above 100F.
- AcuRite 06002M Indoor / Outdoor Temp/Humidity Sensor
Installing RTL_433
In order to convert the 433mhz message into MQTT messages, we will be leveraging the software, rtl_433.
Depending on your environment, there are a few ways to go about setting this up. I will detail kubernetes, docker-compose, and home-assistant.
This is the method I used for around two years to run rtl_433. Only recently did I switch everything over to Kubernetes.
  rtl_433:
    image: hertzg/rtl_433:master
    hostname: rtl_433
    container_name: rtl_433
    #command: '-Fmqtt://IP_OR_HOSTNAME_OF_MQTT_SERVER:MQTT_PORT,events=MQTT_TOPIC[/model][/id]'
    command: '-Fmqtt://mqtt:1883,events=rtl_433[/model][/id]'
    devices:
      - /dev/bus/usb
    ## Note, I Leverage cgroups to only pass through the specific RTL-433 stick.
    ## I have left this section commented out for ease of use.
    #device_cgroup_rules:
    #  - 'a 189:* rwm'
    volumes:
      - /etc/timezone:/etc/timezone:ro
      - /etc/localtime:/etc/localtime:ro
      - rtl_433:/etc/rtl_433
    labels:
      ## Enable watchtower automatic updates.
      com.centurylinklabs.watchtower.enable: true
    restart: unless-stopped
volumes:
  rtl_433:
    name: rtl_433
To note- I simplified the manifests to make this more accessible to new-comers.
# Create a namespace
kind: Namespace
apiVersion: v1
metadata:
  name: rtl_433
---
apiVersion: apps/v1
kind: StatefulSet
metadata:
  name: rtl-433
  namespace: rtl_433
spec:
  replicas: 1
  serviceName: rtl-433
  selector:
    matchLabels:
      app: rtl-433
  template:
    metadata:
      labels:
        app: rtl-433
    spec:
      volumes:
        ## Custom Configuration - Will need to uncomment to leverage a custom configuration.
        #- name: config
        #  configMap:
        #    name: rtl-config
        #    defaultMode: 420
        - name: usb
          hostPath:
            path: /dev/bus/usb
      containers:
        - name: rtl-433
          image: hertzg/rtl_433:master
          securityContext:
            privileged: true  # This is required to pass in the host path containing the USB devices.... At least until Kubernetes has an easier way to do device passthrough.
          args:
            - '-Fmqtt://mqtt:1883,events=rtl_433[/model][/id]'    # NOTE- Replace mqtt:1883 with the IP/Hostname, and port of your MQTT server.
          volumeMounts:
            ## If you want to pass through a custom configuration, you will need to uncomment these lines.
            #- name: config
            #  mountPath: /etc/rtl-433
            - mountPath: /dev/bus/usb
              name: usb
      nodeSelector:
        # Requires rtl stick. (See below comments.)
        #feature.node.kubernetes.io/custom-rtl: 'true'
feature.node.kubernetes.io/custom-rtl, the line is commented out because I cannot assume everyone runs Node Feature Discovery (NFD).
As such- I left the required label commented. If however- you need an example as to how my values.yaml are configured for the RTL-SDR stick- here is an excerp from my values.yaml used by the helm chart.
I would highly recommend using NFD.
  worker:
    config:
      sources:
        custom:
        - name: "rtl" # RTL2838 radio dongel
          matchOn:
            - usbId:
                vendor: ["0bda"]
                device: ["2838"]
If you wish to pass through a custom configuration file, you will need to uncomment the lines in the above manifest under volumes, and volume mounts. See the Example RTL_433 configuration file
kind: ConfigMap
apiVersion: v1
metadata:
  name: rtl-config
  namespace: rtl_sdr
data:
  rtl_433.conf: >
    # config for rtl_433

    # A valid config line is a keyword followed by an argument to the end of line.
    # Whitespace around the keyword is ignored, whitespace is space and tab
    # Comments start with a hash sign, no inline comments, empty lines are ok.
    #
    # Boolean options can be true/false, yes/no, on/off, enable/disable, or 1/0
    #
    # All options will be applied in the order given, overwriting previous values
    #
    # Config files can be nested/stacked (use multiple -c and config_file = ).
    #
    # If no -c option is given the first found of this list will be loaded:
    # - ./rtl_433.conf
    # - ~/.config/rtl_433/rtl_433.conf
    # - /usr/local/etc/rtl_433.conf
    # - /etc/rtl_433.conf

    ## General options

    # as command line option:
    #   [-v] Increase verbosity (can be used multiple times).
    #        -v : verbose, -vv : verbose decoders, -vvv : debug decoders, -vvvv : trace decoding).
    # 0 = normal, 1 = verbose, 2 = verbose decoders, 3 = debug decoders, 4 = trace decoding
    #verbose

    # as command line option:
    #   [-c <path>] Read config options from a file
    #config_file
    ## Rest of this file is truncated. Please see the example file linked above.
I will note, there are two versions, one with auto-discovery, and one without.
I personally, recommend not using auto-discovery, unless you don't mind having entities created for each tire on every other car driving down the road.
Tire pressure sensors typically leverage 433mhz to transmit information. If you live in a busy area- this can generate a lot of entities.
To note, I do not use this method, However- I have assisted multiple people with executing this method, and it works flawlessly.
Validate RTL_433 is working properly
Regardless of the above method utilized to install your rtl_433 container- you should connect to your MQTT broker, and verify the data is being properly received.
I personally use MQTT Explorer to view my broker. Its small, simple, and fast.
After connecting to your broker, you should see a topic named, "rtl_433"
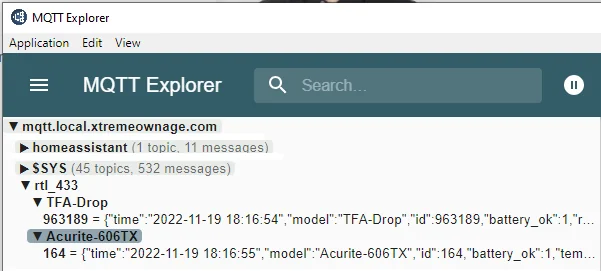
Note- the above image was edited to remove non-relavent topics to protect my privacy
If, you can see data coming into the topic- you are ready to move to the next section.
However- if you cannot see data, I would recommend looking at the container's logs.
Configuring Home Assistant
Next up, we need to configure the sensors for home-assistant. Depending on the method you went with (docker,kubernetes,add-on), this section will be slightly different for you.
This is because with the docker-compose / kubernetes route, I specified a custom format, which I believe was more suitable for this data.
Common Configuration
Added 2026. Please see Acurite Discovery Blueprint for an easy button to add acurite sensors to your home assistant instance.
Common Configuration (OLD Method)
Info
This information has been superseded by the above setup blueprint/script. However, I am retaining this information here.
If you are like me, you will wind up having a ton of sensors. I personally didn't want to bloat home-assistant's configuration.yml, So, for this example, we will leverage YAML's ability to include another file.
The format and configuration is the same between the above Docker and Kubernetes deployments.
Example Events, in JSON Format
Acurite Tower - Example Event
{"time":"2022-11-19 18:33:51","model":"Acurite-Tower","id":2888,"channel":"B","battery_ok":1,"temperature_C":22.4,"humidity":42,"mic":"CHECKSUM"}
Acurite 606TX - Example Event (Note, no humidity)
{"time":"2022-11-19 18:33:58","model":"Acurite-606TX","id":164,"battery_ok":1,"temperature_C":22.9,"mic":"CHECKSUM"}
First- we need to define the temp and humidity sensors.
  ## 6731 = Back Porch
  - name: back_porch_temp                                 # Set your preferred name here.
    state_topic: "rtl_433/Acurite-Tower/6731"             # This needs to match the path as seen in your MQTT server.
    json_attributes_topic: "rtl_433/Acurite-Tower/6731"   # This, should match the state_topic above.
    value_template: "{{ value_json.temperature_C }}"      # This should match the json attribute containing your temperature.
    device_class: temperature
    unique_id: 6731_temp                                  # This value needs to be unique PER sensor.
    unit_of_measurement: '°C'                             # This needs to match the measurement as seen in your MQTT events. You change your performance preference within Home-Assistant's GUI.
    expire_after: 600                                     # After 10 minutes of no-data, report as unavailable.

  - name: back_porch_humidity
    state_topic: "rtl_433/Acurite-Tower/6731"
    json_attributes_topic: "rtl_433/Acurite-Tower/6731"
    value_template: "{{ value_json.humidity }}"
    device_class: humidity
    unique_id: 6731_humidity
    unit_of_measurement: '%'                               # '%' is the unit of measurement for humidity.
    expire_after: 600


  ## Note- if you have the Acurite-606TX, you will only define a sensor for temperature.
  - name: random_temp
    state_topic: "rtl_433/Acurite-606TX/14"
    json_attributes_topic: "rtl_433/Acurite-606TX/14"
    value_template: "{{ value_json.temperature_C }}"
    device_class: temperature
    unique_id: 14_temp
    unit_of_measurement: '°C'
    expire_after: 600
The Acurite sensors report battery information back as "battery_ok", with a value of 1 for yes, or 0 for no. We will
- name: back_porch_battery_ok                               # Unique name for this sensor
  state_topic: "rtl_433/Acurite-Tower/6731"                 # Needs to match the json topic name
  json_attributes_topic: "rtl_433/Acurite-Tower/6731"       # Needs to match the json topic name
  value_template: "{{ value_json.battery_ok }}"
  payload_off: 0
  payload_on: 1
  unique_id: 6731_battery                                   # Unique value for this sensor.
And- thats it.
Since I leverage JSON format when using either the Docker or Kubernetes deployment, and the home-assistant addon does not- we will need to do our configuration slightly different.
Since-I do not leverage this method- I do not have any example events to share.
- name: Outdoor Temperature                                                           # Friendly name for your sensor
  state_topic: "rtl_433/74930c0d-rtl433/devices/Acurite-Tower/A/2415/temperature_C"   # This needs to match the state topic containing the temp.
  device_class: temperature
  object_id: outdoortemp_temp                                                         # Needs to be unique
  unique_id: outdoortemp_temp                                                         # Needs to be unique
  unit_of_measurement: "°C"
  expire_after: 600
- name: Outdoor Humidity
  state_topic: "rtl_433/74930c0d-rtl433/devices/Acurite-Tower/A/2415/humidity"        # This needs to match the state topic containing the humidity.
  device_class: humidity
  object_id: outdoorhum_temp
  unique_id: outdoorhum_temp
  unit_of_measurement: '%'
  expire_after: 600
The Acurite sensors report battery information back as "battery_ok", with a value of 1 for yes, or 0 for no. We will
- unique_id: garagefreezer_battery_ok                                                # Must be a unique name.
  state_topic: "rtl_433/74930c0d-rtl433/devices/Acurite-986/1R/49691/battery_ok"     # This needs to match the state topic for "battery_ok"
  name: Garage Freezer Battery                                                       # Put a friendly name here.
  device_class: battery
  payload_off: 1
  payload_on: 0
Conclusion
At this point, you are all done. After restarting home assistant, or reloading its MQTT configuration- you should have working sensors within Home-Assistant.
History
This post was migrated from my Wordpress Site. The original post was written in Jan, 2021.
Since creating the orignal post, all of my sensors have been working flawlessly.
I did- however, leave out the section on the Sonoff RM433, as I have not found it very useful.
You may also want to check out the original Fridge / Freezer Monitoring Post for more information.