Home Assistant - 433mhz Automation
Objective
Info
This post was originally published in 2021, and has been adopted to this static-site from wordpress.
The object of this article, is to provide simple instructions on how to get started with 433mhz based automation and sensors.
This article will provide basic steps for the integration of a 433mhz based temp sensor, and remote control.
Hardware utilized in this article
- RTL_SDR Radio - Around 30-40$
- RTL-SDR v3
- Note- there are many options to choose from. If you watch to search yourself- look for "RTL-SDR"
- Note- make sure it comes with an antenna! Otherwise, you will need to pick up one!
- AcuRite Temp and Humidity Sensor
- SONOFF RM433 Remote Controller
- Directly from iTead
- SOMETHING to run docker containers on. I personally use unraid to run my containers. However- you can also run docker containers from home assistant with the portainer addon.
To note- this is the exact radio I purchased. However- it is now unavailable.
Implementation
To note- I started writing this post 3 months ago. My original implementation was based on a d1 mini, using ESP Home, with a RXB6 receiver. With my testing- I was unable to get consistent results utilizing the Remote Receiver component. Thus- I dropped the project until a few days ago.
After acquiring the new RTL-SDR radio, I mounted the rabbit-ears antenna in my server closet, and plugged the device into an available usb socket on my unraid server.
From here- I did a bit of research, and determined the best route to take, involved utilizing the rtl_433 github repository. Out of the box- it already supported all of the 433mhz devices I had laying around... so- the first step, was to determine how to get it running.
Step 1. Running RTL_433 via Docker
Over on unraid, I configured a new docker container, with the following settings:
- Name: rtl_433_mqtt (This part, can be whatever you wish to identify it as...)
- Repository: hertzg/rtl_433
- Post Arguments: -Fmqtt://mqtt.xtremeownage.com:1883 (Replace this, with the DNS/IP:PORT of your MQTT server.
- I mapped device /dev/bus/usb/005/002 to this container. To find the path to your device, you can utilize "lsusb". Note- in the below screenshot- bus 005, Device 002. Notice in the path above- 005/002.
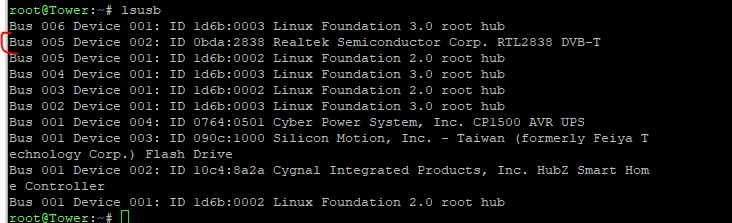
LSUSB output showing the USB RTL-SDR device
- I mapped /etc/rtl_433 to /mnt/user/appdata/rtl_433 on my host, to allow me to customize the configuration.
For more information on how to configure the docker container, please visit its home page HERE.
Next up- by default, the configuration for the RM433 remote, is not enabled by default.
Assuming you followed my steps above, and mapped your containers /etc/rtl_433 to a shared path-
Visit https://github.com/merbanan/rtl_433/tree/master/conf, and download sonoff_rm433.conf and place this into your configuration directory for rtl_433.
Also- we will need a configuration file telling the software to load this module. For this, I downloaded rtl_433.example.conf, and placed into my configuration directory. I had to comment out a few of the protocols, and add a line to the bottom, telling the software to load the rm_433 module.
MANY other configuration parameters, and guides/resources for rtl_433, can be found on it's github page HERE, OR, their website HERE If you run into any issues, I would look there first!
Below are my exact configuration files, and contents of my configuration directory.
# config for rtl_433

# A valid config line is a keyword followed by an argument to the end of line.
# Whitespace around the keyword is ignored, whitespace is space and tab
# Comments start with a hash sign, no inline comments, empty lines are ok.
#
# Boolean options can be true/false, yes/no, on/off, enable/disable, or 1/0
#
# All options will be applied in the order given, overwritting previous values
#
# Config files can be nested/stacked (use multiple -c and config_file = ).
#
# If no -c option is given the first found of this list will be loaded:
# - ./rtl_433.conf
# - ~/.config/rtl_433/rtl_433.conf
# - /usr/local/etc/rtl_433.conf
# - /etc/rtl_433.conf

## General options

# as command line option:
#   [-v] Increase verbosity (can be used multiple times).
#        -v : verbose, -vv : verbose decoders, -vvv : debug decoders, -vvvv : trace decoding).
# 0 = normal, 1 = verbose, 2 = verbose decoders, 3 = debug decoders, 4 = trace decoding
#verbose

# as command line option:
#   [-c <path>] Read config options from a file
#config_file

## Tuner options

# as command line option:
#   [-d <RTL-SDR USB device index>] (default: 0)
#   [-d :<RTL-SDR USB device serial (can be set with rtl_eeprom -s)>]
#   [-d "" Open default SoapySDR device
#   [-d driver=rtlsdr Open e.g. specific SoapySDR device
# default is "0" (RTL-SDR) or "" (SoapySDR)
device        0

# as command line option:
#   [-g <gain>] (default: 0 for auto)
# For RTL-SDR: gain in tenths of dB ("0" is auto).
# For SoapySDR: gain in dB for automatic distribution ("" is auto), or string of gain elements.
# E.g. "LNA=20,TIA=8,PGA=2" for LimeSDR.
gain          0

# as command line option:
#   [-t <settings>] apply a list of keyword=value settings for SoapySDR devices
# E.g. "antenna=A,bandwidth=4.5M,rfnotch_ctrl=false"
#settings      antenna=A,bandwidth=4.5M

# as command line option:
#   [-f <frequency>] [-f...] Receive frequency(s) (default: 433920000 Hz)
# default is "433.92M", other resonable values are 315M, 345M, 915M and 868M
frequency     433.92M

# as command line option:
#   [-H <seconds>] Hop interval for polling of multiple frequencies (default: 600 seconds)
# default is "600" seconds, only used when multiple frequencies are given
hop_interval  600

# as command line option:
#   [-p <ppm_error] Correct rtl-sdr tuner frequency offset error (default: 0)
# default is "0"
ppm_error     0

# as command line option:
#   [-s <sample rate>] Set sample rate (default: 250000 Hz)
# default is "250k", other valid settings are 1024k, 2048k, 3200k
sample_rate   250k

## Demodulator options

# as command line option:
#   [-R <device>] Enable only the specified device decoding protocol (can be used multiple times)
# see "protocol" section below.

# as command line option:
#   [-G] Enable blacklisted device decoding protocols, for testing only.
#register_all false

# as command line option:
#   [-X <spec> | help] Add a general purpose decoder (prepend -R 0 to disable all decoders)
# see "decoder" section below.

# as command line option:
#   [-Y level=<dB level>] Manual detection level used to determine pulses (-1.0 to -30.0) (0=auto)
#pulse_detect level=0

# as command line option:
#   [-Y auto | classic | minmax] FSK pulse detector mode.
#pulse_detect auto

# as command line option:
#   [-n <value>] Specify number of samples to take (each sample is 2 bytes: 1 each of I & Q)
samples_to_read 0

## Analyze/Debug options

# as command line option:
#   [-a] Analyze mode. Print a textual description of the signal. Disables decoding
#analyze false

# as command line option:
#   [-A] Pulse Analyzer. Enable pulse analysis and decode attempt
analyze_pulses false

# as command line option:
#   [-b] Out block size: 262144 (default)
#out_block_size

# as command line option:
#   [-M time[:<options>]|protocol|level|stats|bits|oldmodel] Add various metadata to every output line.
# Use "time" to add current date and time meta data (preset for live inputs).
# Use "time:rel" to add sample position meta data (preset for read-file and stdin).
# Use "time:unix" to show the seconds since unix epoch as time meta data.
# Use "time:iso" to show the time with ISO-8601 format (YYYY-MM-DD"T"hh:mm:ss).
# Use "time:off" to remove time meta data.
# Use "time:usec" to add microseconds to date time meta data.
# Use "time:utc" to output time in UTC.
#   (this may also be accomplished by invocation with TZ environment variable set).
#   "usec" and "utc" can be combined with other options, eg. "time:unix:utc:usec".
# Use "protocol" / "noprotocol" to output the decoder protocol number meta data.
# Use "level" to add Modulation, Frequency, RSSI, SNR, and Noise meta data.
# Use "stats[:[<level>][:<interval>]]" to report statistics (default: 600 seconds).
#   level 0: no report, 1: report successful devices, 2: report active devices, 3: report all
# Use "oldmodel" to use to old model keys. This will be removed shortly.
report_meta level
report_meta stats
report_meta time:usec
report_meta protocol

# as command line option:
#   [-y <code>] Verify decoding of demodulated test data (e.g. "{25}fb2dd58") with enabled devices
#test_data {25}fb2dd58

## File I/O options

# as command line option:
#   [-S none|all|unknown|known] Signal auto save. Creates one file per signal.
#     Note: Saves raw I/Q samples (uint8 pcm, 2 channel). Preferred mode for generating test files.
signal_grabber none

# as command line option:
#   [-r <filename>] Read data from input file instead of a receiver
#read_file FILENAME.cu8

# as command line option:
#   [-w <filename>] Save data stream to output file (a '-' dumps samples to stdout)
#write_file FILENAME.cu8

# as command line option:
#   [-W <filename>] Save data stream to output file, overwrite existing file
#overwrite_file FILENAME.cu8

## Data output options

# as command line option:
#   [-F kv|json|csv|mqtt|syslog|null] Produce decoded output in given format.
#     Without this option the default is KV output. Use "-F null" to remove the default.
#     Append output to file with :<filename> (e.g. -F csv:log.csv), defaults to stdout.
#     Specify MQTT server with e.g. -F mqtt://localhost:1883
#     Add MQTT options with e.g. -F "mqtt://host:1883,opt=arg"
#     MQTT options are: user=foo, pass=bar, retain[=0|1], <format>[=topic]
#     Supported MQTT formats: (default is all)
#       events: posts JSON event data
#       states: posts JSON state data
#       devices: posts device and sensor info in nested topics
#     The topic string will expand keys like [/model]
#     E.g. -F "mqtt://localhost:1883,user=USERNAME,pass=PASSWORD,retain=0,devices=rtl_433[/id]"
#     Specify host/port for syslog with e.g. -F syslog:127.0.0.1:1514
# default is "kv", multiple outputs can be used.
output json

# as command line option:
#   [-C] native|si|customary Convert units in decoded output.
# default is "native"
convert si

# as command line option:
#   [-T] specify number of seconds to run
#duration 0

# as command line option:
#   [-E] Stop after outputting successful event(s)
stop_after_successful_events false

## Protocols to enable (command line option "-R")

  protocol 1   # Silvercrest Remote Control
  protocol 2   # Rubicson Temperature Sensor
  protocol 3   # Prologue, FreeTec NC-7104, NC-7159-675 temperature sensor
  protocol 4   # Waveman Switch Transmitter
# protocol 6   # ELV EM 1000
# protocol 7   # ELV WS 2000
  protocol 8   # LaCrosse TX Temperature / Humidity Sensor
# protocol 10  # Acurite 896 Rain Gauge
  protocol 11  # Acurite 609TXC Temperature and Humidity Sensor
  protocol 12  # Oregon Scientific Weather Sensor
# protocol 13  # Mebus 433
# protocol 14  # Intertechno 433
  protocol 15  # KlikAanKlikUit Wireless Switch
  protocol 16  # AlectoV1 Weather Sensor (Alecto WS3500 WS4500 Ventus W155/W044 Oregon)
  protocol 17  # Cardin S466-TX2
  protocol 18  # Fine Offset Electronics, WH2, WH5, Telldus Temperature/Humidity/Rain Sensor
  protocol 19  # Nexus, FreeTec NC-7345, NX-3980, Solight TE82S, TFA 30.3209 temperature/humidity sensor
  protocol 20  # Ambient Weather, TFA 30.3208.02 temperature sensor
  protocol 21  # Calibeur RF-104 Sensor
# protocol 22  # X10 RF
  protocol 23  # DSC Security Contact
# protocol 24  # Brennenstuhl RCS 2044
  protocol 25  # Globaltronics GT-WT-02 Sensor
  protocol 26  # Danfoss CFR Thermostat
  protocol 29  # Chuango Security Technology
  protocol 30  # Generic Remote SC226x EV1527
  protocol 31  # TFA-Twin-Plus-30.3049, Conrad KW9010, Ea2 BL999
  protocol 32  # Fine Offset Electronics WH1080/WH3080 Weather Station
  protocol 33  # WT450, WT260H, WT405H
  protocol 34  # LaCrosse WS-2310 / WS-3600 Weather Station
  protocol 35  # Esperanza EWS
  protocol 36  # Efergy e2 classic
# protocol 37  # Inovalley kw9015b, TFA Dostmann 30.3161 (Rain and temperature sensor)
  protocol 38  # Generic temperature sensor 1
  protocol 39  # WG-PB12V1 Temperature Sensor
  protocol 40  # Acurite 592TXR Temp/Humidity, 5n1 Weather Station, 6045 Lightning, 3N1, Atlas
  protocol 41  # Acurite 986 Refrigerator / Freezer Thermometer
  protocol 42  # HIDEKI TS04 Temperature, Humidity, Wind and Rain Sensor
  protocol 43  # Watchman Sonic / Apollo Ultrasonic / Beckett Rocket oil tank monitor
  protocol 44  # CurrentCost Current Sensor
  protocol 45  # emonTx OpenEnergyMonitor
  protocol 46  # HT680 Remote control
  protocol 47  # Conrad S3318P, FreeTec NC-5849-913 temperature humidity sensor
  protocol 48  # Akhan 100F14 remote keyless entry
  protocol 49  # Quhwa
  protocol 50  # OSv1 Temperature Sensor
  protocol 51  # Proove / Nexa / KlikAanKlikUit Wireless Switch
  protocol 52  # Bresser Thermo-/Hygro-Sensor 3CH
  protocol 53  # Springfield Temperature and Soil Moisture
  protocol 54  # Oregon Scientific SL109H Remote Thermal Hygro Sensor
  protocol 55  # Acurite 606TX Temperature Sensor
  protocol 56  # TFA pool temperature sensor
  protocol 57  # Kedsum Temperature & Humidity Sensor, Pearl NC-7415
  protocol 58  # Blyss DC5-UK-WH
  protocol 59  # Steelmate TPMS
  protocol 60  # Schrader TPMS
# protocol 61  # LightwaveRF
# protocol 62  # Elro DB286A Doorbell
  protocol 63  # Efergy Optical
# protocol 64  # Honda Car Key
  protocol 67  # Radiohead ASK
  protocol 68  # Kerui PIR / Contact Sensor
  protocol 69  # Fine Offset WH1050 Weather Station
  protocol 70  # Honeywell Door/Window Sensor, 2Gig DW10/DW11, RE208 repeater
  protocol 71  # Maverick ET-732/733 BBQ Sensor
# protocol 72  # RF-tech
  protocol 73  # LaCrosse TX141-Bv2, TX141TH-Bv2, TX141-Bv3, TX141W, TX145wsdth sensor
  protocol 74  # Acurite 00275rm,00276rm Temp/Humidity with optional probe
  protocol 75  # LaCrosse TX35DTH-IT, TFA Dostmann 30.3155 Temperature/Humidity sensor
  protocol 76  # LaCrosse TX29IT, TFA Dostmann 30.3159.IT Temperature sensor
  protocol 77  # Vaillant calorMatic VRT340f Central Heating Control
  protocol 78  # Fine Offset Electronics, WH25, WH32B, WH24, WH65B, HP1000 Temperature/Humidity/Pressure Sensor
  protocol 79  # Fine Offset Electronics, WH0530 Temperature/Rain Sensor
  protocol 80  # IBIS beacon
  protocol 81  # Oil Ultrasonic STANDARD FSK
  protocol 82  # Citroen TPMS
  protocol 83  # Oil Ultrasonic STANDARD ASK
  protocol 84  # Thermopro TP11 Thermometer
  protocol 85  # Solight TE44/TE66, EMOS E0107T, NX-6876-917
  protocol 86  # Wireless Smoke and Heat Detector GS 558
  protocol 87  # Generic wireless motion sensor
  protocol 88  # Toyota TPMS
  protocol 89  # Ford TPMS
  protocol 90  # Renault TPMS
  protocol 91  # inFactory, nor-tec, FreeTec NC-3982-913 temperature humidity sensor
  protocol 92  # FT-004-B Temperature Sensor
  protocol 93  # Ford Car Key
  protocol 94  # Philips outdoor temperature sensor (type AJ3650)
  protocol 95  # Schrader TPMS EG53MA4, PA66GF35
  protocol 96  # Nexa
  protocol 97  # Thermopro TP08/TP12/TP20 thermometer
  protocol 98  # GE Color Effects
  protocol 99  # X10 Security
  protocol 100 # Interlogix GE UTC Security Devices
# protocol 101 # Dish remote 6.3
  protocol 102 # SimpliSafe Home Security System (May require disabling automatic gain for KeyPad decodes)
  protocol 103 # Sensible Living Mini-Plant Moisture Sensor
  protocol 104 # Wireless M-Bus, Mode C&T, 100kbps (-f 868950000 -s 1200000)
  protocol 105 # Wireless M-Bus, Mode S, 32.768kbps (-f 868300000 -s 1000000)
# protocol 106 # Wireless M-Bus, Mode R, 4.8kbps (-f 868330000)
# protocol 107 # Wireless M-Bus, Mode F, 2.4kbps
  protocol 108 # Hyundai WS SENZOR Remote Temperature Sensor
  protocol 109 # WT0124 Pool Thermometer
  protocol 110 # PMV-107J (Toyota) TPMS
  protocol 111 # Emos TTX201 Temperature Sensor
  protocol 112 # Ambient Weather TX-8300 Temperature/Humidity Sensor
  protocol 113 # Ambient Weather WH31E Thermo-Hygrometer Sensor, EcoWitt WH40 rain gauge
  protocol 114 # Maverick et73
  protocol 115 # Honeywell ActivLink, Wireless Doorbell
  protocol 116 # Honeywell ActivLink, Wireless Doorbell (FSK)
# protocol 117 # ESA1000 / ESA2000 Energy Monitor
# protocol 118 # Biltema rain gauge
  protocol 119 # Bresser Weather Center 5-in-1
# protocol 120 # Digitech XC-0324 temperature sensor
  protocol 121 # Opus/Imagintronix XT300 Soil Moisture
# protocol 122 # FS20
# protocol 123 # Jansite TPMS Model TY02S
  protocol 124 # LaCrosse/ELV/Conrad WS7000/WS2500 weather sensors
  protocol 125 # TS-FT002 Wireless Ultrasonic Tank Liquid Level Meter With Temperature Sensor
  protocol 126 # Companion WTR001 Temperature Sensor
  protocol 127 # Ecowitt Wireless Outdoor Thermometer WH53/WH0280/WH0281A
  protocol 128 # DirecTV RC66RX Remote Control
# protocol 129 # Eurochron temperature and humidity sensor
  protocol 130 # IKEA Sparsnas Energy Meter Monitor
  protocol 131 # Microchip HCS200 KeeLoq Hopping Encoder based remotes
  protocol 132 # TFA Dostmann 30.3196 T/H outdoor sensor
  protocol 133 # Rubicson 48659 Thermometer
  protocol 134 # Holman Industries iWeather WS5029 weather station (newer PCM)
  protocol 135 # Philips outdoor temperature sensor (type AJ7010)
  protocol 136 # ESIC EMT7110 power meter
  protocol 137 # Globaltronics QUIGG GT-TMBBQ-05
  protocol 138 # Globaltronics GT-WT-03 Sensor
  protocol 139 # Norgo NGE101
  protocol 140 # Elantra2012 TPMS
  protocol 141 # Auriol HG02832, HG05124A-DCF, Rubicson 48957 temperature/humidity sensor
  protocol 142 # Fine Offset Electronics/ECOWITT WH51 Soil Moisture Sensor
  protocol 143 # Holman Industries iWeather WS5029 weather station (older PWM)
  protocol 144 # TBH weather sensor
  protocol 145 # WS2032 weather station
  protocol 146 # Auriol AFW2A1 temperature/humidity sensor
  protocol 147 # TFA Drop Rain Gauge 30.3233.01
  protocol 148 # DSC Security Contact (WS4945)
  protocol 149 # ERT Standard Consumption Message (SCM)
# protocol 150 # Klimalogg
  protocol 151 # Visonic powercode
  protocol 152 # Eurochron EFTH-800 temperature and humidity sensor
  protocol 153 # Cotech 36-7959 wireless weather station with USB
  protocol 154 # Standard Consumption Message Plus (SCMplus)
  protocol 155 # Fine Offset Electronics WH1080/WH3080 Weather Station (FSK)
  protocol 156 # Abarth 124 Spider TPMS
  protocol 157 # Missil ML0757 weather station
  protocol 158 # Sharp SPC775 weather station
  protocol 159 # Insteon
  protocol 160 # ERT Interval Data Message (IDM)
  protocol 161 # ERT Interval Data Message (IDM) for Net Meters
# protocol 162 # ThermoPro-TX2 temperature sensor
  protocol 163 # Acurite 590TX Temperature with optional Humidity
  protocol 164 # Security+ 2.0 (Keyfob)
  protocol 165 # TFA Dostmann 30.3221.02 T/H Outdoor Sensor
  protocol 166 # LaCrosse Technology View LTV-WSDTH01 Breeze Pro Wind Sensor
  protocol 167 # Somfy RTS
  protocol 168 # Schrader TPMS SMD3MA4 (Subaru)
# protocol 169 # Nice Flor-s remote control for gates
  protocol 170 # LaCrosse Technology View LTV-WR1 Multi Sensor
  protocol 171 # LaCrosse Technology View LTV-TH Thermo/Hygro Sensor
  protocol 172 # Bresser Weather Center 6-in-1, 7-in-1 indoor, new 5-in-1, 3-in-1 wind gauge, Froggit WH6000, Ventus C8488A
  protocol 173 # Bresser Weather Center 7-in-1
  protocol 174 # EcoDHOME Smart Socket and MCEE Solar monitor
  protocol 175 # LaCrosse Technology View LTV-R1 Rainfall Gauge
#  protocol 176 # BlueLine Power Monitor
#  protocol 177 # Burnhard BBQ thermometer

#sonoff RM433
decoder n=Sonoff-RM433,m=OOK_PWM,s=260,l=744,r=8000,g=800,t=50,bits>=24,invert,get=@20:{4}:button:[8:A 12:B 4:C 9:D 2:E 5:F 1:G 3:H],unique
# Sonoff RM433 remote controller
# https://www.itead.cc/sonoff-rm433-remote-controller-base.html

# map the 8 buttons to A->H
# Each remote controller has its own ID (2 first bytes)

decoder {
    name=Sonoff-RM433,
    modulation=OOK_PWM,
    short=260,
    long=744,
    reset=8000,
    gap=800,
    tolerance=50,
    bits>=24,
    invert,
    get=@0:{20}:id,
    get=@20:{4}:button:[8:A 12:B 4:C 9:D 2:E 5:F 1:G 3:H],
    unique
}
After this step- I was able to turn on the container, and validate it was starting properly by viewing the container's logs.
Step 2. Integrate the MQTT data with Home Assistant
From this moment, I utilized MQTT Explorer to view the messages in my MQTT broker.

The next step- was to configure MQTT sensors in Home Assistant.
To do this- I just added this to my configuration.yaml
sensor:
  - platform: mqtt
    state_topic: "rtl_433/+/devices/Acurite-Tower/A/6731/temperature_C"
    device_class: temperature
    unique_id: 6731_temp
    name: back_porch_temp
    unit_of_measurement: '°C'
  - platform: mqtt
    state_topic: "rtl_433/+/devices/Acurite-Tower/A/6731/humidity"
    device_class: humidity
    unique_id: 6731_humidity
    name: back_porch_humidity
    unit_of_measurement: '%'
After validating my configuration, and restarting Home Assistant- I made a simple dashboard to show the values being collected on the sensor.
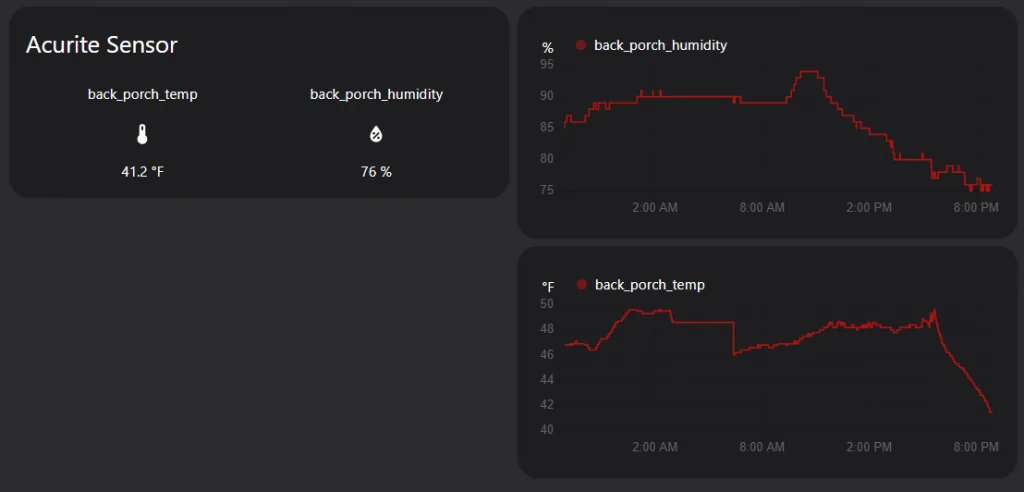
Simple dashboard plotting the current, and historical values coming from MQTT.
With this simple integration complete, I moved my focus over to the Sonoff RM433.
Step 4. Tackling the RM433 remote via Node-Red
While, this automation can be done reasonably easily using Home Assistant, I decided to instead, utilize node-red for this first try.
Here is an image of my workflow.
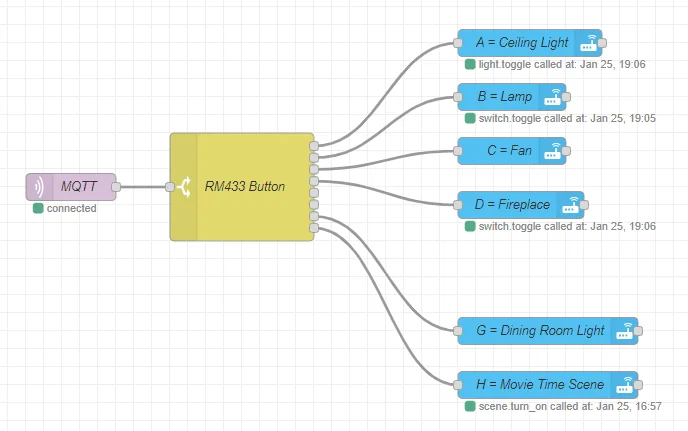
Node-red workflow, for handling RM433 input.
The first step- receives MQTT messages from rtl_433/+/devices/Sonoff-RM433/button. The + is in the path- because rtl_433 seems to generate a new ID every time it starts.
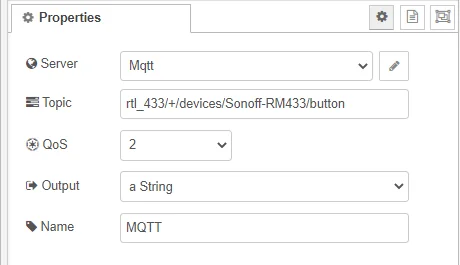
MQTT node configuration
Next- I use a switch statement to choose an action from the 8 possible input buttons. Quite simply- it just choose the output path, from the msg.payload (which contains the button pressed.)
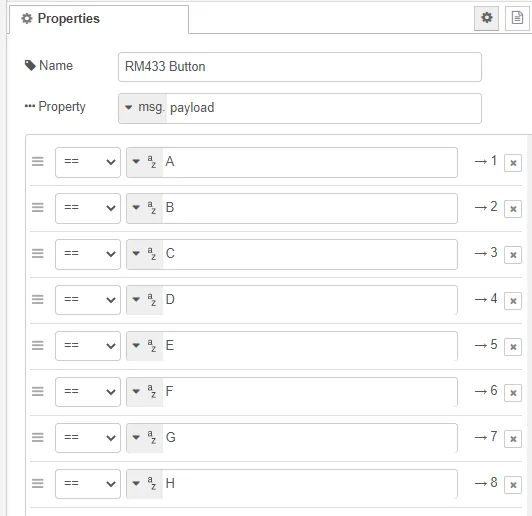
The last part- is connecting your home assistant services, to each of the branches. Do note- I do not currently have button E & F mapped. In the future, I will add a "Netflix & Chill" button.. lol.
While- I am not very artistic- (Please don't make fun of it too much!) I did leverage my label printer to print a few labels....
ASSUMING, you don't have massive sausage fingers like myself- theoretically you can actually properly align the labels... and it would look decent.

My horribly aligned labels, for the sonoff RM433.
Notes
The MQTT path name can be easily adjusted to suit your needs.
https://triq.org/rtl_433/OPERATION.html#mqtt-format-strings
After writing this article, I did adjust my parameters to instead be:
-Fmqtt://mqtt.xtremeownage.com:1883,events=rtl_433[/model][/id]
With this change- rtl_433 will instead, submit json objects to the above topic. You will need to compensate with your configurations if you choose to do this.
Summary
Overall- with a minor amount of technical knowledge- it was quite easy to integrate 433mhz using a RTL-SDR USB stick.
I am actually quite surprised at the update interval from the Acurite temp/humidity sensor- especially since I have not changed its batteries in over a year. It.... sends updates multiple times per minute. While, I cannot attest to its accuracy- I will say, for my outside weather, it is more accurate then the news/google/weather.
For the RM433, overall, it is nice having a physical button I can press to turn lights on/off, turn on the fireplace, or activate scenes. With the current configuration as seen above- there is around a one second delay from press, to action. This may be due to my configuration, which will be updated in the future.
I will note- this is my first second swing at 433mhz, and is subject to change, and improvements. In the event, I can greatly improve this service, I will link it at the bottom of this post, and create a new post with the updated details.
Likewise- if you have any tips for how I can improve this setup, please let me know in the comments below!
Future ideas-
Implement this script for auto-discovery of entities into Home Assistant.